21 Organizing Ideas for a Clutter-Free Home
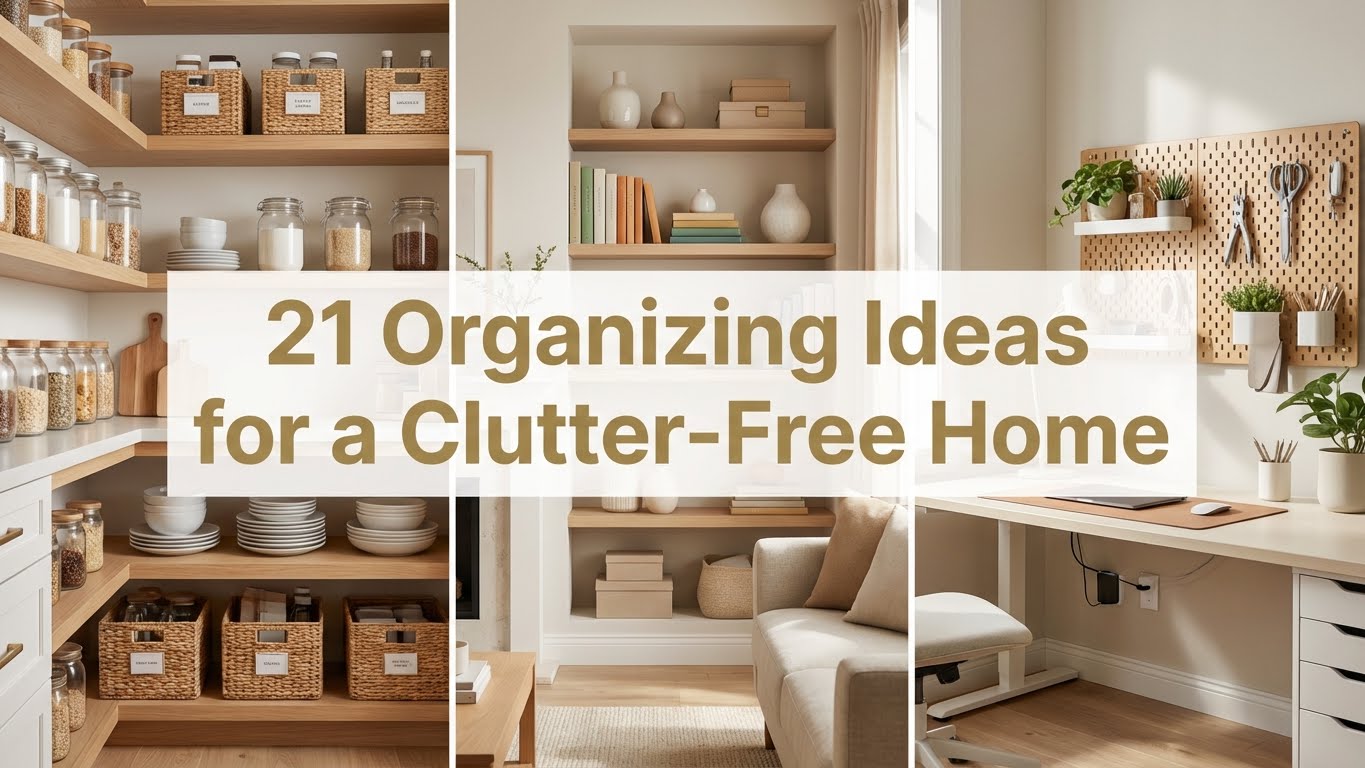
Imagine stepping into a home where everything has its place and clutter is a thing of the past—that’s the magic of effective organizing ideas! These strategies have gained popularity because they turn chaos into calm, making daily routines smoother and living spaces more enjoyable.
In this article, you’ll find a variety of clever and practical organizing ideas that can be tailored to any room or lifestyle. Whether you’re looking for simple swaps or creative storage solutions, these tips will inspire you to transform your home into an organized oasis you’ll love coming back to.
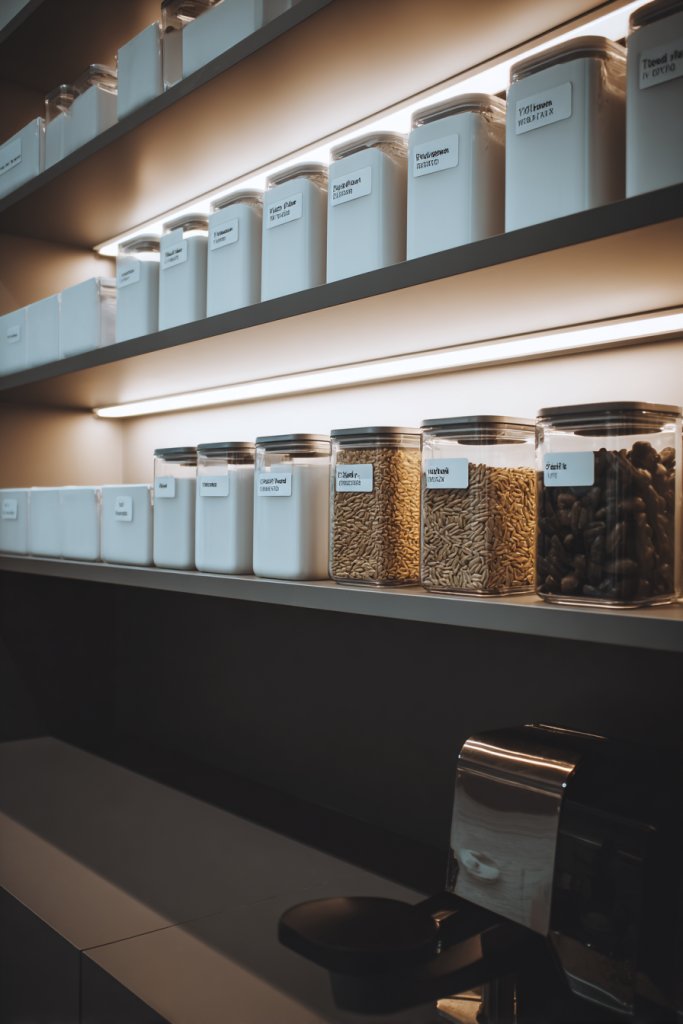
1. Utilize Floating Wall Shelves to Maximize Vertical Storage
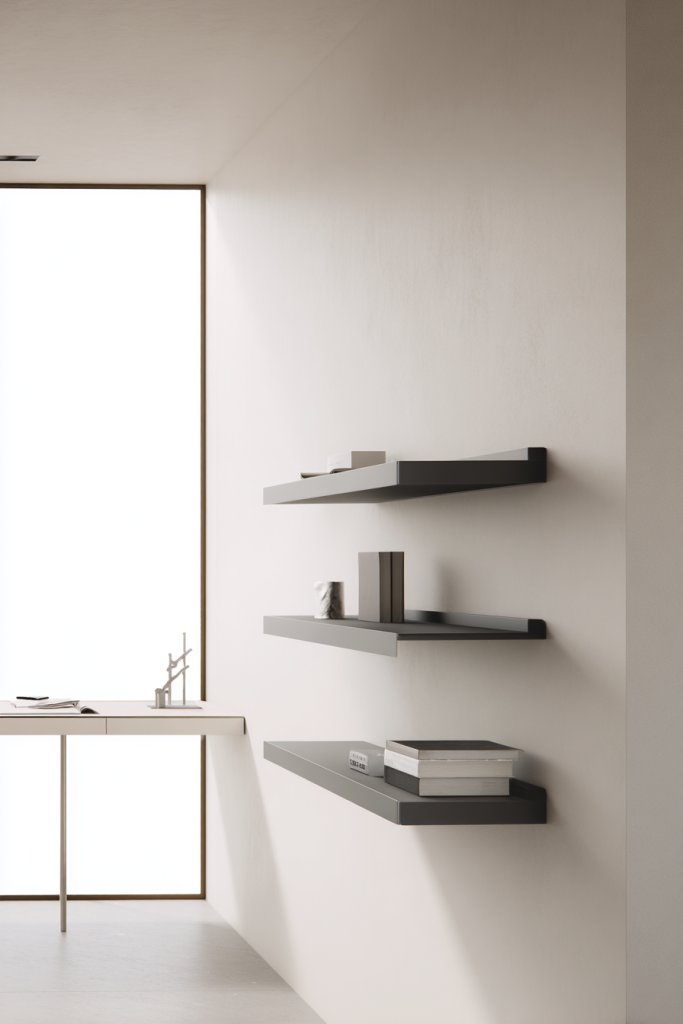
Ever feel overwhelmed by clutter taking over your surfaces? Sometimes, all you need is a clever way to make use of vertical space without sacrificing style. Floating wall shelves are like magic tricks for your home—they clear up horizontal chaos and add a sleek look. It’s the perfect solution for anyone tired of piling things on every available flat surface.
Imagine a set of slim, matte-finished shelves mounted high on a wall, holding everything from books and picture frames to decorative boxes. The open design creates a sense of openness, while the floating effect keeps everything looking airy and modern. Soft lighting accents the shelves, casting gentle shadows that add depth and warmth. The textures of the materials—metal, wood, or glass—play with light, making your space feel alive.
You can customize these shelves for any style—minimalist, industrial, or boho. Use colorful baskets or fabric bins for a pop of color and extra storage. For seasonal flair, swap out decor items or add fairy lights for cozy nights. Small spaces benefit most, but even large rooms can gain a sense of order and sophistication with well-placed shelves.
Start by measuring your wall space to determine the length and number of shelves. Choose durable materials like solid wood, metal, or high-quality laminated boards. Use a level and anchors to ensure perfect alignment and stability. Install brackets or hidden mounting hardware for a clean look. Arrange items by size and purpose for easy access and visual harmony. Regularly dust and check stability for long-term use.
Add personal touches like framed photos, small potted plants (if you’re into greenery), or quirky collectibles. Paint the shelves in bold or subtle hues to match your decor. Incorporate decorative elements like vintage trinkets or modern sculptures to reflect your personality. Layer items with books stacked horizontally or vertically for visual interest.
Floating shelves turn any blank wall into a statement piece and make organization look effortless. Once you see how much you can free up surface space, you’ll wonder why you didn’t do it earlier. It’s a simple upgrade that offers big style and functional payoff—your home will thank you!
2. Incorporate Under-Bed Storage Bins for Hidden Clutter Control
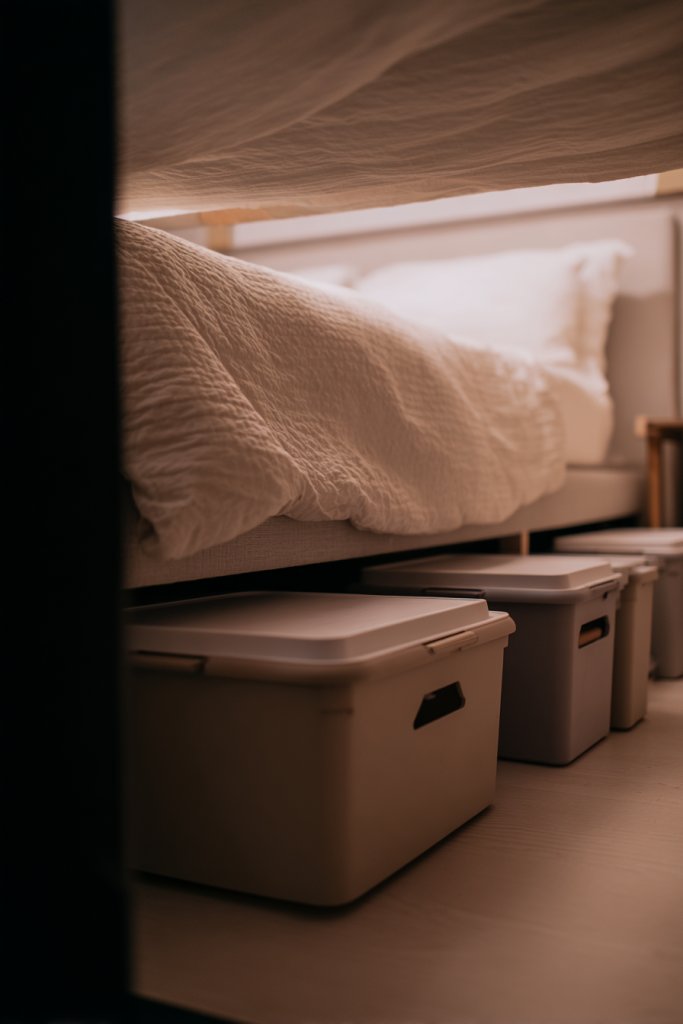
Is your bedroom a storage chaos zone? Sometimes, the real estate under your bed is the perfect secret weapon to hide clutter and free up closet space. Using under-bed storage bins transforms a neglected area into an organized, accessible haven. No more overflowing drawers or piles of seasonal stuff taking over your room.
Picture flat, sturdy bins made of fabric, plastic, or woven materials sliding smoothly beneath your bed frame. Their low profile keeps floors clear and allows for easy retrieval. When filled with off-season clothing, shoes, or linens, they create a sleek, uniform look. The bins come in neutral tones or bright colors, adding a pop of personality without cluttering your space.
Choose containers with lids to keep dust out and contents fresh. For a more decorative look, opt for woven baskets with handles or soft fabric bins that can be tucked away discreetly. Seasonal swaps are simple—store holiday decor in winter and lightweight summer clothes in summer. Different bed sizes and room layouts might require custom-sized bins for optimal fit.
Clear out your closet or dresser to identify what should go under the bed. Measure the space to select bins that slide easily without scraping or causing damage. Label each bin for quick identification—think color-coded or printed tags. Consider stacking or nesting smaller bins for extra organization. Regularly review and rotate contents to keep it relevant and tidy.
Personalize your storage with decorative labels, fabric liners, or matching sets. Use a soft throw blanket or a stylish bed skirt to hide the bins completely, creating a polished look. Incorporate scent sachets inside to keep everything smelling fresh. For added convenience, choose bins with wheels for easy pulling out.
Hidden storage like this declutters your visual space and makes your room feel bigger and more serene. It’s a straightforward fix that can dramatically improve your daily routine. Once you experience how much easier it is to find what you need, you’ll wonder why you didn’t do it sooner!
3. Install Over-the-Door Organizers in Entryways and Closets
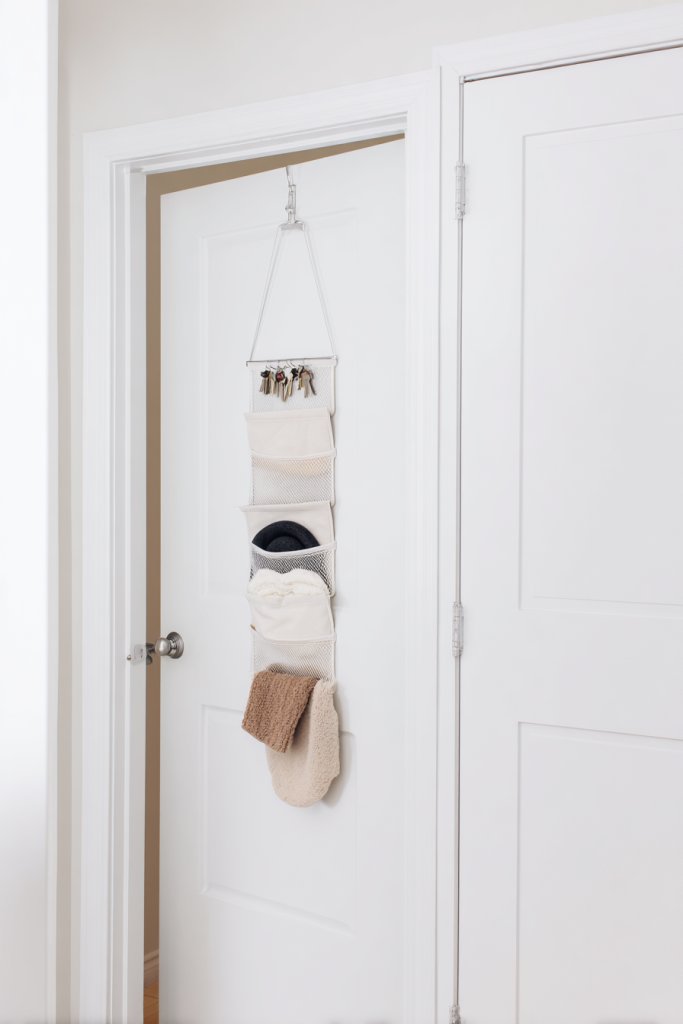
Ever struggle to keep small items from cluttering your entryway or closet floors? Over-the-door organizers are a game changer for maximizing space and keeping essentials within arm’s reach. Whether it’s shoes, accessories, or cleaning supplies, hanging solutions prevent chaos and make your daily routine smoother.
Visualize fabric or clear plastic pockets hanging neatly over doors—each pocket holding a pair of shoes, sunglasses, or small tools. The arrangement creates a tidy, streamlined look, turning a plain door into extra storage real estate. The variety of styles—from soft mesh to sturdy vinyl—lets you customize for durability and aesthetics. The compartments look almost like a retail display, but right in your home.
Select over-the-door organizers with adjustable hooks or different pocket sizes for versatile use. Use a slim, minimalist design in modern homes or a colorful, patterned version to add fun to kids’ rooms. These organizers work well in laundry rooms, garages, or mudrooms too, adapting to your needs. For seasonal changes, swap out contents or rearrange pockets for better flow.
Choose a durable material that fits your door thickness and weight requirements. Install hooks or over-the-door brackets, ensuring they sit securely without damaging the door surface. Organize items by frequency of use—everyday essentials in front, seasonal or less-used items behind. Regularly declutter and wipe down pockets for hygiene and fresh appearance. Maximize space by stacking or combining with small bins inside larger pockets.
Personalize with labels on pockets for quick identification or add decorative trims. Use color schemes that match your room’s decor to create harmony. Incorporate scented sachets or small decorative accents to make the storage more inviting. For kids, choose fun patterns or characters to encourage organization.
Over-the-door organizers turn wasted space into a practical storage hub, reducing clutter and stress. They’re easy to install and adapt, making organization accessible to everyone. Once you see how much tidier your entryway or closet becomes, you’ll want to upgrade other areas too!
4. Use Clear Acrylic Drawer Organizers in Kitchens and Bathrooms
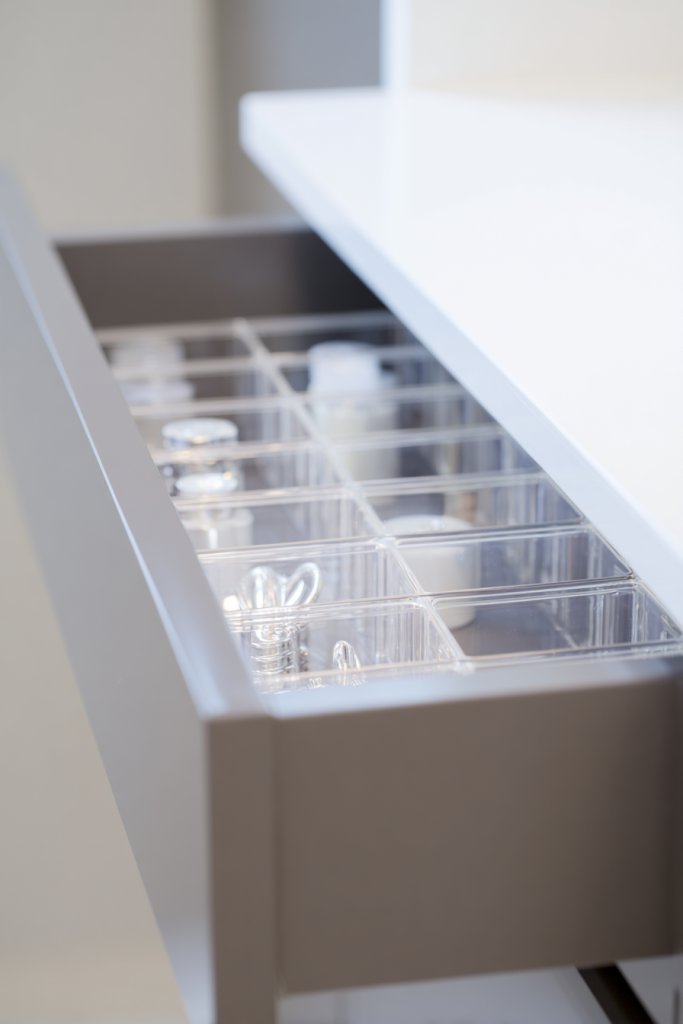
Do you find yourself digging through drawers trying to find that one tiny utensil or tube of lipstick? Clear acrylic drawer organizers are the antidote to chaos, transforming cluttered drawers into streamlined storage. They make everything visible at a glance, saving time and frustration every day.
Imagine a set of sleek, transparent trays dividing your kitchen utensils or bathroom cosmetics into neat sections. The clarity of the acrylic lets you see all items instantly, whether it’s a collection of spoons or skincare bottles. The minimalist design complements any decor style, from modern to rustic. These organizers create a sense of order that’s both functional and visually appealing.
Choose modular sets that can be arranged to fit your drawer’s shape and size. Use smaller compartments for jewelry or makeup brushes, and larger ones for spatulas or hair tools. Opt for stackable or expandable units to grow with your collection. Color accents or labels can add personality, but keep the overall look clean and simple.
Measure your drawers carefully before purchasing to ensure a perfect fit. Remove all items and clean the drawer surface thoroughly. Organize items by category—spoons, knives, skincare, etc.—and then assign each to a specific acrylic tray or section. Regularly review and tidy to prevent buildup of unused or expired products. Use the dividers to keep everything in its place and avoid overstuffing.
Add decorative touches like colored liners or small labels on each section for easy identification. Use matching sets to keep a cohesive look or mix materials for a more eclectic vibe. Incorporate small scent sachets in bathroom drawers for freshness. For a more personalized touch, engrave or paint the edges of the acrylic for a custom feel.
Clear acrylic organizers turn drawers from dumping grounds into showcase spaces of order. They boost efficiency and make daily routines less stressful. Once you see how much easier it is to find what you need, organization becomes addictive—your home will be more functional and beautiful!
5. Hang Mason Jar Storage for Small Items and Craft Supplies
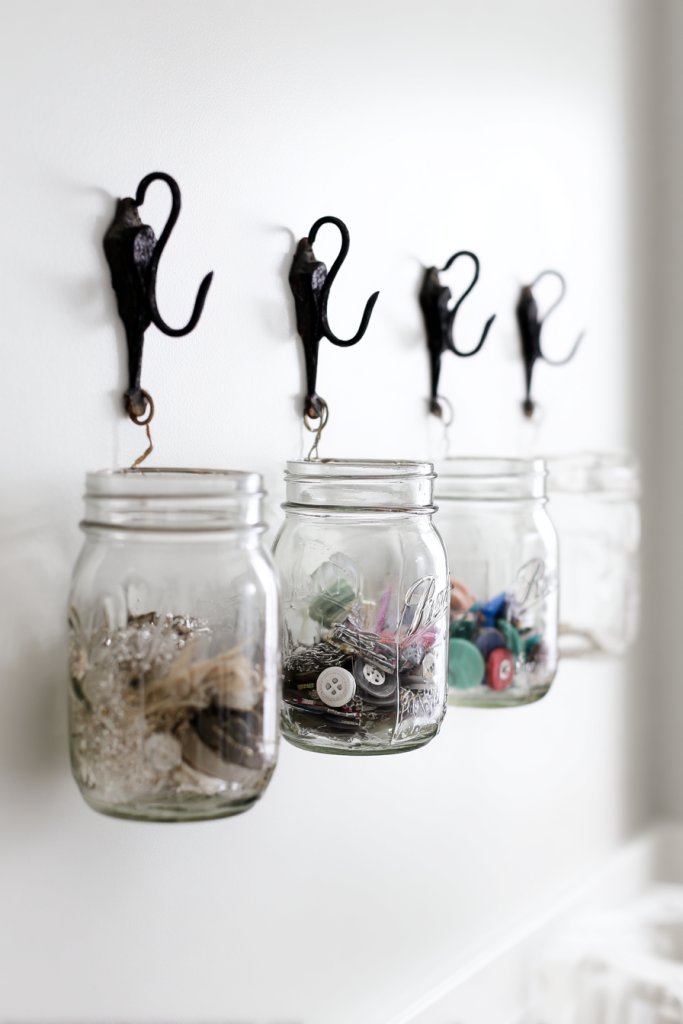
Are your tiny craft supplies, spices, or buttons scattered in every corner? Mason jars are classic, charming, and surprisingly versatile storage solutions. Hanging them keeps small items visible and accessible, turning clutter into a decorative element. Plus, they add a rustic vibe that’s hard to beat.
Visualize a wooden plank mounted on the wall with evenly spaced hooks or slots holding glass jars. The jars are filled with colorful beads, buttons, or dried herbs, creating a cheerful mosaic of textures and hues. The transparency of the glass lets you see contents at a glance, while the metal lids add an industrial touch. It’s both practical and eye-catching.
Use different sizes and shapes of jars to suit your needs—small for pins, larger for yarn or brushes. Decorate the lids with paint or labels to match your decor style. You can also hang jars in a grid pattern for a more organized, contemporary look. This setup works well in kitchens, craft rooms, or even bathrooms for cotton balls and swabs.
Secure a sturdy wooden board or metal rack to your wall at a comfortable height. Use hooks, brackets, or wire to hang the jars securely. Label each jar for quick identification—think chalkboard labels or printed tags. Fill the jars with your small items, then hang or mount the setup in a convenient spot. Regularly clean and refill to keep everything fresh and organized.
Decorate the jars with colorful bands, painted lids, or custom labels for a personalized touch. Incorporate different textures with fabric liners or cork stoppers. Combine with small shelves or baskets for larger items. Use this system to create a themed display, like vintage kitchen or craft room aesthetics.
Hanging mason jars turn storage into a statement piece that’s both functional and beautiful. It’s a fun DIY project that instantly upgrades your organization game. With everything in sight, you’ll find it easier to stay on top of clutter and enjoy your space more.
6. Add Decorative Baskets for Stylish Storage in Living Rooms and Bedrooms
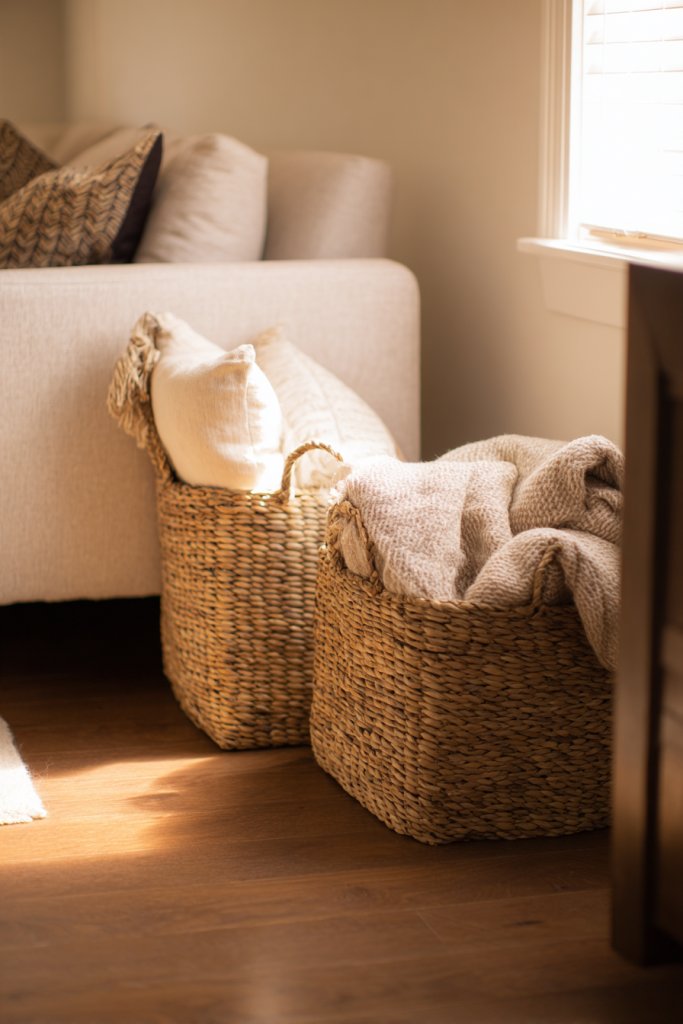
Clutter in living rooms and bedrooms can turn cozy spaces into chaotic zones. But baskets aren’t just for storage—they’re stylish decor elements that add warmth and texture. They hide everyday messes like blankets, magazines, or toys, while elevating your room’s aesthetic.
Picture woven or fabric baskets placed neatly in corners or under side tables, filled with plush throws and magazines. The natural fibers or vibrant textiles add visual interest and softness to the space. When arranged thoughtfully, they create a layered, inviting look that feels both functional and welcoming. The mix of textures—jute, cotton, or wicker—adds depth and personality.
Select baskets that complement your decor—sleek and monochrome for modern, rustic and earthy for farmhouse, or colorful and patterned for boho vibes. Use different sizes and shapes for variety, grouping smaller baskets for quick access and larger ones for bulkier items. Incorporate lids or open designs based on what you plan to store.
Identify areas where storage can be both hidden and decorative—under coffee tables, next to beds, or in open shelves. Choose baskets with sturdy handles for easy mobility. Keep contents organized with smaller containers or dividers inside larger baskets. Regularly refresh and tidy to prevent dust buildup and keep the aesthetic intact.
Personalize baskets with labels, decorative ribbons, or custom fabric liners. Mix and match patterns and textures for a curated look, or stick to a uniform style for minimalism. Use baskets to display seasonal items or themed decor, making your space feel fresh and intentional. Incorporate small plants or candles nearby for extra warmth.
Decorative baskets are a versatile way to keep clutter at bay without sacrificing style. They make your space look effortlessly put-together, encouraging you to maintain organization long-term. Once you see how baskets transform your rooms, you’ll be hooked on combining function with fashion.
7. Implement Drawer Dividers for Better Closet and Drawer Organization
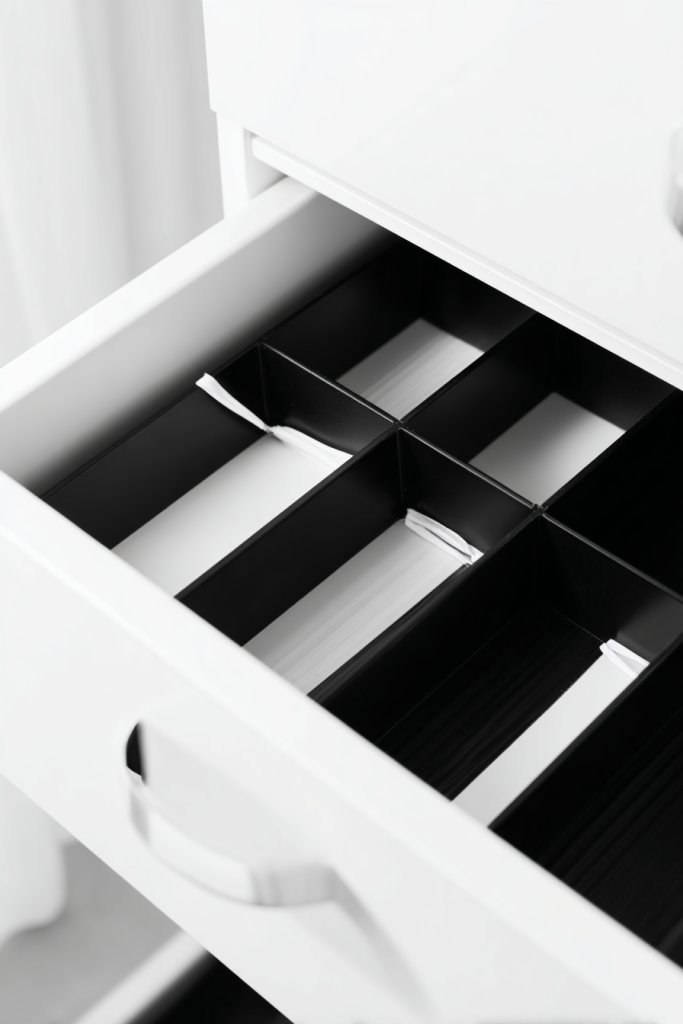
Messy drawers are the bane of every organized home. Finding that one sock or earring can feel like a treasure hunt. Drawer dividers are the simple fix that keeps everything in its place, saving you time and frustration. They turn chaos into calm without any major overhaul.
Visualize adjustable or modular dividers creating custom compartments within your drawers—separating socks, underwear, jewelry, or office supplies. The clean lines and neat stacks give a sense of order. The dividers come in sleek plastic, wood, or metal, matching your style and durability needs. Everything is visible and accessible at a glance.
Use flexible, adjustable dividers for versatile organization, especially if your storage needs change seasonally. For delicate jewelry, consider padded or soft-lined sections. In larger drawers, create zones for different categories—office supplies, accessories, or seasonal clothing. Combine with labeled containers for extra clarity in your system.
Empty your drawers and sort items by type. Install the dividers according to your measurements, ensuring they fit snugly without damaging the drawer sides. Organize items into each compartment, stacking or lining up for easy retrieval. Periodically review and declutter to maintain efficiency. Use small containers inside larger sections for tiny items.
Personalize your dividers with paint, decals, or fabric overlays to match your decor. Label sections for family members or specific items for quicker access. Incorporate small trays or bowls for loose jewelry or coins. Keep the system fresh by rotating or reorganizing as your collection grows.
Drawer dividers make everyday routines smoother and help prevent clutter from returning. They’re a small investment with a big payoff—your drawers will thank you. Once you experience the joy of a perfectly organized drawer, you’ll wonder how you ever lived without them!
8. Create a Command Center with a Wall-Mounted Chalkboard and Mail Sorters
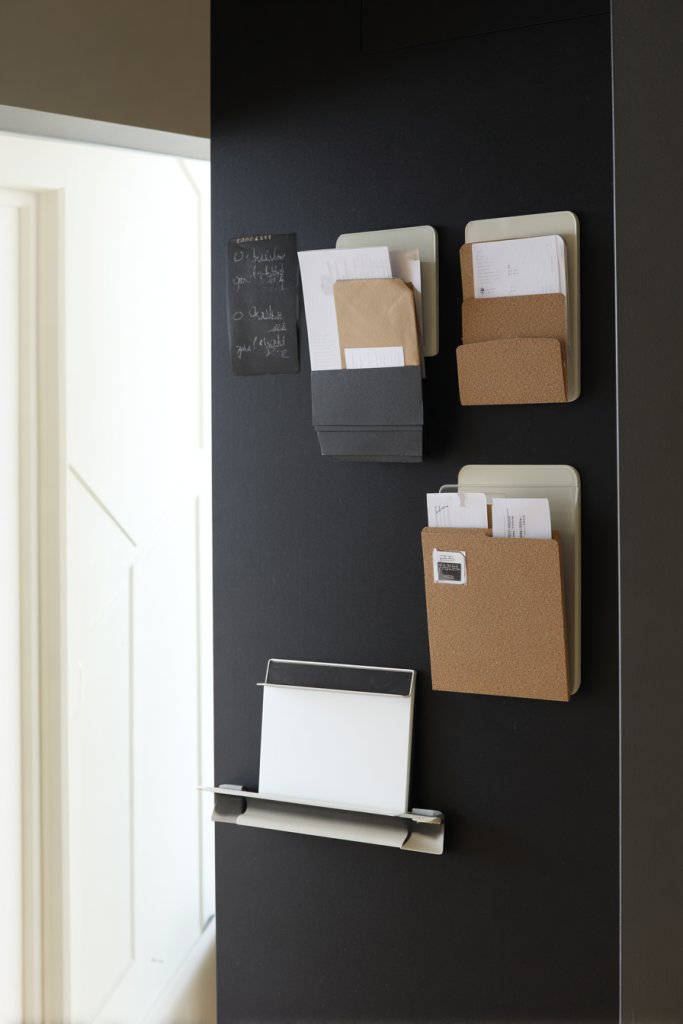
Is your home drowning in mail, to-do lists, and schedules? A designated command center keeps everything in one place, reducing clutter and stress. It transforms chaos into clarity, making daily routines more manageable. Who doesn’t want a dedicated spot for life’s little chaos?
Imagine a wall-mounted chalkboard or whiteboard paired with a series of mail sorters or pockets. The chalkboard displays your weekly schedule or motivational quotes, while the mail pockets hold bills, invitations, or important papers. The setup is both functional and stylish, with options for rustic wood frames or sleek metal accents. It becomes a focal point that organizes your entire household.
Choose a chalkboard with a colorful frame or a minimalist design that blends with your decor. Mail sorters can be open or with labeled compartments—ideal for families or singles. Seasonal themes or motivational quotes can refresh the look periodically. For small spaces, combine with a narrow shelf or corkboard for extra notes.
Pick a prominent wall in your kitchen, entryway, or home office. Mount the chalkboard at eye level and install mail sorters below or beside it. Use magnets or clips to attach notes or reminders. Dedicate a specific day each week to clear out and update the system, keeping everything current. Incorporate a small tray or basket nearby for keys or small essentials.
Add decorative touches like washi tape labels or painted frames. Personalize with your favorite quotes or family goals for motivation. Use colorful markers or chalk for visual interest. Incorporate small plants or decorative items on nearby shelves to create a warm, inviting space.
A command center keeps your household organized and your mind clear. It promotes a sense of control and reduces last-minute scrambling. Once you see how much easier daily tasks become, you’ll be inspired to create similar systems in other areas!
9. Use Stackable Storage Bins for Closet and Pantry Organization
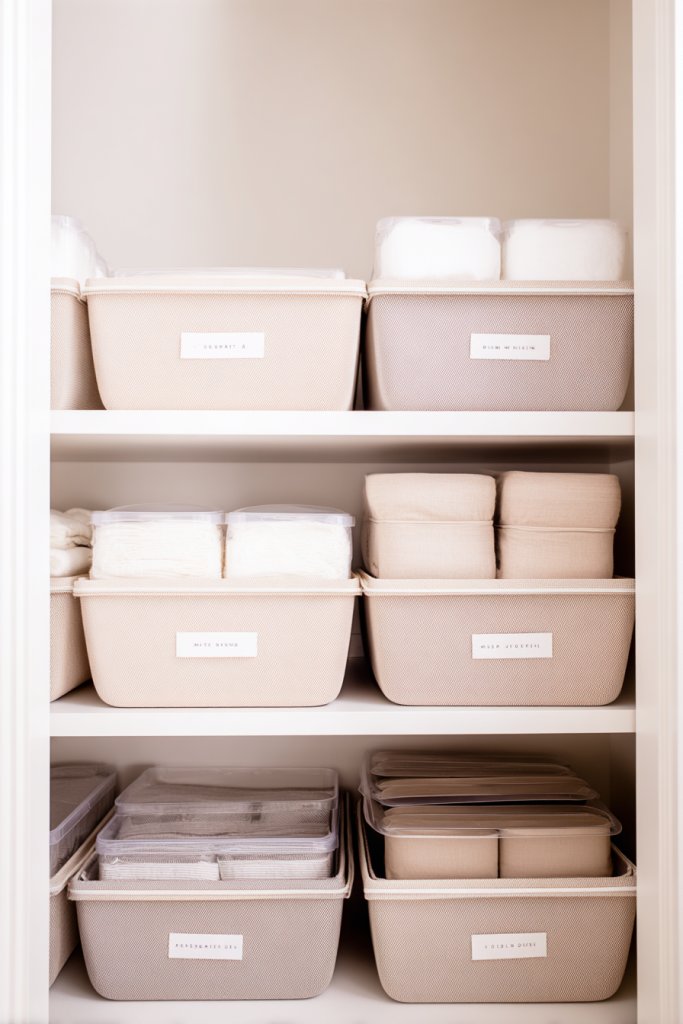
Are your closet shelves and pantry cabinets a jumble of mismatched items? Stackable storage bins offer a simple way to create order out of chaos. They maximize vertical space and make everything easy to find. Plus, they keep your space looking neat and put-together.
Visualize uniform, clear or colored bins stacked neatly on shelves, each labeled with its content—like snacks, spices, or accessories. The consistent shapes make stacking straightforward, creating a clean, organized look. The transparency or labels ensure you see what’s inside without rummaging. It’s like a mini warehouse right in your home.
Choose airtight plastic or fabric bins depending on your needs—food-safe for pantry items or breathable for clothing. Use different sizes for versatility, stacking smaller bins inside larger ones. For aesthetic appeal, coordinate colors or textures with your existing decor. Rotate contents seasonally or as needed for freshness.
Empty your closet or pantry area and categorize items. Select bins that fit your space and item size. Label each container clearly for quick retrieval. Stack the bins efficiently to prevent overhanging or unstable setups. Regularly review and purge to maintain a clutter-free environment. Use shelf risers or tiered systems for even better space utilization.
Add decorative labels, chalkboard tags, or custom stickers for a personal touch. Incorporate color-coding to differentiate categories. Use transparent bins to see contents at a glance. For a uniform look, select matching sets and consider adding decorative trims or ribbons.
Stackable bins turn cluttered spaces into models of efficiency. They make access easier and help you keep track of supplies. Once organized, you’ll find it easier to stock up and avoid duplicates—saving time and money long-term.
10. Install Magnetic Strips for Metal Tools and Kitchen Utensils
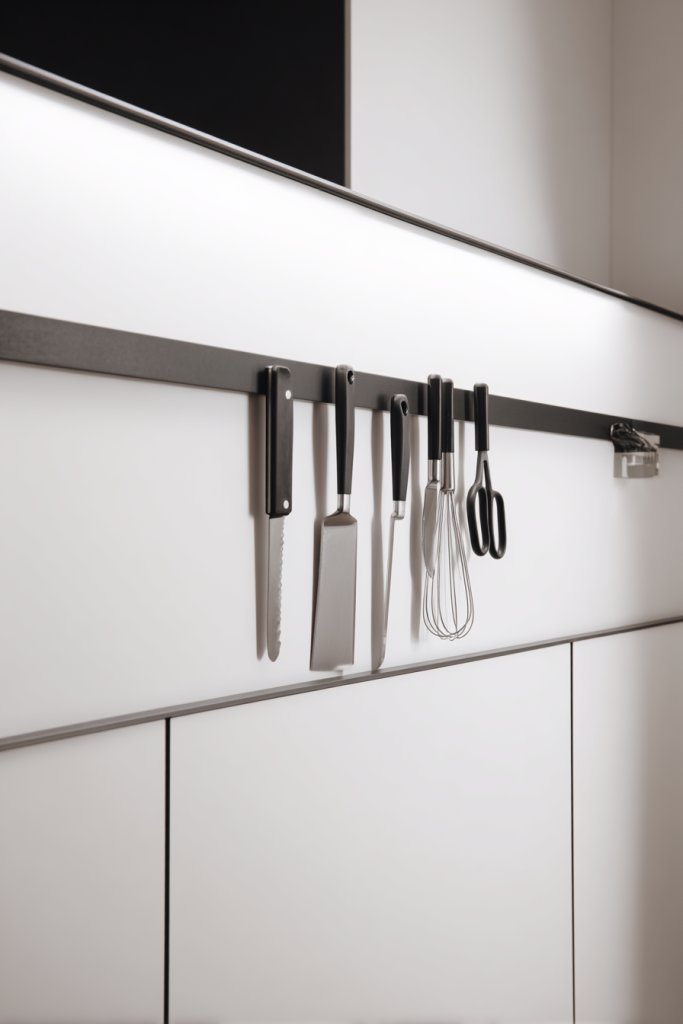
Messy drawers and cluttered counters make your workspace look chaotic and uninviting. Magnetic strips offer a sleek, practical way to keep metal tools and utensils within easy reach. They clear up space and add a modern, streamlined look to your kitchen or workshop. Who knew the answer was sticking magnets on the wall?
Picture a long, slim magnetic strip mounted on a backsplash or wall, holding knives, scissors, or small metal tools securely in place. The shiny metal contrasts with your wall color, creating a stylish display. The tools are always visible and accessible, eliminating the need to dig through drawers. It’s both functional and minimalist, perfect for busy mornings or craft sessions.
Choose magnetic strips with different finishes—chrome, black, or painted—to match your decor. Use multiple strips for different zones—kitchen, garage, or craft room. Incorporate small containers or hooks for non-metallic items. For added safety, opt for strips with rounded edges or protective covers. They work well in both small and large spaces.
Clean the mounting surface thoroughly before installation. Use screws or adhesive strips depending on your wall type—tile, drywall, or wood. Arrange your tools on the strip in order of use or size for quick access. Regularly wipe the strip to prevent dust and metal residue buildup. Check the magnet’s hold periodically and replace if necessary.
Label sections with engraved tags or stickers for specific tools. Add decorative elements like colorful grips or rubber accents. Use multiple strips to create a designated tool zone—like a knife rack or screwdriver station. Incorporate small magnetic containers for screws or nails nearby for a complete system.
Magnetic strips streamline your workspace and boost efficiency. They turn cluttered drawers into organized zones and make tools look like functional art. Once you experience the convenience, you’ll wonder why you didn’t do it sooner—your home and workshop will thank you!
11. Repurpose Vintage Suitcases or Crates as Stylish Storage Solutions
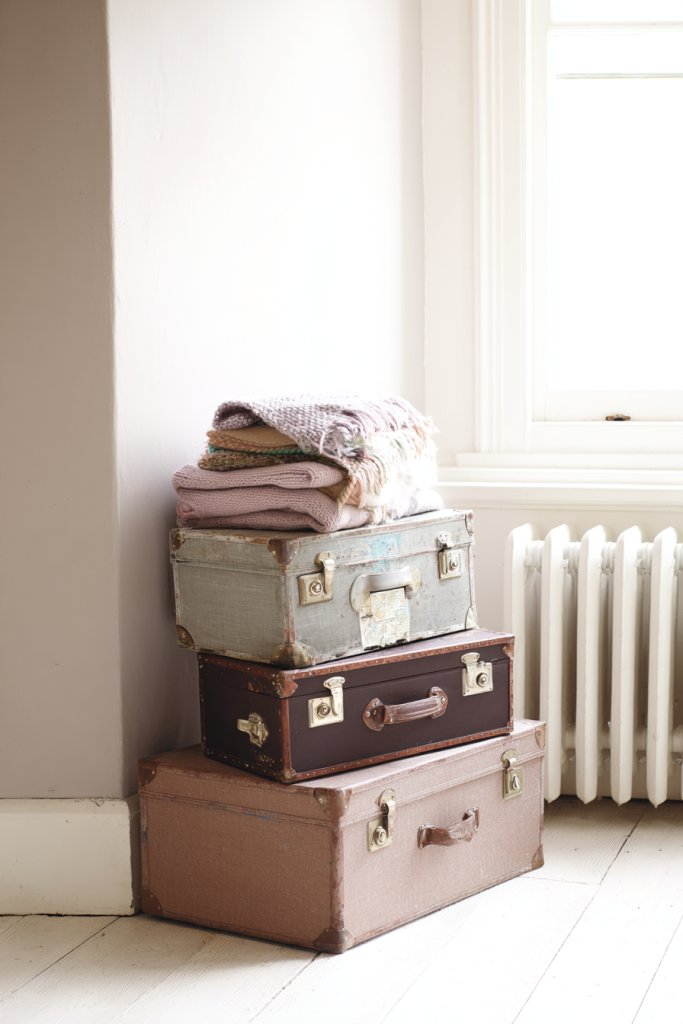
Looking for unique storage options that add charm and personality? Vintage suitcases and crates are the perfect blend of function and nostalgia. They’re ideal for storing blankets, books, or seasonal decor while serving as decorative accents. Who says storage can’t be stylish?
Imagine a stack of aged suitcases with leather straps and brass hardware, neatly arranged in a corner or under a console table. They’re filled with plush throws or vintage magazines, adding instant character. The weathered finishes and textured surfaces create a cozy, eclectic vibe. When opened, they reveal organized, hidden compartments that invite curiosity.
Use different sizes and styles for a layered look—small cases for jewelry or accessories, larger ones for bedding or seasonal items. Decorate the exterior with decals, paint, or fabric to match your decor theme. Place them on stands or wheels for easy mobility. Incorporate vintage tags or labels for added flair and organization.
Clean and inspect the cases for stability. Line the insides with fabric or paper for added protection and aesthetics. Use inside dividers for smaller items or organize with small baskets. Stack the suitcases for vertical storage or line them side by side. Regularly dust and check for wear, repairing hardware as needed. Combine with modern furniture for a balanced look.
Customize with paint, stencils, or fabric to fit your style. Attach decorative handles or vintage hardware for authenticity. Use labels or tags inside to categorize contents. Mix with contemporary furniture or art pieces for a curated space that tells a story. Incorporate textiles like throws or cushions on top for extra comfort.
Vintage suitcases and crates bring personality and warmth to any home. They’re versatile, functional, and full of character—perfect for creative storage solutions. Once you see how they elevate your decor, you’ll be inspired to incorporate more vintage finds into your home design!
12. Incorporate Hidden Storage Ottomans and Footstools
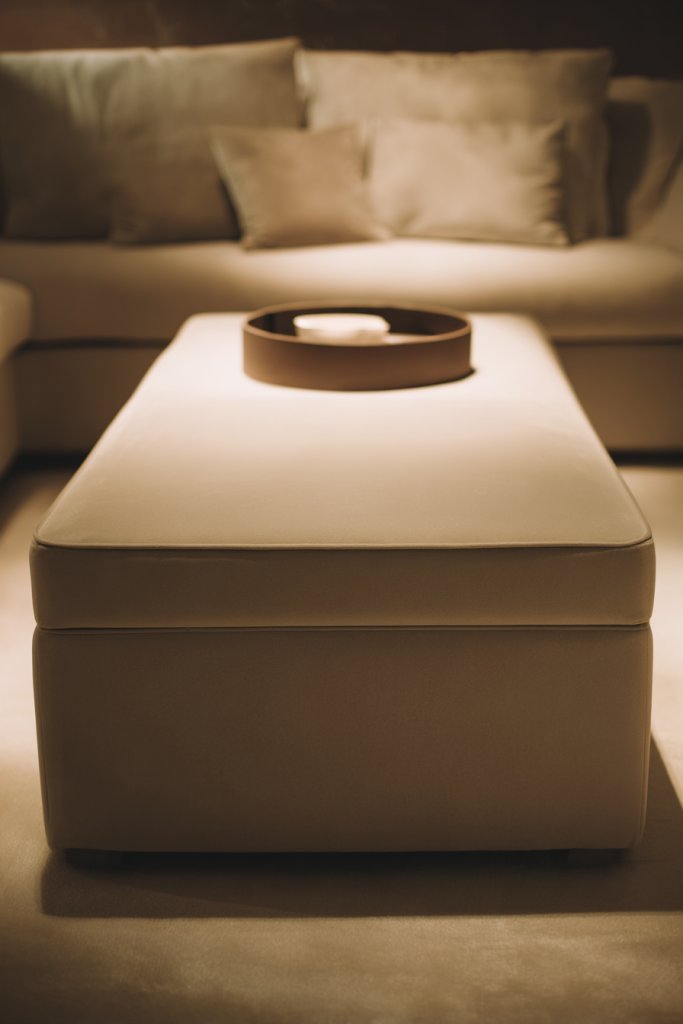
Clutter in living rooms and bedrooms often spills into every corner, making spaces feel cramped. Hidden storage ottomans and footstools combine comfort with clever organization. They provide a place to rest your feet while discreetly hiding away blankets, magazines, or toys. It’s like having your cake and eating it too.
Picture a plush fabric ottoman with a hinged top, nestled at the foot of your sofa. Inside, soft throws are neatly folded, and remote controls or magazines are tucked away. The exterior can be upholstered in textured velvet, leather, or patterned fabric, matching your decor. The dual-purpose furniture piece adds a layer of sophistication and practicality.
Select ottomans with storage compartments that suit your style—sleek leather for modern, tufted fabric for traditional. Choose sizes that fit your space and storage needs. For multi-room homes, opt for stackable or modular designs. Use decorative trays or baskets inside for smaller items, keeping everything accessible.
Identify a suitable spot—living room, bedroom, or even entryway. Measure the available space and select an ottoman with enough internal capacity. Assemble or place the ottoman, then organize your items inside—cozy throws, spare pillows, or toys. Regularly declutter and rotate contents to keep it fresh. Protect the fabric with spot cleaning or covers.
Customize with decorative stitching, embroidery, or contrasting piping. Add labels or small pouches for specific items like remote controls or chargers. Use a decorative tray on top for drinks or decor accents. Incorporate seasonal textiles or covers to refresh the look and keep it aligned with your decor style.
Hidden storage ottomans elevate your space’s style while keeping clutter out of sight. They’re perfect for creating a cozy, organized environment that feels inviting and functional. Once you enjoy the blend of comfort and practicality, you’ll wonder how you ever lived without one!
13. Attach Pegboards in Garages and Craft Rooms for Versatile Hanging Space
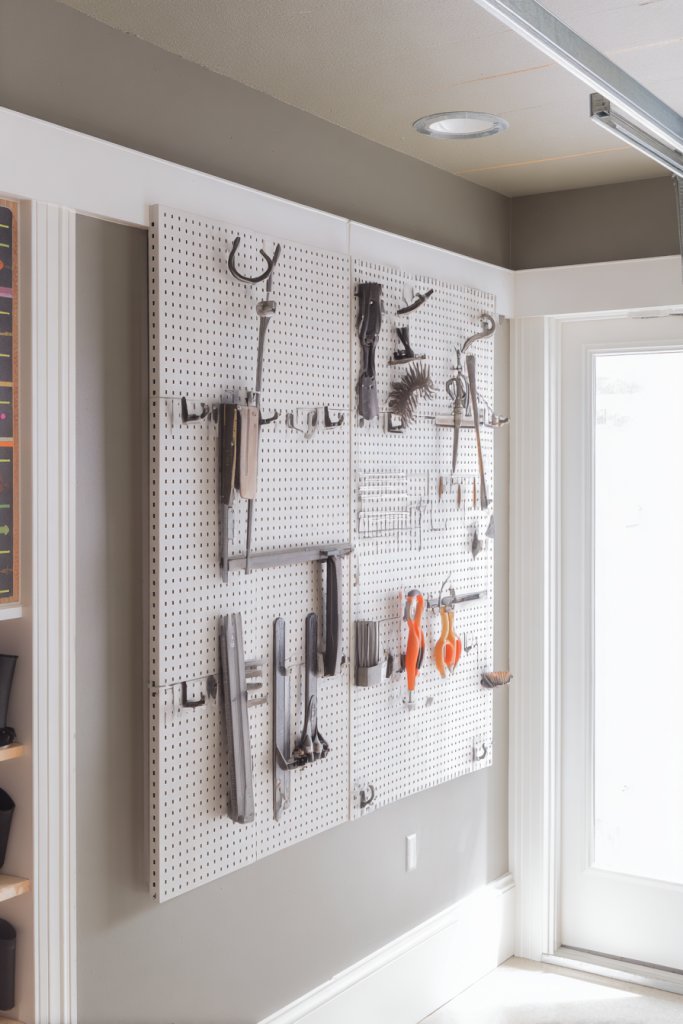
Messy tools and craft supplies clutter your countertops and shelves, wasting valuable space. Pegboards offer a flexible, customizable solution to keep everything visible and accessible. They turn an unruly mess into a streamlined workspace, making your projects easier and more enjoyable.
Envision a large pegboard mounted on a wall, with hooks, baskets, and clips holding everything from hammers and screwdrivers to scissors and paintbrushes. The arrangement is both functional and decorative, with items hanging neatly in order of use. The metal or wooden grid provides a textured backdrop that adds an industrial or rustic vibe. It’s a visual reminder that organization can be stylish.
Choose between metal, wood, or plastic pegboards depending on your style and load-bearing needs. Customize with different hooks, shelves, or baskets for various tools and supplies. Use color-coded hooks or containers for quick identification. For delicate items, opt for padded or specialized clips to prevent damage. Adjust the layout as your collection grows or changes.
Select a prominent wall in your garage, workshop, or craft room. Mount the pegboard securely using appropriate hardware—studs or anchors for drywall. Organize items logically—frequently used tools at eye level, seasonal or less-used items higher or lower. Regularly review and reorganize your setup to keep it efficient. Keep the surface clean and free of dust for longevity.
Add labels or color-coded caps for quick identification. Incorporate small decorative signs or tags for a personalized touch. Use a combination of hooks, shelves, and bins for a multi-dimensional storage system. Decorate the surrounding area with framed photos or inspirational quotes to make it inviting.
Pegboards maximize wall space and keep your tools organized and visible. They make your workspace more efficient and less frustrating. Once you experience the ease of finding what you need instantly, you’ll be motivated to tackle projects more confidently and keep your space tidy!
14. Use Over-the-Shelf Baskets in Pantry and Closet Shelves
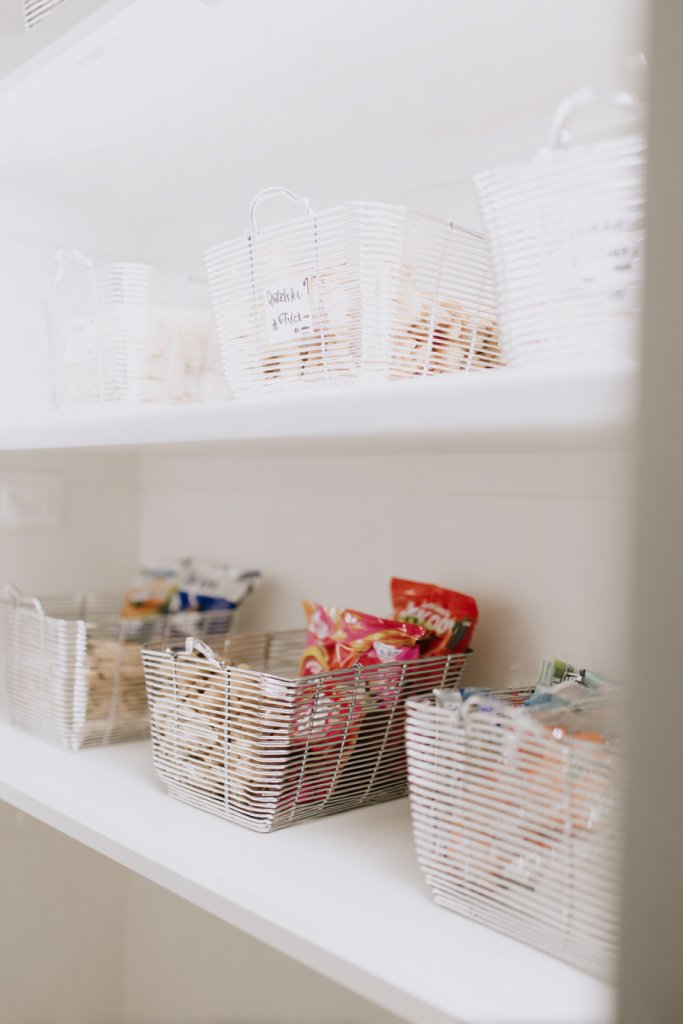
Are your pantry and closet shelves overflowing with loose items and random clutter? Over-the-shelf baskets are the perfect fix to contain chaos and create designated zones. They keep everything in check and make it easier to find what you need without digging through piles. Who knew baskets could be so transformative?
Imagine wire or fabric baskets sitting neatly on your existing shelves, each holding groups of similar items—snacks, spices, or accessories. The uniform shape creates a tidy, organized appearance, while the open design allows quick access. When filled with colorful or neutral items, these baskets add a layer of texture and visual interest to your space. It’s a simple upgrade that makes a big difference.
Choose baskets with handles for portability or lids for dust protection. Use different sizes to fit various shelf heights and storage needs. Incorporate labels or tags to identify contents at a glance. For seasonal or infrequent items, stack baskets or use nesting styles to save space. Match colors or materials to your decor for a cohesive look.
Clear your shelves and measure available space. Select baskets that fit your measurements and organize items into logical groups. Place baskets strategically—everyday items at eye level, infrequently used in higher or lower spots. Label each basket for quick identification. Regularly review and tidy to keep everything accessible and clutter-free.
Decorate baskets with labels, painted patterns, or stickers for a personalized touch. Incorporate decorative trims or ribbons to enhance visual appeal. Use color-coding for specific categories—think red for snacks, green for produce. Combine with small shelf risers or dividers to optimize space further.
Over-the-shelf baskets transform cluttered shelves into organized showcases. They make it easy to maintain order and find items quickly. Once you see how much tidier and functional your space becomes, you’ll be motivated to keep up the habit and explore more smart storage ideas!
15. Install Pull-Out Shelves and Lazy Susans in Cabinets for Easy Access
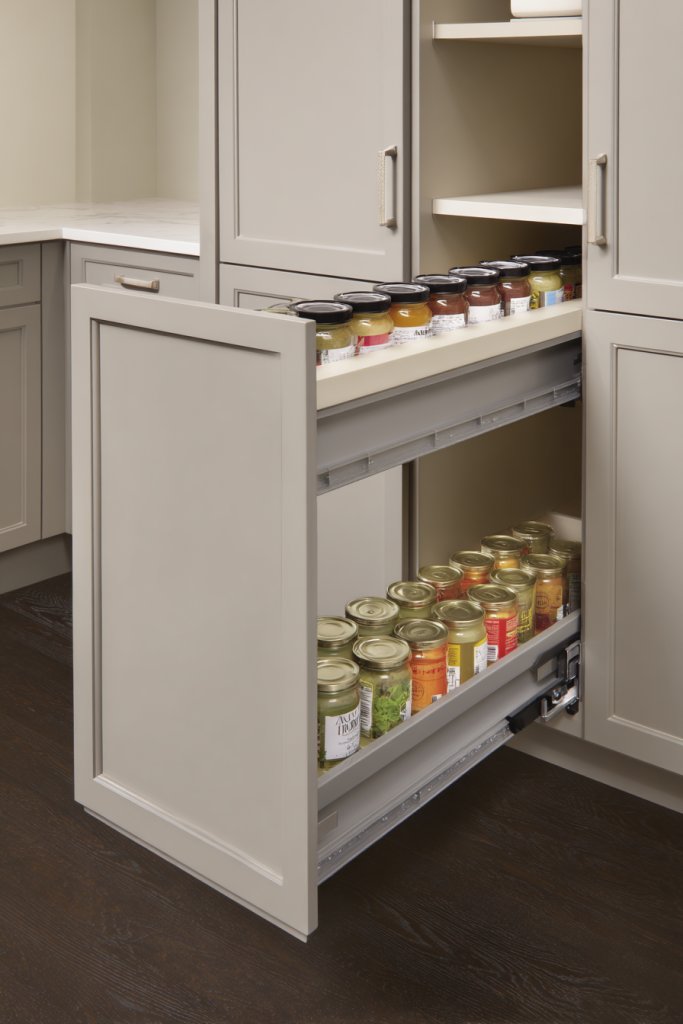
Deep cabinet corners are notorious for hiding forgotten items and creating frustration. Pull-out shelves and Lazy Susans bring everything to the front, making your kitchen or pantry more efficient. They eliminate the need to dig through stacks of cans or spices, saving you time and effort. Who wants to fight with cluttered cabinets?
Picture a sleek, chrome pull-out shelf installed inside a cabinet, smoothly gliding out to reveal neatly stacked cans or jars. Alternatively, a Lazy Susan rotates easily, displaying spices and condiments in a circular fashion. Both options utilize space intelligently, with items visible and accessible at all times. The hardware blends seamlessly into your cabinetry, keeping the look clean.
Choose between wood, metal, or plastic trays depending on your decor and durability needs. Use different sizes and heights for various items—small for spices, larger for canned goods. Incorporate adjustable or modular components to customize your setup. For corner cabinets, Lazy Susans are especially effective, turning blind spots into accessible storage zones.
Measure your cabinet dimensions carefully before purchasing. Install the pull-out shelves or Lazy Susans according to manufacturer instructions, ensuring smooth operation. Organize items by category—group spices, canned foods, or baking supplies. Regularly clean and reorganize to prevent overfilling and ensure easy access. Use labels or color coding to streamline your workflow.
Decorate the edges of shelves with decorative trims or labels for a custom look. Use liners or baskets inside to contain smaller items. Incorporate clear containers or jars for freshness and visibility. You can also add small hooks or clips for utensils or tools that need to hang.
Pull-out shelves and Lazy Susans make your cabinets more functional and less frustrating. They help you maintain a tidy, organized space that’s easy to use daily. Once you experience the convenience, you’ll be inspired to upgrade other storage areas and keep your home effortlessly clutter-free!
16. Group Similar Items with Labelled Containers and Jars
Messy kitchens and workspaces slow you down and create chaos. Grouping similar items in labeled containers keeps everything neat and accessible. It’s like having a mini warehouse right on your countertop or shelf—organized, efficient, and visually pleasing. Who doesn’t want that?
Visualize a row of glass jars filled with colorful spices, herbs, or dry goods, each labeled with clear tags. The uniform containers create a cohesive look while making it easy to locate what you need. The labels add a sense of order and professionalism, transforming clutter into curated displays. The transparency of the jars offers quick visual cues for inventory.
Use matching jars with different sizes for versatility or mix clear and opaque containers for variety. Incorporate labels with chalkboard paint, printouts, or engraved tags for personalization. Group items by frequency of use or category—baking supplies, snacks, or office supplies. Rotate contents seasonally or as needed for freshness and relevance.
Clean and dry your storage area before organizing. Fill containers with your items and label each one clearly. Arrange containers by size or category for easy access—place the most-used at eye level. Regularly review and refill to prevent shortages or expired items. Use stackable jars or racks to optimize space in cabinets or on counters.
Customize with decorative labels, colorful tapes, or engraved tags for a personal touch. Incorporate themed or seasonal labels to keep the setup fresh. Use matching containers for a uniform look or mix materials for visual interest. Add small scoops or tongs inside for convenience and hygiene.
Labeled containers turn everyday clutter into a showcase of order and style. They make your kitchen or workspace more efficient and enjoyable. Once you see how easy it is to find and access everything, you’ll be motivated to keep your entire home organized and beautiful!
17. Hang Hooks and Racks on Walls for Coats, Bags, and Accessories
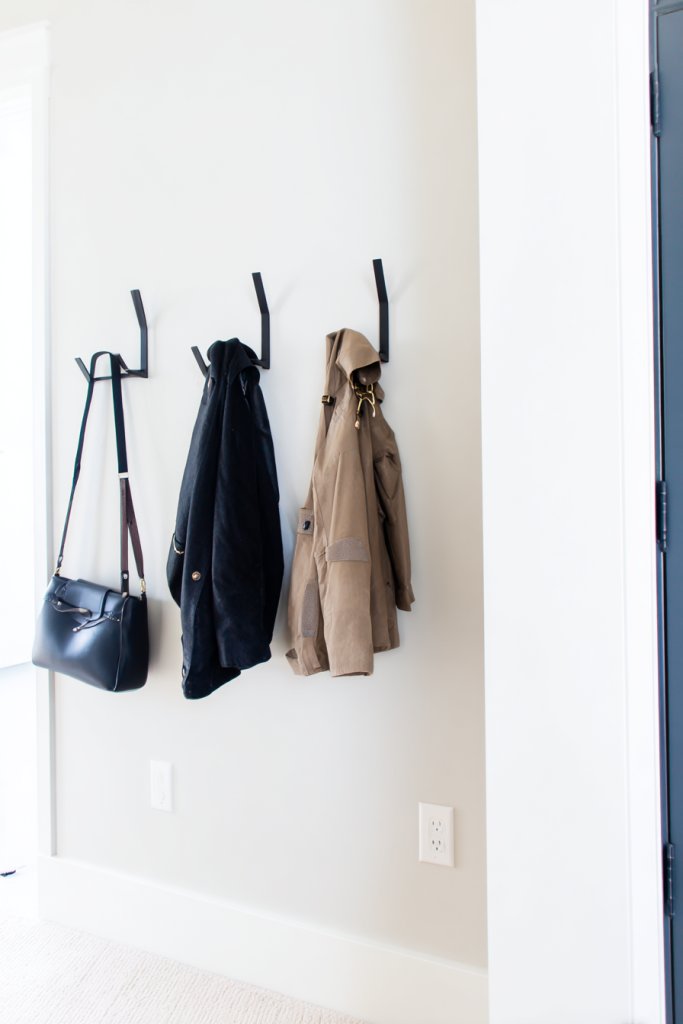
Cluttered entryways and bedrooms make your space look chaotic and unwelcoming. Wall hooks and racks are a simple, effective way to keep coats, bags, and accessories off the floor and organized. They free up closet space and make your daily routine smoother. Who needs bulky furniture when a few hooks do the trick?
Picture a sleek metal or wooden hook rack mounted just inside your door, with hooks holding jackets, umbrellas, and backpacks. Beneath, a small shelf can hold hats or shoes, creating a mini station. The hooks come in different finishes, from matte black to rustic wood, blending seamlessly with your decor. The arrangement keeps everything within arm’s reach and visually tidy.
Select hooks with decorative finishes or practical features—such as padded arms for delicate fabrics or multiple hooks for accessories. Use wall-mounted racks in mudrooms, bedrooms, or bathrooms. Consider multi-tiered options for maximum capacity. Incorporate decorative elements like vintage knobs or modern geometric designs to match your style.
Choose a sturdy wall with enough space for your needs. Mount the hooks or racks at a height that’s comfortable for everyone in the household. Organize items by type—heavy coats on lower hooks, hats and bags higher up. Regularly check for stability and clean the hooks to prevent dust buildup. Reconfigure as your collection evolves.
Decorate hooks with paint or decals to add personality. Use labels or color coding to differentiate family members or item types. Incorporate decorative ribbons or charms for a whimsical touch. Pair with a small bench or mirror nearby for a complete entryway station. Keep it functional and fun.
Wall hooks and racks turn clutter into a curated display, making your space more welcoming and organized. They encourage tidy habits and reduce morning chaos. Once you see how much easier it is to grab what you need, you’ll be motivated to keep your entire home looking sharp!
18. Implement a Rotating Donation and Disposal Station

Clutter tends to accumulate when you’re not actively sorting through your belongings. A dedicated donation and disposal station helps prevent this buildup, keeping your home tidy and clutter-free. It’s a simple habit that transforms chaos into order and makes decluttering less overwhelming.
Visualize a sturdy bin or basket in a prominent spot—like near the front door or laundry area—labeled for donations or discards. Regularly, you or your family drop off items you no longer need or use. When full, you take a quick trip to donate or discard, preventing pile-ups. The station acts as a visual cue and motivation to stay organized.
Choose a container that matches your decor—simple basket, vintage crate, or sleek bin. Use different containers for different categories—clothes, books, toys. Incorporate a calendar or reminder to review the station weekly or monthly. Adapt the size and placement based on your space and lifestyle needs. Make it accessible yet out of the way.
Set up a designated spot with a clear label. Regularly encourage family participation by establishing routines—like weekly declutter days. Keep the station well-maintained with fresh bags or liners. Periodically review contents, and schedule trips for donation or disposal to avoid overflow. Use visual cues like color coding for different types of items.
Decorate the station with motivational quotes or colorful tags. Incorporate small tools like sticky notes or checklists to remind you of routines. Use a portable bin for ease of transport to donation centers. Celebrate progress with small rewards—like a treat or a new organization tool—to reinforce habits.
A rotating donation station makes decluttering a manageable part of your lifestyle. It helps you keep your home free of unnecessary stuff and encourages mindful consumption. Once it becomes a habit, maintaining a tidy home feels effortless. Your space will be more peaceful, and your mind clearer.
19. Use Over-the-Cabinet Door Hooks for Dish Towels and Cleaning Supplies
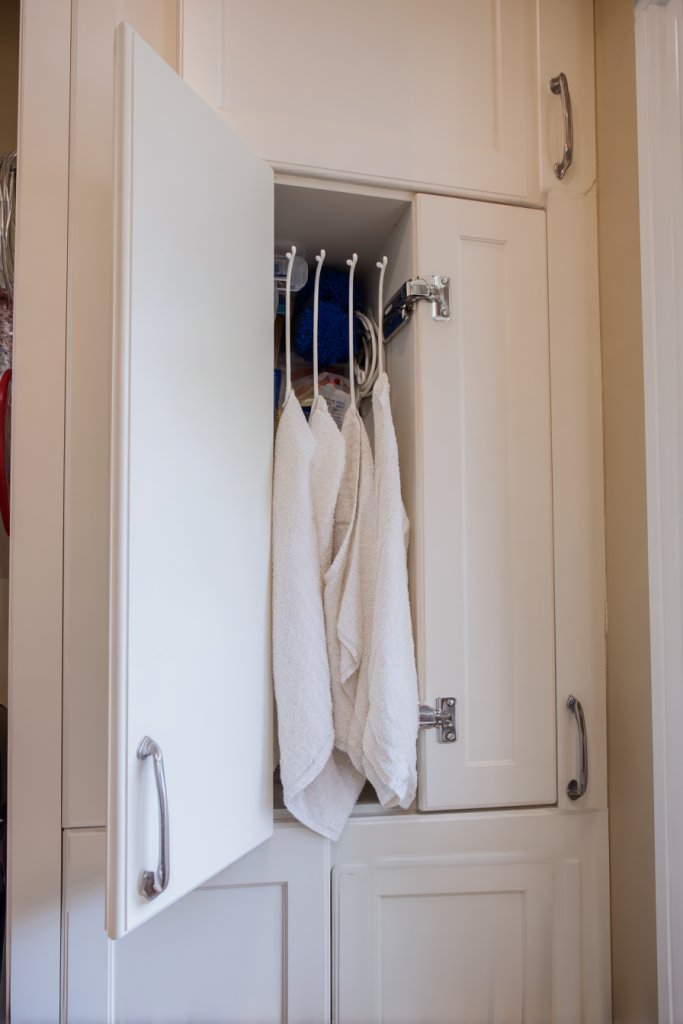
Counter space is precious, especially in small kitchens. Over-the-cabinet door hooks are a smart way to organize frequently used items like dish towels and cleaning supplies. They keep essentials within reach while freeing up drawers and countertops. Who needs clutter when a simple hook can do so much?
Visualize sleek hooks hanging over cabinet doors, holding brightly colored towels and spray bottles. The hooks are discreet and sturdy, blending seamlessly with your cabinetry. They keep your workspace tidy and visually appealing, with everything you need right where you want it. The setup is quick, affordable, and instantly makes your kitchen look more organized.
Choose from rubber-coated, metal, or plastic hooks depending on your style and weight requirements. Use different hooks for various items—heavy-duty for cleaning bottles, softer for towels. In laundry or utility rooms, these hooks can hold brushes, cloths, or small tools. Rotate items seasonally for a fresh look and better organization.
Measure your cabinet door thickness and select compatible hooks. Install them securely over the top edge, ensuring they don’t interfere with door movement. Hang your towels, sponges, or cleaning bottles, keeping them visible and accessible. Regularly wipe down hooks and replace worn or damaged ones to maintain safety and appearance.
Add decorative elements like colorful grips or labels to match your kitchen decor. Use hooks with hooks or clips for extra versatility—holding utensils or small cloths. Incorporate a small tray or caddy on the door for additional storage of sponges or brushes. Refresh the look seasonally with new colors or styles.
Over-the-cabinet hooks turn underused space into a practical storage hub, making your kitchen more efficient. They’re easy to install and reconfigure, encouraging ongoing organization habits. Once you see how much neater your space feels, you’ll be motivated to keep your entire home clutter-free!
20. Create a Dedicated Charging Station in a Clear, Accessible Spot

Ever spend ages hunting for chargers or plugging devices into random outlets? A designated charging station simplifies your tech life and reduces cable clutter. It keeps all electronics in one safe, accessible place and makes charging effortless. No more tangled cords or lost devices—just organized convenience.
Picture a sleek tray or box with designated slots for phones, tablets, and smartwatches, all neatly arranged. Extension cords are hidden behind or inside the station, with cables routed through holes or clips for a tidy look. The entire setup is on a countertop or shelf in a common area, ready to use anytime. It’s both functional and stylish, making tech management look effortless.
Use decorative trays, wooden boxes, or acrylic organizers depending on your decor style. Incorporate cable clips, wraps, or labels for easy identification. For shared households, assign specific spots for each person’s devices. Elevate the station with a small lamp or decorative accents, or keep it minimal with just essentials. Adjust placement based on your daily routines.
Choose a visible but clutter-free spot—kitchen counter, bedside table, or entryway shelf. Set up the organizer with power strips or extension cords hidden behind for a clean look. Route cables through designated openings or clips to prevent tangling. Dedicate specific spots for each device, and label if needed. Regularly clean and check cords for safety.
Add decorative elements like plants, photos, or seasonal decor around the station. Use colorful or themed organizers to match your style. Incorporate small baskets or trays for accessories, earbuds, or chargers. Keep cords tangle-free with reusable cable ties or wraps, making maintenance quick and easy.
A dedicated charging station declutters your space and makes tech management less stressful. It encourages better cable habits and reduces frustration. Once you see how organized and accessible your devices are, you’ll be inspired to create similar systems in other parts of your home!
21. Incorporate Multi-Functional Furniture with Built-In Storage
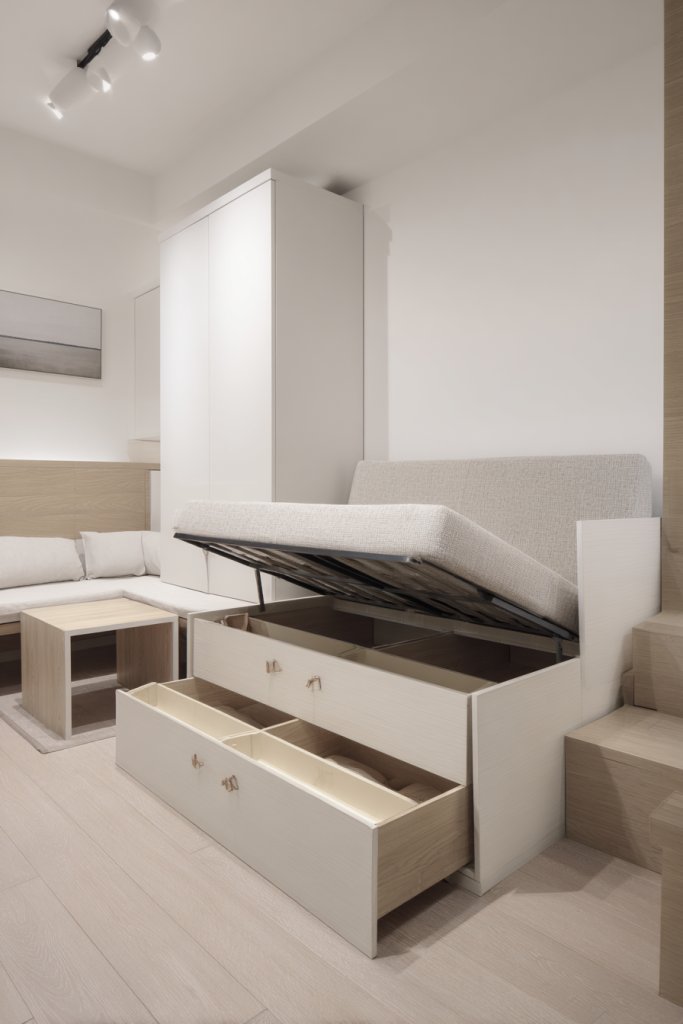
Small spaces demand smart solutions, and multi-functional furniture with built-in storage is a total game-changer. It combines seating, sleeping, or tables with hidden compartments to maximize every inch. Who wouldn’t want a piece that looks stylish and keeps clutter out of sight?
Imagine a sleek sofa with storage underneath the cushions or a bed with drawers built into the frame. The furniture blends seamlessly into your decor, offering a tidy look while hiding blankets, clothes, or books. The material choices—wood, fabric, or metal—align with your style, creating a cohesive, functional space. It’s like furniture that’s secretly a closet.
Choose from beds with storage drawers, ottomans with hidden compartments, or coffee tables with lift-top storage. Select pieces that match your decor—modern, rustic, or eclectic. Use the hidden space for seasonal items, extra linens, or toys. For multi-use rooms, opt for fold-away or modular furniture that adapts to your needs.
Identify your storage needs and measure available space. Choose furniture with sturdy construction and easy access to compartments. Assemble following manufacturer instructions, ensuring safety and stability. Organize items inside with baskets, dividers, or bins for quick retrieval. Regularly declutter and reorganize as your needs change.
Decorate with throws, cushions, or decorative accents that match your style. Label storage compartments for quick identification. Incorporate contrasting trims or fabrics for visual interest. Use decorative trays or baskets inside for smaller items. Keep the space fresh with seasonal decor or textiles.
Multi-functional furniture saves space and adds a sleek, cohesive look to your home. It encourages smart organization and simplifies your daily routines. Once you see how much more functional your space becomes, you’ll be motivated to continue upgrading and decluttering with confidence!
Conclusion
From clever storage hacks to stylish organization solutions, these ideas cover all aspects of creating a clutter-free home. Trying out even a few can make a big difference in how your space functions and feels. Take action today and turn your home into a beautifully organized sanctuary—your clutter-free future starts now!

Post Comment