21 New Ceiling Design Ideas to Elevate Your Space
“introduction”: “Have you ever looked up and thought, \\”My ceiling could be so much more?\\” Ceiling designs are gaining popularity because they instantly add personality, depth, and a touch of luxury to any room. A stunning ceiling can completely transform your space, making it feel more inviting and stylish without a full remodel.\n\nIn this article, you’ll find a variety of innovative and beautiful ceiling ideas that suit different styles and budgets. From subtle accents to bold statement features, these options will inspire you to elevate your home’s aesthetic and create a truly unique environment. Get ready to see your ceilings in a whole new light!”,
1. Coffered Ceiling with Modern Molding for Elegant Depth
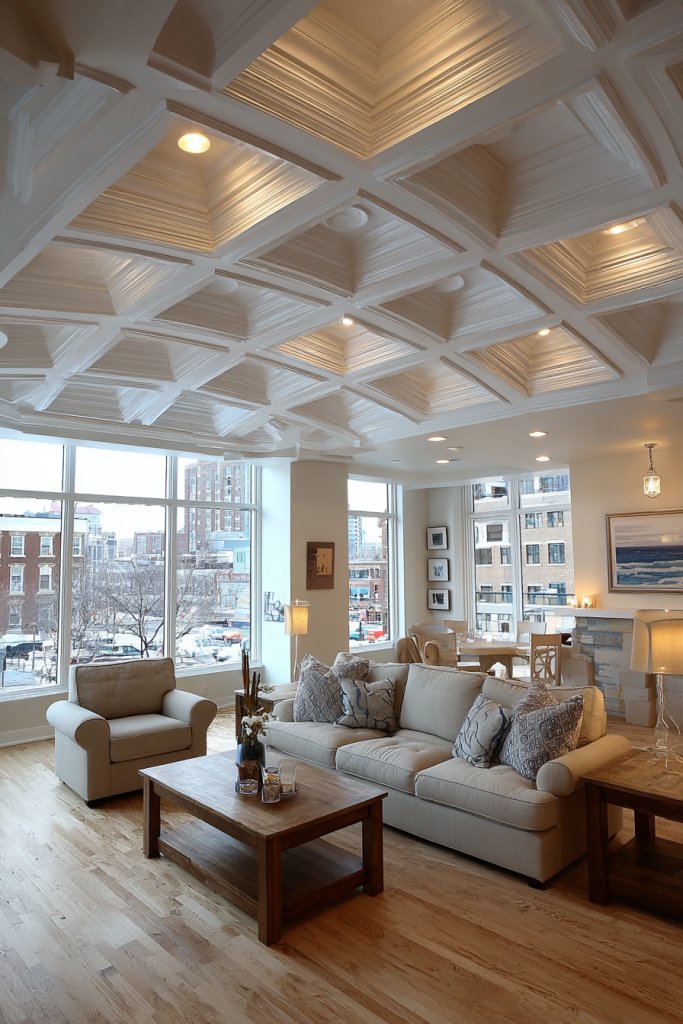
Ever felt your ceilings lack that wow factor, making rooms seem flat or uninspired? A coffered ceiling with modern molding instantly elevates your space, adding a sense of grandeur without overwhelming the room. It’s perfect for those who crave elegance but don’t want the fuss of ornate traditional styles. If your space needs a subtle upgrade that screams sophistication, this idea is your answer.
Imagine sleek, geometric panels framed with thin, matte black or brushed nickel moldings. The depth created by these recessed sections adds shadow play, making ceilings appear higher and more dynamic. Soft ambient lighting can accentuate the geometric shapes, highlighting their clean lines. The overall effect is a modern, architectural feature that transforms your ceiling into a design centerpiece, blending minimalism with luxury.
You can customize the size and pattern of the coffers—square, rectangular, or even octagonal—and choose moldings that match your decor style, from matte black to polished chrome. For smaller rooms, a subtle grid pattern works best, while larger spaces can handle bold, large-coffer designs. Seasonal tweaks, like adding metallic or colored accents, can refresh the look. You can also incorporate textured or patterned panels for a more personalized vibe.
Start by measuring your ceiling and sketching a grid layout. Use lightweight MDF or foam moldings for easy installation, attaching them with strong adhesive or nails. Precision is key—use a level and laser line to ensure straight lines. For a seamless look, paint the moldings the same color as your ceiling or in a contrasting hue for extra pop. Finish with soft LED strip lighting tucked into the recesses to emphasize the depth and shape. Hiring a professional might be wise if you’re new to DIY projects.
Add a pop of color by painting the moldings in bold shades or metallic finishes. Incorporate hidden LED lighting for a customizable glow, or install a centralized statement light fixture in the middle of the pattern. For a textured touch, use materials like leather or fabric-covered panels within the coffers. You could also experiment with different shapes or asymmetrical designs to suit your personal style.
A coffered ceiling combines timeless elegance with modern sensibilities, making your space feel both cozy and stylish. It’s a feature that impresses guests and boosts your home’s perceived value. With a little planning and some DIY spirit, you can achieve professional-looking results that elevate your entire room. Ready to add depth and dimension to your ceilings? Let this be your next home upgrade!
2. Faux Wood Beamed Ceiling for Rustic Charm
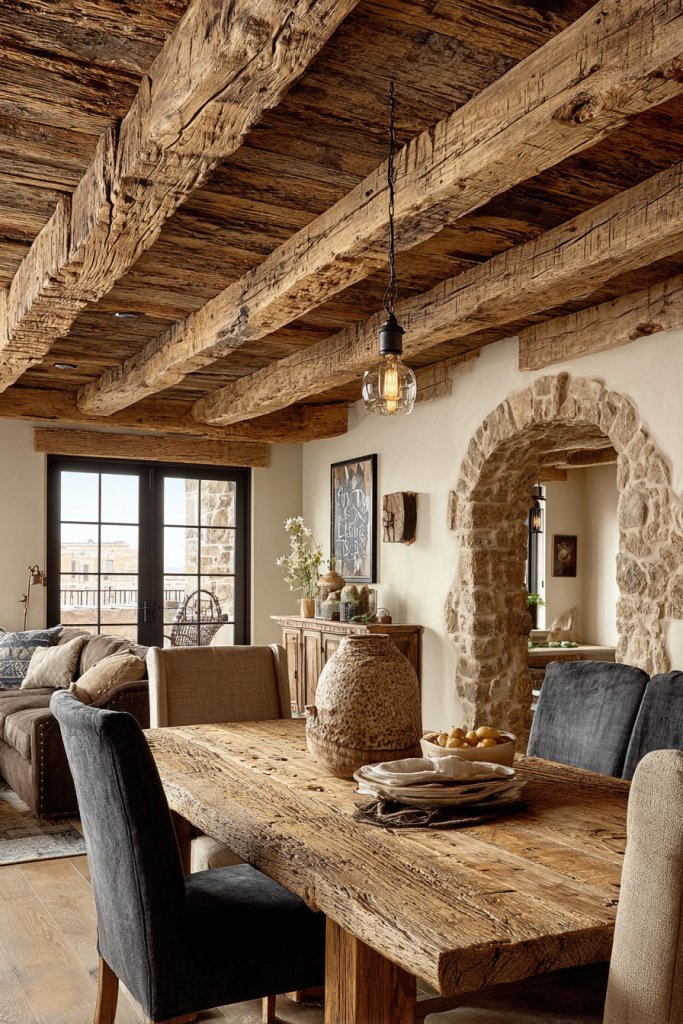
Does your room feel a bit too sterile or flat, lacking that warm, inviting vibe? Faux wood beams are the answer if you want to bring rustic charm without the hefty price tag or structural changes. They instantly add character, making even modern spaces feel cozy and lived-in. If you’ve ever admired those picturesque country homes, this is your chance to recreate that vibe.
Picture wide, textured faux beams running across your ceiling, with a rich, weathered finish that mimics reclaimed wood. The beams contrast beautifully against a crisp white or soft neutral ceiling, creating a striking visual anchor. Soft lighting from sconces or hidden LEDs can highlight the wood grain and add warmth. The overall look feels authentic, rustic, yet surprisingly sleek and modern in its execution.
Faux beams come in various textures, from smooth to heavily distressed, allowing you to match your preferred rustic or farmhouse aesthetic. You can opt for parallel beams for a traditional look or create a herringbone pattern for a modern twist. Seasonal accessories like faux greenery or lantern-style fixtures can enhance the rustic charm. Smaller rooms benefit from fewer beams, while large open spaces can handle a more dramatic layout.
Begin by measuring your ceiling and choosing faux beams made from lightweight polystyrene, polyurethane, or wood veneer. Use construction adhesive and nails to secure the beams, ensuring they sit flush against the ceiling. Sand and paint or stain the beams in your desired finish—weathered gray, dark walnut, or light oak. For authenticity, add subtle distressing or knots. Finish by installing indirect lighting or small sconces to enhance the texture and warmth.
Mix and match beam finishes—some darker, some lighter—to create visual interest. Incorporate decorative brackets or corbels for a more authentic look. You can also use the beams to frame a central feature like a chandelier or a statement fan. Adding fabric or textured wallpaper in the background can further deepen the rustic feel. Personal touches like hanging vintage signs or family heirlooms nearby amplify the charm.
Faux wood beams are a quick, cost-effective way to add warmth and character to any room. They bridge the gap between rustic and modern, giving you a versatile design feature that’s easy to update. Once installed, your space will feel instantly more inviting and stylish. Go ahead—bring that cozy cabin vibe into your home without the hassle!
3. Metallic Accent Ceiling for Glamorous Flair
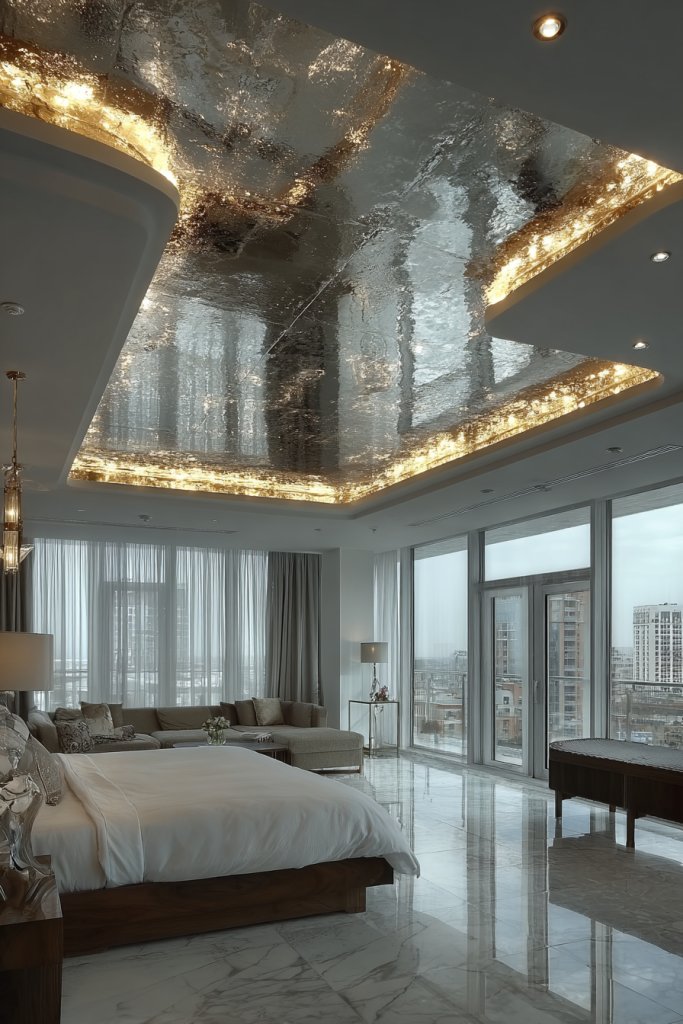
Feeling like your ceilings are a bit dull and need a touch of luxury? Metallic accents are the perfect way to add that glamorous, high-end feel without tearing down walls or remodeling. They reflect light beautifully, making your room brighter and more dynamic. If you love a bit of sparkle and shine, this idea will instantly upgrade your decor.
Imagine a ceiling coated in shimmering gold, silver, or copper paint, catching every bit of light and creating a glow that feels luxurious. The metallic finish can be applied in large panels or subtle accents, like a thin border or a central medallion. When paired with matte walls and plush textiles, the reflective ceiling becomes a stunning focal point. Soft, warm lighting enhances the metallic sheen, adding depth and richness.
For a subtle effect, opt for a metallic paint on just the ceiling trim or a decorative border. For more impact, cover the entire ceiling with high-gloss metallic finish. You can also experiment with textured metallic wallpapers or foil panels for a more layered look. Seasonal touches like metallic garlands or ornaments can refresh the space for special occasions. This approach works well in bedrooms, dining rooms, or even entryways.
Start by prepping your ceiling with a smooth, clean surface. Use a high-quality metallic paint or adhesive foil specifically designed for ceilings. Apply evenly with a roller or brush, ensuring no streaks or bubbles. For large areas, consider a spray application for a flawless finish. Pair with layered lighting—such as dimmable LEDs—to emphasize the reflective surface and create mood. Seal with a clear, protective coat if necessary for durability.
Combine metallic ceilings with rich textiles, velvet curtains, or plush rugs to enhance the glam vibe. For a modern twist, pair metallic finishes with matte black or deep jewel tones walls. Adding a statement chandelier or pendant with metallic accents can tie the look together. Personalize with decorative moldings or stenciled patterns in metallic shades for extra flair. Keep accessories minimal to let the ceiling shine.
A metallic accent ceiling transforms your room into a luxurious retreat, perfect for entertaining or relaxing. It’s a bold choice that pays off with a stunning visual impact. With a little effort, you can achieve a sophisticated look that rivals high-end interiors. Ready to add some shimmer and shine? Your glamorous upgrade awaits!
4. Drop Ceiling with Integrated LED Lighting
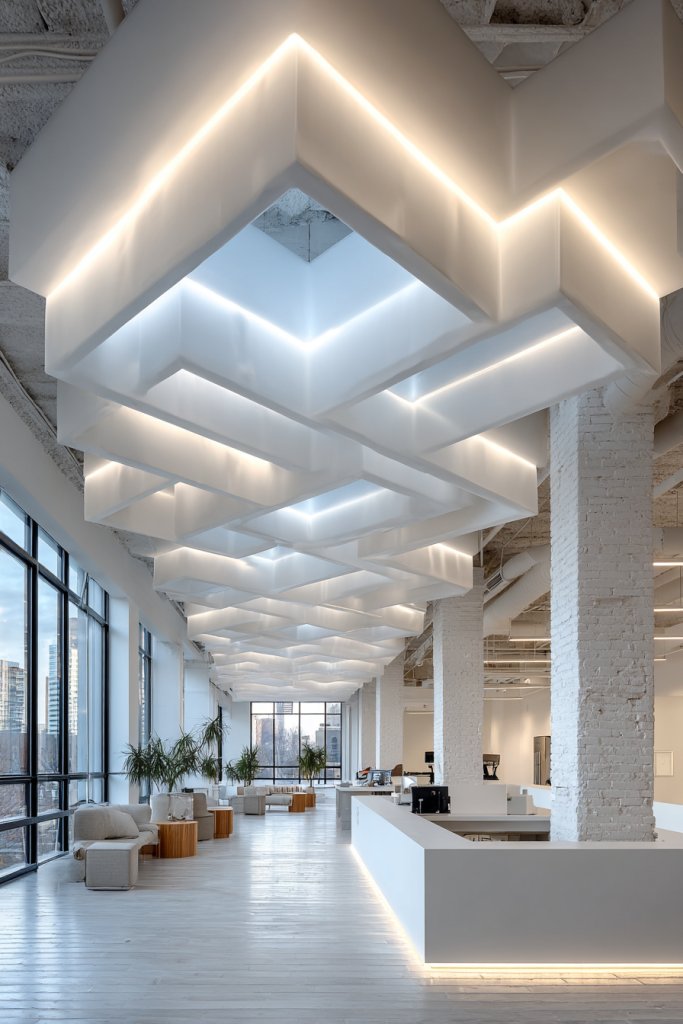
Is your current ceiling feeling flat and uninspired? A layered drop ceiling with integrated LED lighting can turn that plain surface into a sleek, customizable feature. It’s perfect for creating mood lighting or highlighting specific areas. Plus, it adds dimension and depth, making even small rooms feel larger.
Visualize a multi-layered ceiling with a recessed central panel, softly illuminated by hidden LED strips. The outer layer can be finished with sleek tiles or smooth plaster, while the inner layer glows with ambient light. The contrast between shadow and light creates a modern, sophisticated look. You might also include geometric patterns or textured panels to add visual interest, all while staying subtle and elegant.
Layered drop ceilings can be customized with different materials—glass, wood veneer, or acoustic tiles—depending on your needs. You can incorporate color-changing LEDs for seasonal or mood shifts. The design can be simple or complex, with multiple recesses or geometric shapes. For rooms with high ceilings, this approach adds intimacy; for lower ceilings, it creates the illusion of height.
Begin by designing your layered layout and selecting suitable materials. Install the main drop frame first, then attach the secondary layers with clips or brackets. Embed LED strips into the recesses, connecting them to dimmers or controllers for adjustable lighting. Ensure all wiring is concealed for a clean look. Finish the surface with your chosen material—paint, tiles, or panels—then test the lighting to perfect the ambiance. Hiring a professional electrician or contractor can make this process smoother.
Customize your lighting with color-changing LEDs or smart controls for dynamic effects. Add decorative features like textured panels or metallic accents in the recesses. Use dimming features to switch from functional to ambient lighting easily. For a personalized touch, incorporate artwork or patterns that reflect your style within the layered sections. This ceiling can become a statement piece that evolves with your mood.
A drop ceiling with integrated lighting elevates your space from basic to breathtaking, blending function with high design. It’s a practical way to introduce layered lighting without cluttering your walls. Once complete, your room will feel brighter, more spacious, and stylish. Take the leap—your modern, illuminated ceiling is within reach!
5. Textured Plaster Finish for Artistic Appeal
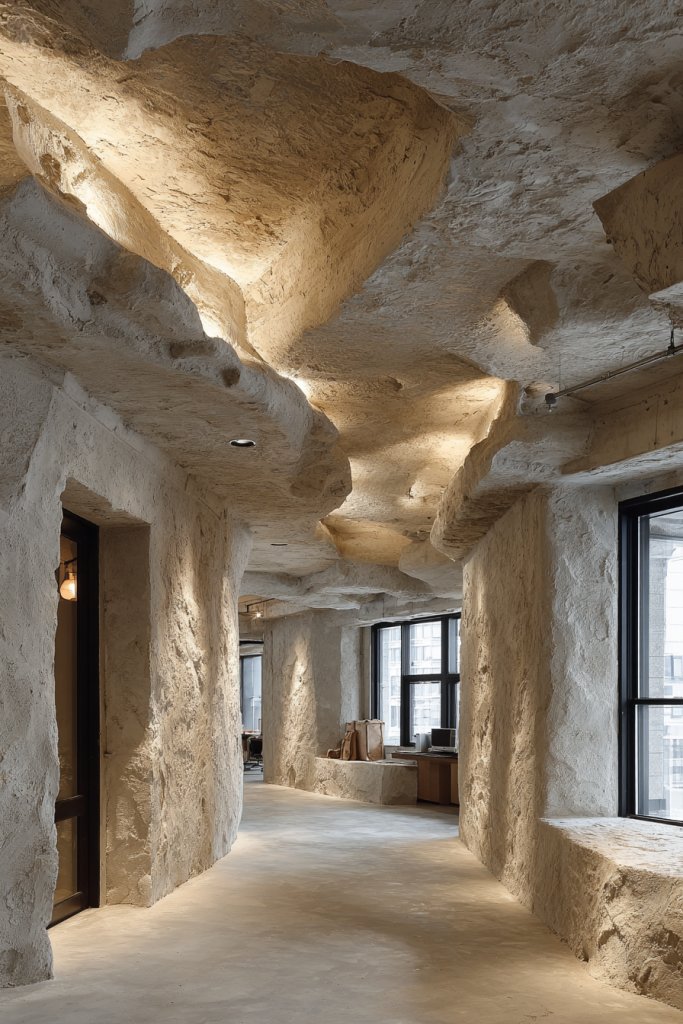
Tired of boring, flat ceilings that do nothing for your decor? A textured plaster finish adds an artistic touch, creating a tactile, interesting surface. It’s perfect for those who want their ceilings to be a subtle work of art, adding depth and personality. If you love handcrafted, unique looks, this idea will turn your ceiling into a statement feature.
Imagine a ceiling with a swirled, stucco-like surface, or perhaps a subtle, feathered texture. The finish catches light differently depending on the angle, creating shifting shadows and highlights. You might choose a matte or slightly glossy sheen, enhancing the textured effect. The overall result is an organic, handmade aesthetic that adds warmth and character to any room.
Textures range from subtle stippling to bold, three-dimensional patterns. You can customize the finish with colors—muted neutrals, metallics, or deep jewel tones—to match your decor. Textured plaster pairs well with natural materials and minimalist furniture, emphasizing an earthy, artistic vibe. Seasonal accents like metallic powders or colored pigments can refresh the look periodically.
Start with a smooth, primed ceiling surface. Use a trowel or spatula to apply your chosen plaster mixture—either pre-mixed or DIY—creating your preferred texture pattern. Experiment on a small section first. Once dry, sand lightly if needed and paint with a matte or satin finish. For added depth, incorporate metallic or colored powders into the plaster before application. Sealing the surface with a matte topcoat preserves the texture and prevents damage.
Enhance the artistic appeal by adding metallic or pearl pigments for shimmer. Incorporate subtle color gradations within the texture for a painterly effect. Use lighting strategically—wall sconces or directional LEDs—to emphasize the texture’s shadows and highlights. Personalize the space with complementary decor that complements the handcrafted aesthetic, like organic textiles or rustic furnishings.
A textured plaster ceiling adds an unmistakable artistic touch, making your home feel more curated and warm. It’s a DIY-friendly project that rewards patience and creativity. Your ceiling will stand out as a subtle masterpiece, elevating the entire room’s vibe. Ready to craft your own textured art piece above your head?
6. Tray Ceiling with Soft LED Backlighting
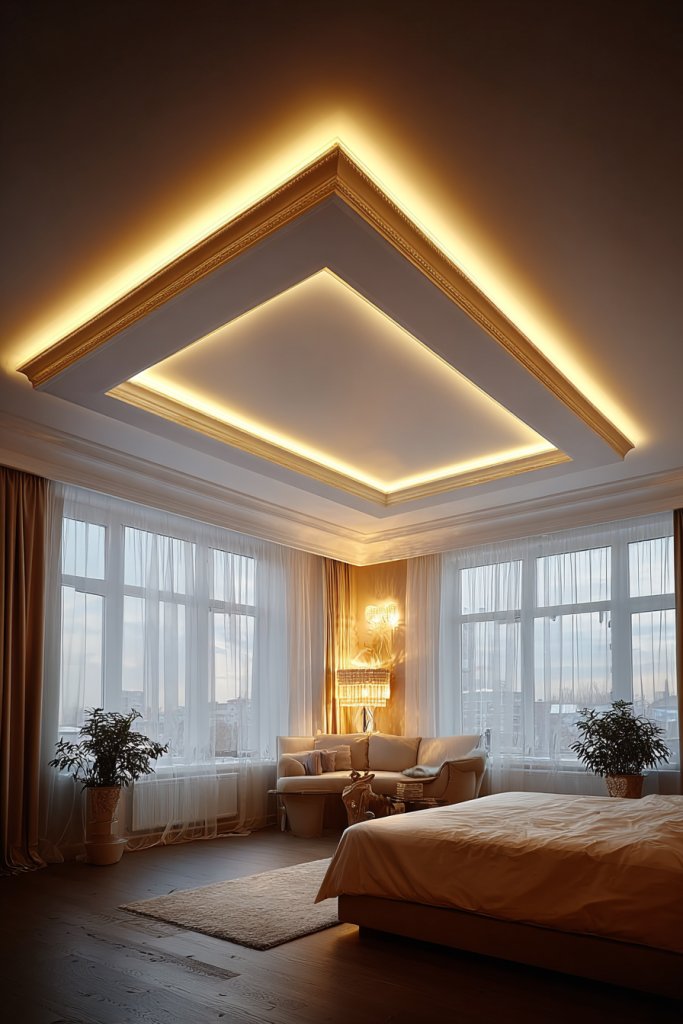
Looking to add a cozy, ambient glow to your bedroom or dining area? A tray ceiling with soft LED backlighting creates a warm, inviting atmosphere. It’s a subtle way to add depth and dimension, making your space feel more intimate and polished. If you love ambient lighting but dislike harsh overhead lights, this is your go-to solution.
Picture a ceiling with a recessed central panel, softly illuminated by hidden LED strips along the edges. The light offers a gentle, diffuse glow that casts a soothing ambience over the room. The surrounding border remains a clean, crisp surface, framing the tray and drawing eyes upward. When paired with plush textiles and warm tones, it creates a cocoon-like environment perfect for relaxing.
You can customize the tray depth and shape—rectangular, square, or even circular—depending on your style. Choose warm white or color-changing LEDs for different moods. The border can be finished with crown molding, decorative trim, or painted in a contrasting color for extra flair. This concept suits bedrooms, living rooms, or even home theaters, adapting easily to your space’s vibe.
Begin by framing the recessed area with a sturdy border or molding. Install LED strip lights along the interior edges, ensuring the wiring is hidden behind the molding. Connect the LEDs to a dimmer or remote control for adjustable brightness and color options. Finish the surface with drywall or plaster, then paint or wallpaper the surrounding ceiling. Test the lighting setup before finalizing to achieve an even, soft glow.
Personalize with color-changing LEDs or smart controls to match your mood or season. Incorporate decorative trim or textured finishes around the tray for added character. Use plush fabrics or textured wall coverings nearby to enhance the cozy feeling. Pair with statement furniture or accessories that complement the soft glow for a complete look.
A tray ceiling with backlighting transforms a standard room into a luxurious retreat. It’s a simple upgrade that makes a big difference in mood and style. Once installed, you’ll enjoy a warm, inviting space perfect for unwinding or entertaining. Your cozy, modern sanctuary is just a few steps away!
7. Patterned Ceiling Tiles for Visual Intrigue
Does your ceiling feel uninspired and plain? Patterned ceiling tiles inject personality and visual intrigue into any room. They’re perfect if you want to add a vintage or eclectic touch without a full renovation. Plus, they’re easy to install and replace, making your ceiling a quick style upgrade.
Imagine decorative tiles with geometric, floral, or intricate patterns arranged across your ceiling. The tiles come in various materials—metal, plastic, or faux tin—each adding its own texture and shine. When illuminated with warm or cool lighting, the patterns cast subtle shadows and highlights, creating a layered, artistic effect. They instantly draw the eye upward, making your ceiling a focal point.
Mix different patterns or colors for a personalized, eclectic look. For a vintage vibe, opt for tin or metal tiles with embossed designs. Modern spaces can incorporate sleek, geometric patterns in monochrome shades. You can also alternate tiles with plain painted surfaces for a balanced effect. Seasonal accents like metallic finishes or painted borders refresh the aesthetic easily.
Start by measuring your ceiling and selecting tiles that fit your style. Clean the surface thoroughly before installation. Use adhesive or clips, depending on the material, to secure the tiles in a grid. For a seamless look, paint the tiles prior to installation or after, depending on the material. Incorporate lighting fixtures or sconces to enhance the patterns and add warmth. Regular cleaning keeps the intricate designs looking sharp.
Customize tiles with metallic or colored finishes for extra flair. Create a pattern by mixing tile styles or colors, or frame the entire ceiling with a decorative border. Use lighting to highlight specific areas or details. Pair with vintage or industrial furniture to complement the aesthetic. Personal touches make the ceiling a true reflection of your style.
Patterned ceiling tiles add charm and character, turning a dull ceiling into a conversation starter. They’re a practical way to add visual interest without a major overhaul. Once installed, your ceiling will exude personality, elevating the entire room’s vibe. Get creative—you’re only limited by your imagination!
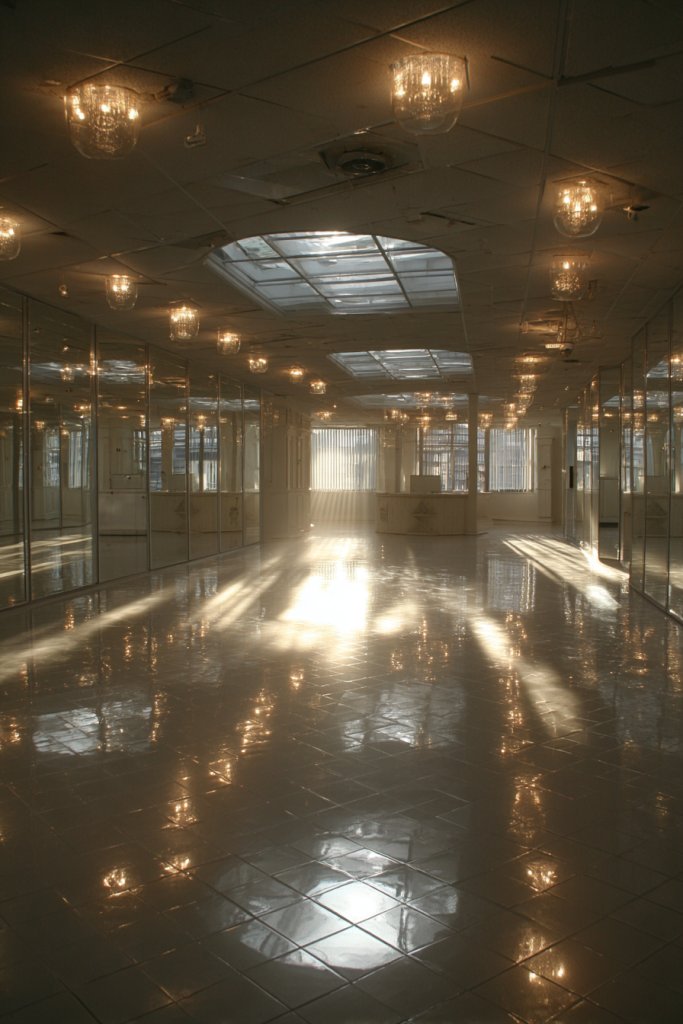
8. Mirrored Ceiling for Illusion of Space
Feeling cramped or low-ceilinged? A mirrored ceiling can create the illusion of space, making your room feel larger and more open. It’s a dramatic design move that instantly brightens the environment by reflecting light and surroundings. If you want a bold, modern statement, this idea is a game-changer.
Visualize a ceiling covered in large, seamless mirror panels that reflect the room below. The reflections bounce natural and artificial light, brightening even the darkest corners. In a bedroom or living room, it doubles the visual height and adds a touch of glamor. When paired with minimal decor and sleek furniture, the mirrored ceiling becomes a stunning, high-impact feature.
Choose from glass or acrylic panels, depending on your budget and safety concerns. You can opt for a full ceiling mirror or create a framed section for a more subtle effect. Complement the mirror with sleek, modern furniture and neutral tones to keep the space feeling airy. Seasonal accents like string lights or decorative fixtures can also enhance the reflective effect.
Begin by measuring your ceiling and selecting mirror panels with appropriate safety features. Install using specialized mounting systems or adhesive designed for glass, ensuring even placement and secure attachment. Seal the edges with trim or molding for a polished look. Clean thoroughly before installation to avoid streaks. Light fixtures can be recessed into the ceiling to avoid glare while maximizing reflection.
Use LED strip lighting around the edges to add a subtle glow and highlight the reflective surface. Incorporate decorative frames or etching for a personalized touch. Pair with elegant, minimalistic furniture to keep the focus on the ceiling. Adding a few well-placed accent pieces in the room enhances the illusion of depth and space.
A mirrored ceiling is a bold choice that pays off by transforming your space into a brighter, larger retreat. It’s a glamorous feature that elevates your home’s style instantly. With proper installation, it’s a safe, stunning way to reflect your personality and taste. Ready for a room that feels twice as spacious?
9. Wallpapered Ceiling with Bold Prints
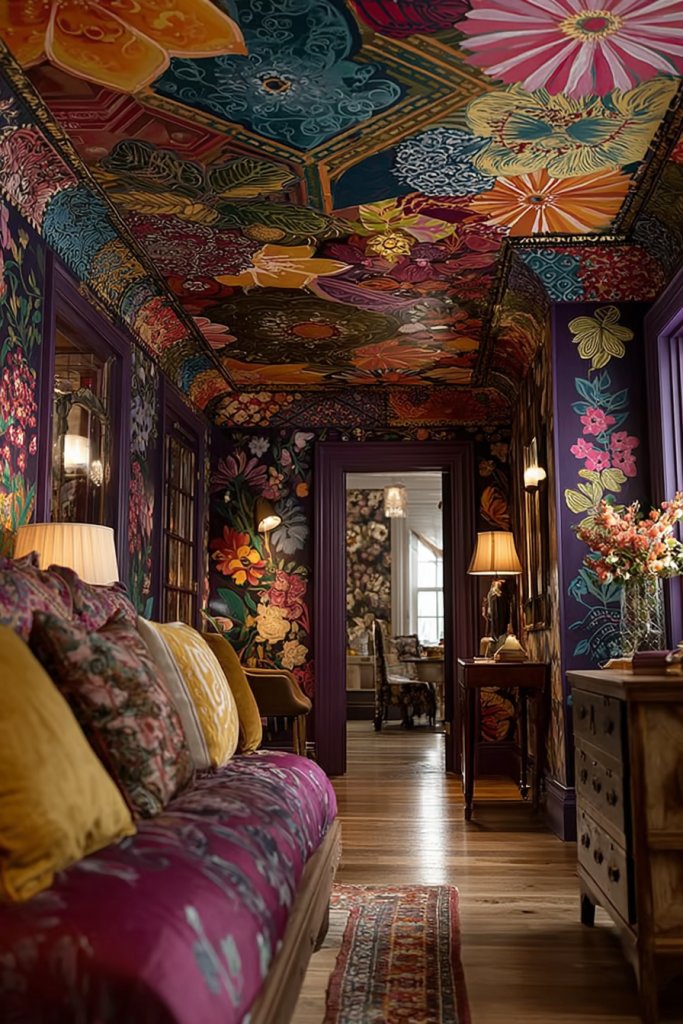
Bored of plain ceilings that blend into the background? Wallpapering your ceiling with bold prints is a fun, unexpected way to add personality and flair. It’s perfect for creating a statement piece that captures attention without overwhelming the space. If you love pattern and color, this idea will spice up any room.
Picture a ceiling covered in vibrant floral, geometric, or abstract wallpaper, instantly drawing the eye upward. The pattern adds depth and visual interest, making the room feel more dynamic. When combined with neutral walls and minimal decor, the ceiling becomes a focal point. Soft lighting enhances the print’s colors and details, creating a lively, inviting atmosphere.
Choose bold, large-scale patterns for a dramatic effect or subtle, intricate designs for a more refined look. You can wallpaper the entire ceiling or just sections for a layered effect. Seasonal or themed prints, like tropical or holiday motifs, keep the decor fresh. Pair with simple, understated furniture to let the wallpaper do all the talking.
Start by selecting a durable, peel-and-stick or traditional wallpaper designed for ceilings. Prepare the surface by cleaning and smoothing out any imperfections. Carefully measure and cut the wallpaper, then apply using a smoothing tool to prevent bubbles. Use a primer or adhesive if needed. Finish with a clear sealant to protect from humidity and wear. Lighting placement should avoid glare on the surface for best effect.
Mix different prints or textures to craft a unique ceiling design. Add metallic or textured accents within the wallpaper for an extra layer of interest. Incorporate lighting features like sconces or hidden LEDs to highlight the pattern. Personal touches like initials or custom motifs elevate the design further. Keep the rest of your decor simple to let the wallpaper shine.
A bold print ceiling transforms your room into a lively, artistic space that reflects your personality. It’s a bold statement that can dramatically change the mood, making your home more fun and stylish. With careful application, it’s a DIY-friendly project that pays off big time. Unleash your creativity and enjoy a ceiling that’s as bold as your personality!
10. Reclaimed Wood Planks for Natural Warmth
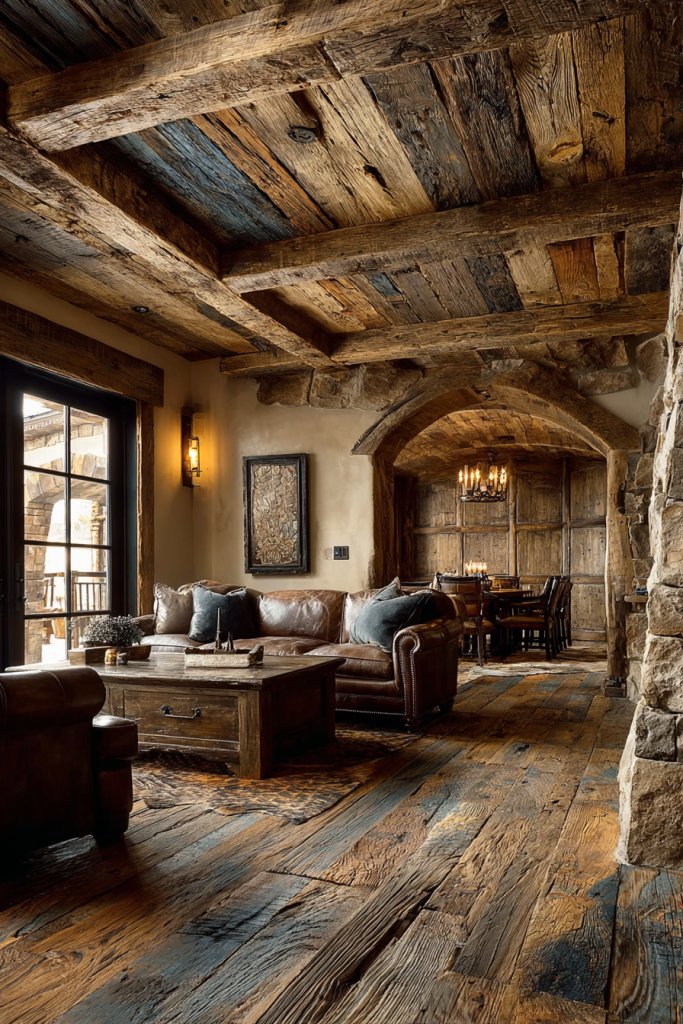
Feeling like your space needs more warmth and texture? Reclaimed wood planks on the ceiling add instant rustic charm and a natural vibe. They create a cozy, inviting atmosphere that balances modern and vintage styles. If you love the look of a cabin or farmhouse, this is your chance to bring that warmth indoors.
Visualize wide, weathered wood planks running parallel or in a herringbone pattern across your ceiling. The rich grain and knots add character, making the room feel more layered and textured. Soft lighting from nearby fixtures highlights the natural imperfections and warm tones. The overall effect is a timeless, organic aesthetic that complements both traditional and contemporary decor.
Use planks with different finishes—from rough-hewn to smooth—to customize the rustic vibe. Mix light and dark tones for visual interest or keep it uniform for a sleek, modern look. Incorporate vintage fixtures or industrial elements nearby for added charm. Seasonal accents like cozy textiles or warm-colored accessories enhance the inviting atmosphere.
Begin by sourcing reclaimed wood from sustainable suppliers or repurposed sources. Prepare the ceiling surface by cleaning and sealing it. Attach the planks with nails or adhesive, ensuring proper spacing and alignment. Seal the wood with a clear finish or light stain for added protection. Consider adding insulation or soundproofing behind the planks for extra comfort.
Add decorative metal or leather accents to complement the wood’s rustic feel. Incorporate lighting fixtures like vintage pendants or spotlights to highlight the texture. Personalize further with wall-mounted shelving or art that complements the natural theme. A cozy throw blanket or textured pillows nearby can complete the warm, inviting look.
Reclaimed wood ceilings evoke warmth and authenticity, instantly transforming your space into a rustic retreat. They add character and charm that age gracefully, making your home feel more lived-in and loved. It’s a sustainable choice with a stunning visual payoff. Ready to bring nature’s beauty into your home?
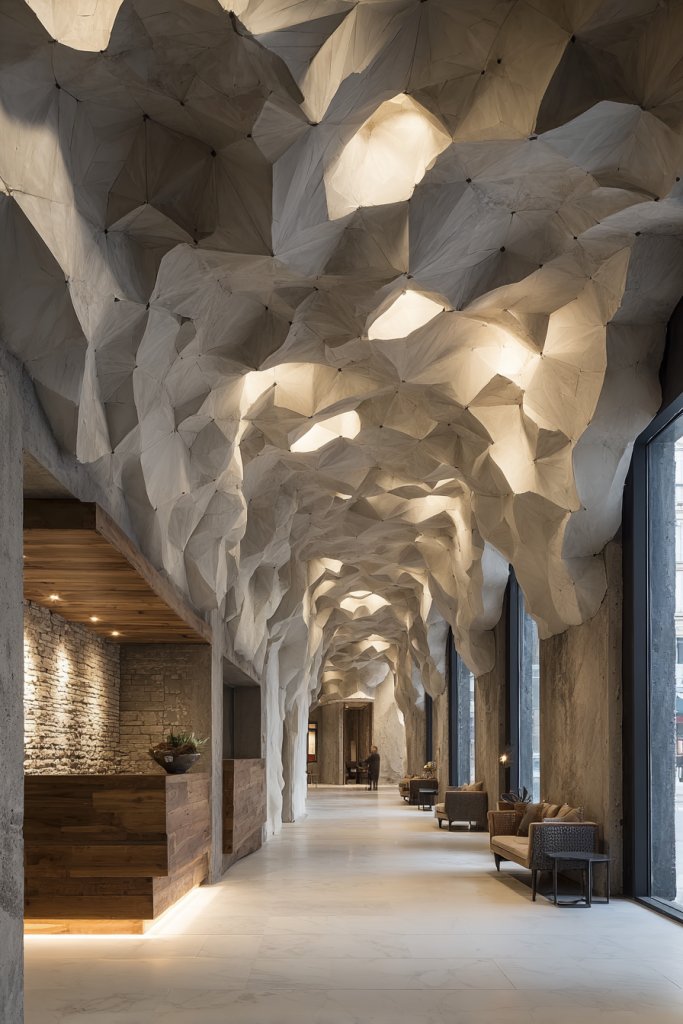
11. Suspended Cloud-Inspired Acoustic Panels
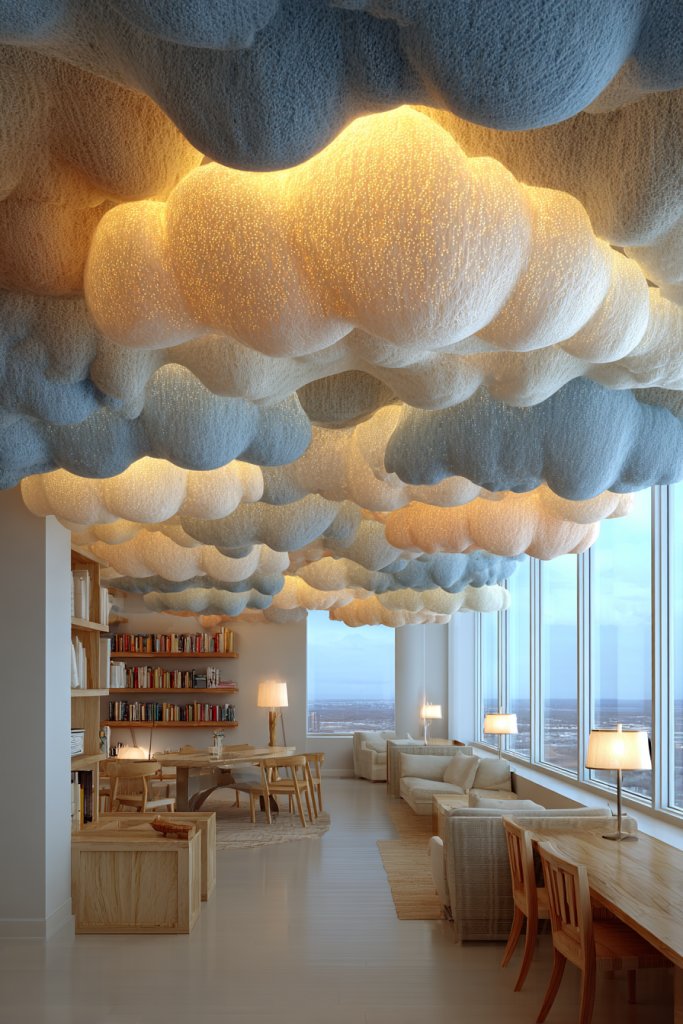
Craving a room that’s not only stylish but also acoustically friendly? Cloud-inspired acoustic panels suspended from the ceiling absorb sound and add a whimsical touch. They’re perfect for home offices, studios, or cozy living rooms. If noise and echoes bother you, this design helps create a calmer, more inviting environment.
Imagine soft, fluffy panels hanging at different heights, resembling floating clouds. The panels can be upholstered in fabric or covered with textured materials, adding tactile appeal. Light filters through or reflects off their surfaces, creating a serene, dreamy atmosphere. They soften the room visually and acoustically, making your space feel cozy and peaceful.
Choose from shapes like rounded, oval, or irregular cloud forms for a playful look. Use neutral fabrics for a calming vibe or vibrant textiles for a pop of color. Vary the hanging lengths for an organic, natural appearance. Incorporate LED backlighting or edge lighting to enhance the floating effect and add a layer of mood lighting.
Start by designing your cloud layout and selecting soft, sound-absorbing fabrics or foam panels. Suspend the panels from the ceiling using discreet wires or cables, ensuring even spacing and height variation. Secure the wires to ceiling anchors or hooks, and hide the hardware behind the panels for a clean look. Finish by adding optional lighting features or decorative trim. Test acoustics and adjust hanging lengths as needed.
Personalize with colorful or patterned fabrics that match your decor. Add subtle lighting behind or around the panels for an ethereal glow. Create a themed cluster—like a sky or dreamy landscape—by varying shapes and sizes. Use decorative elements like faux feathers or textured trims to enhance tactile interest. These panels turn your ceiling into a calming, artistic feature.
Cloud-inspired acoustic panels combine function and whimsy, making your space both beautiful and peaceful. They help reduce noise while elevating your decor to a playful, artistic level. Once installed, your room will feel calmer and more inviting. Take a leap into creative, sound-absorbing design—you’ll love the transformation!
12. Geometric Ceiling Installations with LED Accents
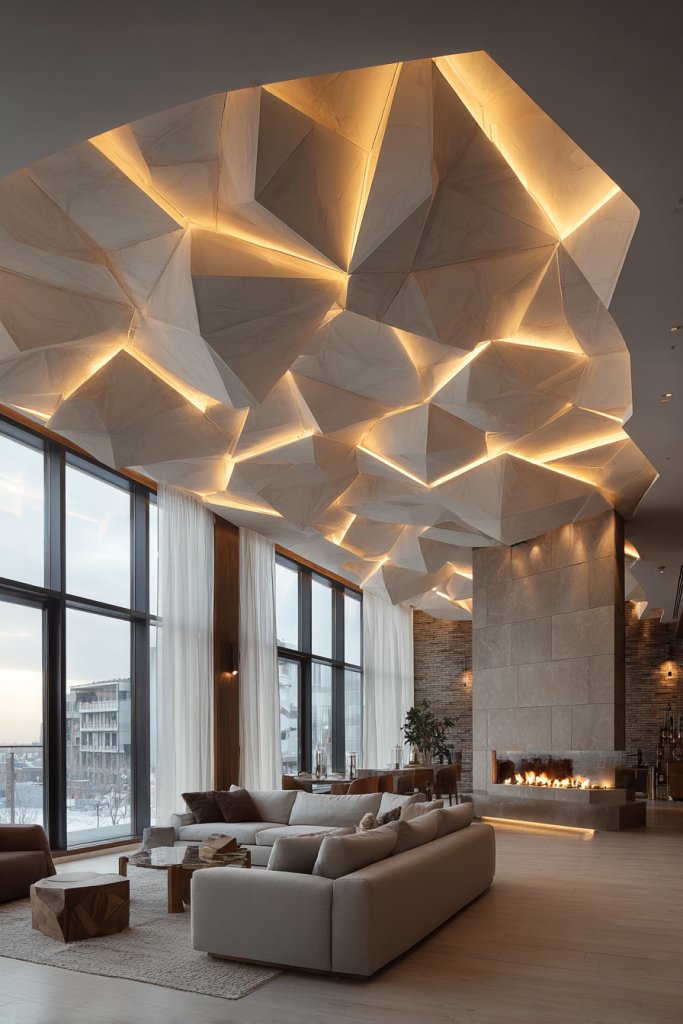
Want to make a bold design statement? Geometric ceiling installations with LED accents turn a plain ceiling into a piece of modern art. They’re perfect for those who love contemporary aesthetics and want to showcase their style. If you crave visual intrigue and innovative lighting, this idea is a game changer.
Visualize 3D geometric shapes—like pyramids, cubes, or hexagons—projecting from the ceiling, each integrated with LED strips. The lights highlight the shapes’ edges, casting shadows and emphasizing depth. The interplay of light and shadow creates a dynamic, ever-changing visual environment. It’s like bringing an urban art installation into your home.
Use different materials—metal, acrylic, or textured panels—for the geometric forms. Incorporate color-changing LEDs for mood versatility. The structures can be arranged symmetrically or asymmetrically, depending on your style. For a more subtle look, focus on smaller shapes or only highlight certain sections of the ceiling. This approach suits modern, minimalist, or eclectic interiors.
Design your geometric layout, considering the room’s size and focal points. Use lightweight panels or modular components, attaching them with strong adhesive or mounting brackets. Install LED strips along the edges of each shape, connecting to controllers for color and brightness adjustments. Ensure wiring is concealed within the shapes or ceiling cavity. Finish with a sealant or paint for a cohesive look, then test lighting effects.
Customize with different colors or patterns within each geometric shape. Use smart lighting controls to switch moods—from vibrant to subdued—easily. Add metallic or reflective surfaces for extra shine. Incorporate your favorite colors or themes to reflect your personality. The ceiling becomes a dynamic, artistic focal point that evolves with your mood.
Geometric ceiling art elevates your space into a modern gallery, showcasing your taste for innovative design. It’s a conversation starter and a visual delight. With some planning and creativity, you can achieve a high-end look that’s uniquely yours. Get ready for a ceiling that’s as bold as your style!
13. Exposed Beams with Neutral Finish for Industrial Vibe

Craving an industrial chic look that feels authentic yet effortless? Exposed beams with a neutral finish add structural charm and raw elegance. They make your ceiling a focal point, blending rustic textures with modern simplicity. If you love the idea of an unfinished, warehouse-inspired aesthetic, this is your perfect fit.
Picture sturdy, natural or weathered beams running across your ceiling, contrasting against a smooth, neutral-colored ceiling. The texture and imperfections of the wood add character, while the neutral finish keeps it versatile. When paired with exposed ductwork or metal accents, the look is industrial yet warm. Soft lighting can cast shadows that highlight the beams’ grain, adding depth.
Opt for beams in natural wood, stained finishes, or painted in shades like black, gray, or white—whatever suits your aesthetic. Keep the beams wide and prominent or slim for a subtler touch. Incorporate industrial fixtures, vintage bulbs, or metallic accents nearby to reinforce the theme. For a softer look, add textiles like linen or burlap in adjacent decor.
Start by inspecting your ceiling’s structural capacity and consulting professionals if needed. Attach the beams securely with heavy-duty brackets or mounting hardware. Finish with a clear sealant for natural wood or paint for a sleek, uniform look. Ensure the beams are level and evenly spaced for a balanced appearance. Add lighting fixtures like pendant or track lights to highlight the beams’ texture.
Personalize with metal brackets, vintage hardware, or distressed finishes for added authenticity. Use Edison bulbs or industrial-style fixtures to complement the beams. Incorporate open shelving or metal accents nearby. Keep the surrounding decor minimal, letting the beams stand out as architectural features. Seasonal textiles or art pieces can soften the industrial vibe.
Exposed beams with a neutral finish bring a timeless, rugged charm that elevates any interior. They blend effortlessly with modern, rustic, or eclectic styles. With the right lighting, they create a warm, inviting atmosphere. Embrace the raw beauty of structural elements—your space will thank you!
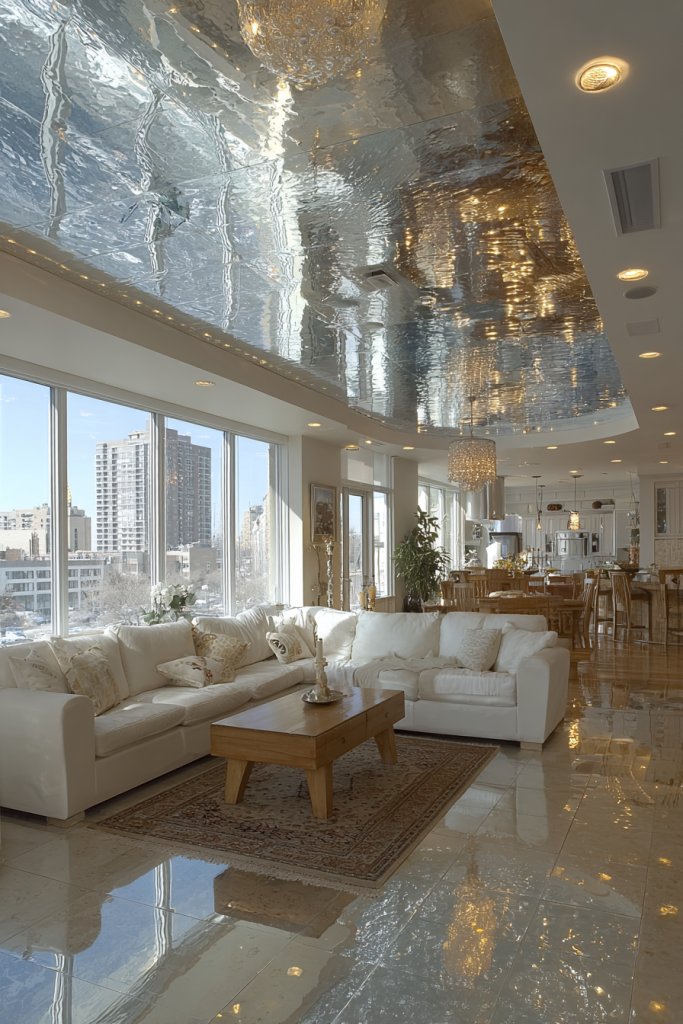
14. Stretch Fabric Ceiling for Seamless Elegance

Want a sleek, flawless ceiling without the hassle of plastering or painting? A stretch fabric ceiling provides a smooth, reflective surface that looks luxurious and modern. It’s an elegant solution for irregular or damaged ceilings, hiding imperfections effortlessly. If you’re after a clean, sophisticated finish, this idea is your new best friend.
Imagine a seamless, glossy fabric tautly stretched across your ceiling, creating a mirror-like or matte surface. The fabric can be in a solid color, metallic, or with subtle textures, depending on your style. When lit with soft, indirect lighting, the surface reflects light evenly, giving a sense of height and space. It’s a sleek backdrop that amplifies your room’s ambiance.
Choose from various fabrics— PVC, polyester, or satin—each offering different finishes and durability. Opt for glossy, matte, or even luminous materials that glow in the dark. The edges can be finished with aluminum or PVC trims, concealing the fabric’s perimeter. You can also incorporate integrated lighting or fiber optic strands for special effects.
Begin with measuring your ceiling accurately. Install a perimeter track system designed for stretch ceilings. Attach the fabric tightly within the track, using professional tools or specialists for a smooth finish. Add your preferred lighting—LEDs or cove lighting—before stretching the fabric fully. Ensure all electrical work is safely concealed. Professional installation is recommended for a flawless look.
Personalize with color, finish, or embedded lighting effects to match your decor. Add decorative trims, moldings, or indirect lighting to enhance the seamless look. Use contrasting colors for a striking effect or keep it monochrome for understated elegance. It’s a versatile option that adapts to various styles and moods.
A stretch fabric ceiling delivers a smooth, high-end appearance that elevates your space instantly. It’s perfect for hiding imperfections and creating dramatic effects. Once installed, it’s low maintenance and long-lasting. Embrace this sleek, modern look and enjoy a seamless, elegant ceiling for years to come!
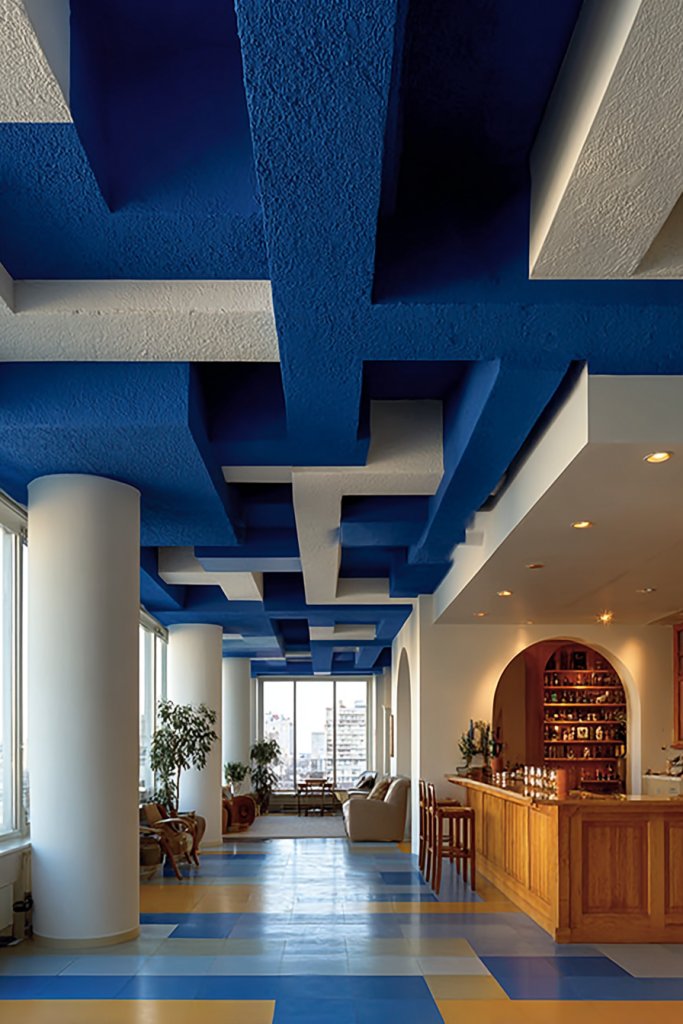
15. Colored Ceilings to Define Zones
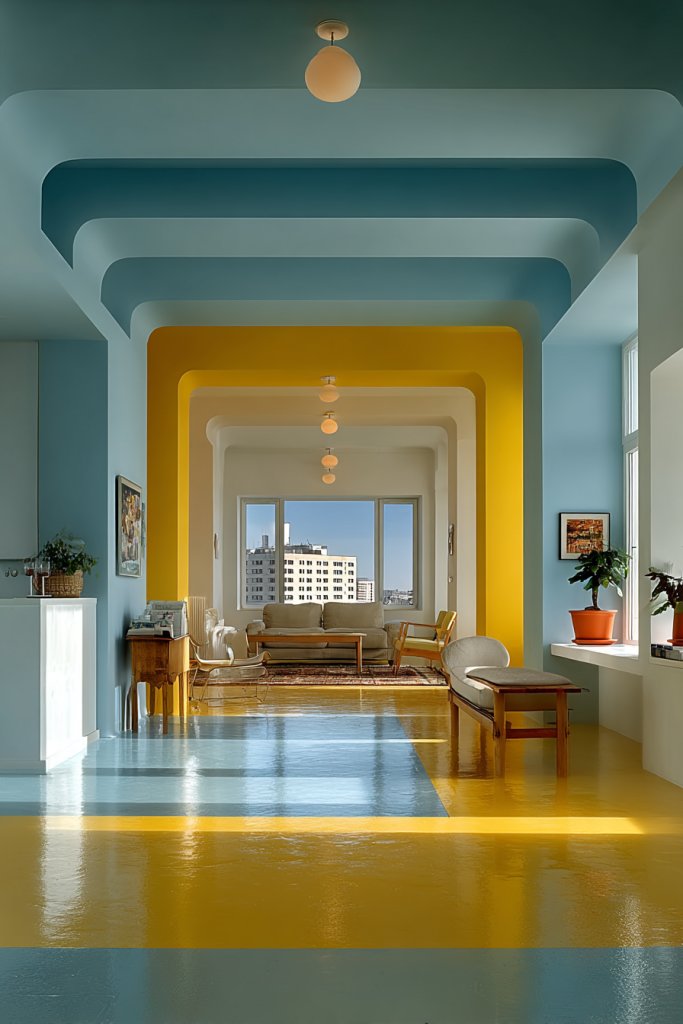
Feeling like your open-plan space lacks definition? Painting the ceiling in bold or pastel colors can visually separate zones without adding walls. It’s a creative way to add personality and color interest from above. If you love playful, unconventional decor, this idea will make your space uniquely yours.
Imagine a ceiling painted in a soft blush or deep navy, contrasting with neutral walls. The color draws attention upward, creating a sense of depth and dimension. In a living area, it can define the seating zone; in a kitchen, it highlights the cooking space. When paired with matching accents or textiles, the colored ceiling ties the room together beautifully.
Use different colors for different zones or create a gradient effect for a subtle transition. Matte finishes work well for a sophisticated look, while gloss adds vibrancy. You can also experiment with stencils or patterns for added visual interest. Seasonal or thematic color schemes allow you to refresh the space periodically.
Start by choosing a high-quality ceiling paint suitable for your surface. Prepare the ceiling by cleaning and priming. Use painter’s tape to outline sections or create geometric patterns. Apply multiple coats for even coverage, ensuring no drips or streaks. Finish with a clear sealer if needed, and carefully remove tape for sharp lines. Consider adding subtle lighting to enhance the color’s impact.
Coordinate ceiling colors with accent walls or furniture for a cohesive look. Use lighting to emphasize different zones—dimmable LEDs or spotlights work well. Add decorative trims or borders in complementary shades for a polished appearance. Your personalized color scheme can evolve with your style or seasons.
Colorful ceilings are an easy, bold way to reinvent your space and express your personality. They add visual interest and help define areas in open layouts. Once done, you’ll enjoy a room that feels lively and thoughtfully curated. Go ahead—make your ceiling a canvas for your creativity!
16. Faux Skylights Using Recessed Lighting and Mirrors
Wish you could bring natural light into dark or windowless rooms? Faux skylights create the illusion of sunlight using clever lighting and reflective surfaces. It’s a cost-effective way to brighten your space and add an airy, open feel. If natural light is limited, this idea can make a big difference.
Imagine a ceiling with recessed lighting paired with strategically placed mirrors or reflective panels. The light bounces off these surfaces, mimicking sunlight streaming through a skylight. The effect can be enhanced with textured or patterned panels that resemble the sky or clouds. The room instantly feels brighter, more spacious, and connected to the outdoors.
Use different mirror shapes—rectangular, oval, or custom cloud-like designs—to suit your decor. Combine with warm or cool LED lighting for different moods. Incorporate textured or frosted glass panels for diffused light effects. Seasonal accents like faux clouds or sky murals can add an extra creative touch. This solution adapts well in bathrooms, basements, or interior hallways.
Install reflective panels or large mirrors flush with the ceiling, ensuring secure mounting and alignment. Position recessed lights to maximize light reflection and distribution. Use dimmable LED fixtures to control brightness and mood. For textured panels, apply faux sky murals or cloud decals for added realism. Regular cleaning and maintenance keep the reflective surfaces bright and effective.
Personalize with seasonal sky murals or cloud decals to change the look throughout the year. Use colored lighting to simulate sunrise or sunset effects. Add decorative trims or framing to enhance the illusion. Incorporate small, hidden vents or speakers for a complete sensory experience that feels natural and immersive.
Faux skylights are a smart, stylish way to brighten dark spaces without windows. They create a sense of openness and connection to nature, boosting your mood. With simple materials and some planning, you can achieve a convincing, uplifting effect. Brighten your home’s interior with this clever illusion!
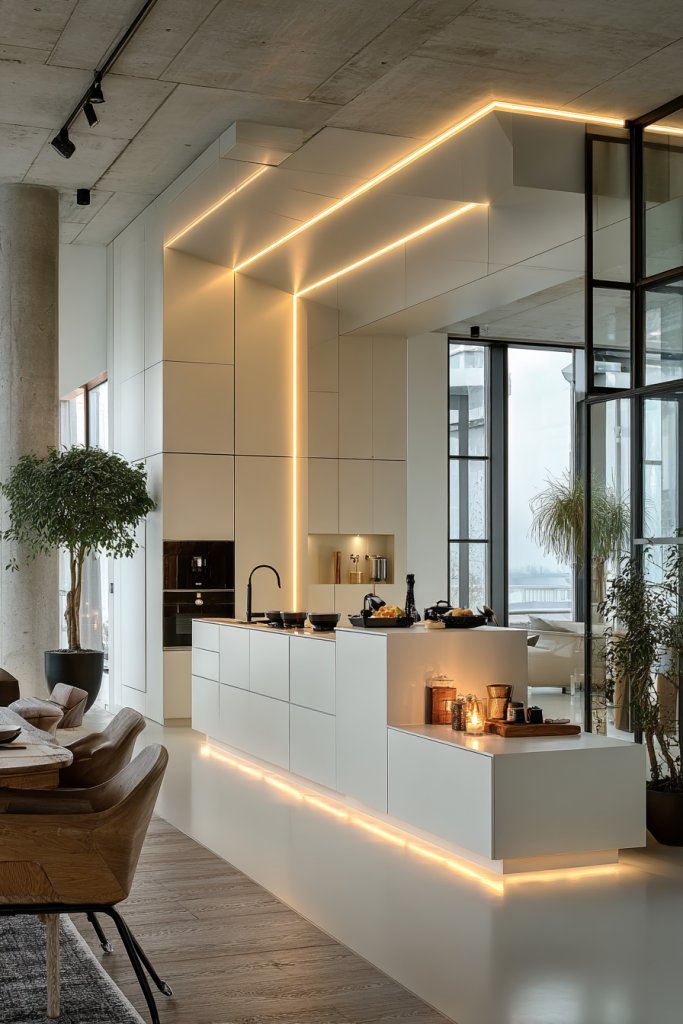
17. Minimalist White Ceilings with Hidden LED Lining
Are your ceilings feeling dull and uninspired? A clean, white ceiling with hidden LED lighting offers a sleek, modern look that’s both functional and stylish. It creates a bright, airy atmosphere while keeping the space feeling uncluttered. If you crave simplicity with a subtle glow, this is your ideal update.
Imagine a pristine white ceiling with concealed LED strips lining the edges or hidden within coves. When turned on, the soft, diffuse light creates an even glow that subtly illuminates the room without harsh shadows. The minimalist aesthetic ensures the ceiling blends seamlessly into your decor, making your space appear larger and more open.
Use warm or cool white LEDs depending on your mood. Incorporate dimmable controls for adjustable ambiance. The LED strips can be hidden behind crown molding, false ceilings, or within architectural coves. For added interest, include subtle textured finishes or micro-patterns on the ceiling surface, remaining true to the minimalist theme.
Begin by planning the placement of LED strips within your ceiling architecture. Install a false ceiling or coves if necessary for concealment. Run wiring discreetly through ceiling cavities or behind moldings. Attach LED strips securely, ensuring even coverage. Connect to dimmers or smart controls for versatility. Finish with a smooth, white paint or plaster surface that complements the lighting setup.
Adjust color temperatures to suit different times of day or occasions. Synchronize with smart home systems for automated lighting scenes. Add decorative trims or molding that emphasizes clean lines. Keep the rest of your decor minimal to allow the lighting effect to shine and create a peaceful, uncluttered vibe.
A minimalist white ceiling with hidden lighting elevates your space into a sleek, modern retreat. It’s a timeless look that adapts easily to any decor style. Once installed, it provides a soft, uniform glow that enhances your room’s overall ambiance. Embrace the simplicity and enjoy the sophisticated upgrade!
18. Artistic 3D Wall Panels Extending to the Ceiling
Want to add a wow factor that’s both artistic and modern? 3D wall panels that extend seamlessly onto the ceiling create a unified, textured statement. They bring depth and dimension to flat surfaces, transforming bland rooms into visual masterpieces. If you love bold, tactile design, this idea will inspire you.
Visualize intricate, sculptural panels with geometric, abstract, or organic patterns flowing from walls onto ceilings. The three-dimensional surface creates shadows and highlights that change with the light, adding dynamism. When illuminated with directional or accent lighting, the textures pop, making your space feel alive and engaging. The overall aesthetic is contemporary and artistic.
Choose from materials like MDF, PVC, or fiber-reinforced panels, depending on your budget and style. Opt for monochrome tones for a sleek look or vibrant colors for a playful vibe. Mix panel patterns or combine with smooth surfaces for contrast. This approach suits modern, eclectic, or artistic interiors, adaptable to any room.
Design your panel layout, ensuring the seamless flow from wall to ceiling. Attach panels with adhesive or mounting brackets, making sure they are aligned and level. Use directional lighting or spotlights to highlight the textures. Finish edges with trims or paint for a cohesive appearance. Regular cleaning and dusting will keep the surfaces looking sharp.
Personalize with painted accents, metallic finishes, or embedded LED lighting within the panels. Incorporate your favorite colors or themes to reflect your personality. Use lighting strategically to emphasize the textures and create mood. Complement with minimal decor that allows the panels to be the focal point.
3D wall-to-ceiling panels turn ordinary surfaces into captivating art pieces, elevating your interiors. They combine artistry with texture, making your home uniquely yours. With careful planning, you can achieve a professional look that’s both bold and elegant. Ready to transform your space into a gallery?
19. Color-Blocked Ceilings for Dynamic Visual Interest
Feeling like your space needs a fresh, modern twist? Color-blocking your ceiling creates striking visual interest and helps define different zones in open plans. It’s a bold, playful way to add personality without cluttering the walls. If you love contemporary design, this idea will energize your room.
Imagine dividing your ceiling into sections painted in contrasting shades—deep navy and crisp white, or vibrant coral and soft pastel. The blocks add depth and dimension, drawing the eye upward. When paired with coordinated decor and lighting, the color blocks create a cohesive, dynamic environment. The visual impact is immediate and memorable.
Vary the size and shape of the blocks—square, rectangular, or irregular—for a personalized look. Use matte or satin finishes depending on your preferred vibe. You can also incorporate textured paint or patterns within each block for added intrigue. Seasonal or thematic color schemes keep the space lively and fresh.
Begin by sketching your design and marking the ceiling with painter’s tape. Use high-quality ceiling paint for clean, crisp lines. Apply multiple coats for even color, and remove tape carefully to maintain sharp edges. Use lighting to highlight the color divisions—spotlights or LED strips work well. Consider adding a clear protective coat for durability.
Coordinate the ceiling colors with wall decor and furnishings for a harmonious look. Use dimmable lighting to adjust the ambiance and enhance the color effects. Incorporate metallic or gloss accents in certain blocks for a luxe touch. Personal touches like monograms or custom motifs can be painted into the blocks.
Color-blocked ceilings are a bold yet adaptable way to showcase your style. They add energy and personality, transforming your room into a vibrant haven. With some planning, you can create a design that’s both fun and sophisticated. Stand out with a ceiling that truly reflects your personality!
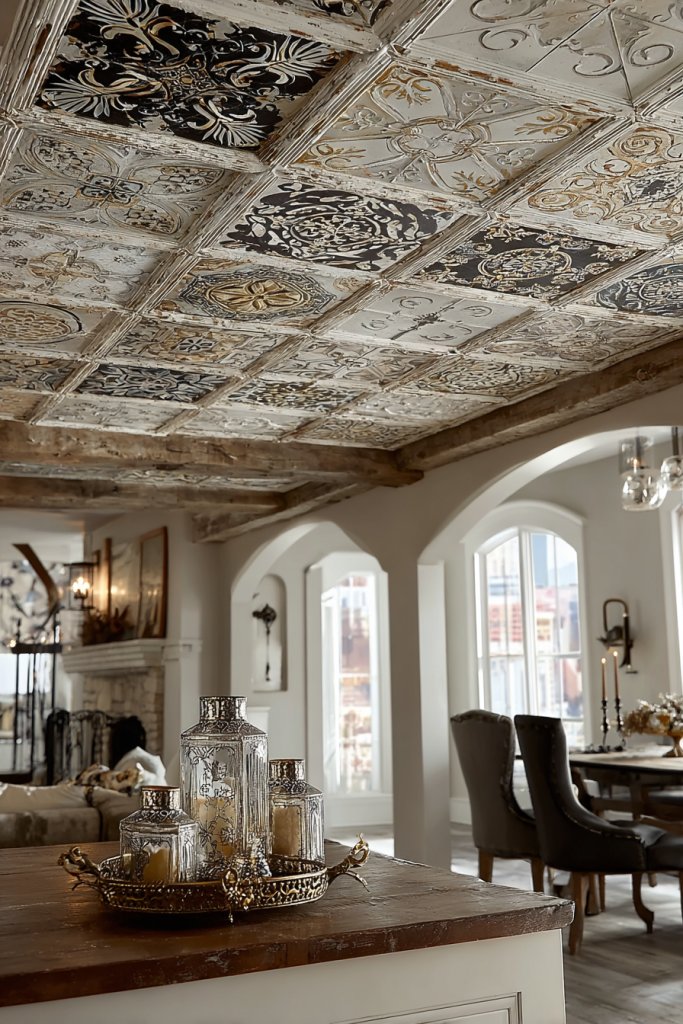
20. Vintage Tin Ceiling Tiles for Classic Character
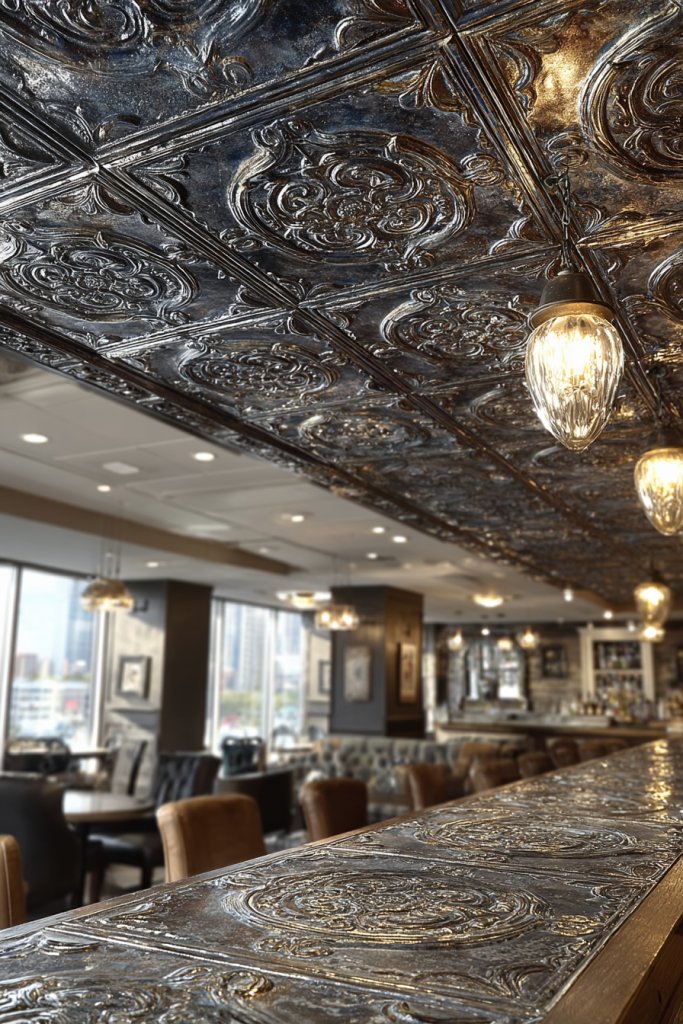
Looking to add timeless charm and intricate detail? Vintage tin ceiling tiles exude classic elegance and craftsmanship. They’re perfect for recreating a historic or vintage vibe and can instantly elevate your decor. If you love ornate, decorative touches, this idea will make your ceiling a highlight.
Visualize embossed tin tiles with floral, geometric, or Victorian patterns arranged across your ceiling. The metallic surface reflects ambient light, adding a subtle shimmer and texture. When paired with warm lighting and antique-inspired furnishings, the overall aesthetic is nostalgic yet refined. It’s like stepping back in time with a modern twist.
Choose from a variety of patterns and finishes—brass, pewter, or painted finishes—to suit your style. You can cover the entire ceiling or create a framed section for emphasis. Complement with vintage light fixtures or ornate moldings. Seasonal accents like painted motifs or faux aging effects can refresh the look.
Start by measuring your ceiling and selecting compatible tiles. Prepare the surface by cleaning and smoothing it out. Attach the tiles with adhesive or nails, aligning patterns carefully. Seal edges with decorative trim or molding for a finished look. Pair with vintage or antique light fixtures to enhance the period feel. Regular cleaning maintains the intricate details.
Add color accents or metallic finishes to customize the tiles. Incorporate decorative moldings or trims that match the vintage style. Use warm lighting to highlight the embossed patterns. Personal touches like painted motifs or monograms make the ceiling unique to your home. This classic detail adds character and history.
Vintage tin ceiling tiles bring timeless elegance and craftsmanship to your home. They create a decorative ceiling that’s both nostalgic and stylish, adding value and charm. With proper installation and care, they’ll remain a stunning feature for years. Embrace this classic upgrade and enjoy the character it adds!
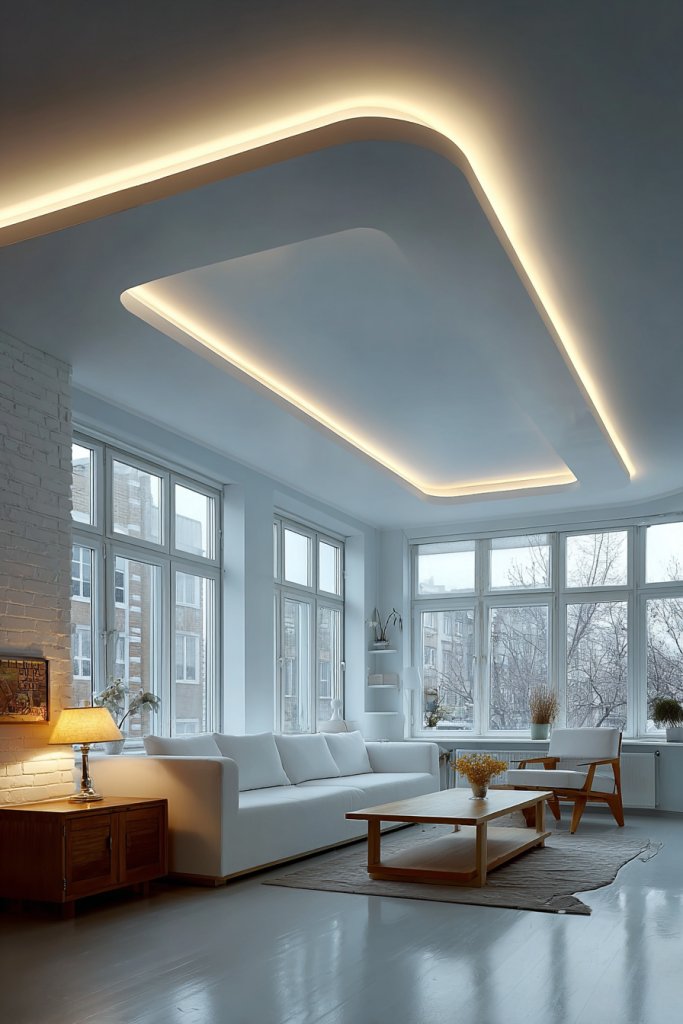
21. Floating Ceiling with Concealed Storage or Lighting
Want a ceiling that’s both stylish and functional? A floating ceiling with concealed storage or lighting combines sleek design with practical innovation. It creates a modern, minimalist look while hiding clutter or providing subtle illumination. If you love smart, space-saving ideas, this will impress you.
Imagine a layered, suspended ceiling that appears to float just below the main ceiling plane. Hidden compartments or lights are seamlessly incorporated into the structure, offering clean lines and a clutter-free look. The concealed lighting provides a soft glow, subtly illuminating the space without overt fixtures. It’s a futuristic yet elegant design that makes your ceiling a feature.
Design the floating layer with materials like MDF, aluminum, or acrylic to suit your style. Use integrated LED strips or hidden downlights for ambient or task lighting. Concealed storage compartments can hold seasonal decor, accessories, or tech gadgets, keeping your space tidy. The design can be rectangular, circular, or irregular, depending on your aesthetic.
Create a suspended framework using metal or wood supports, ensuring stability and level installation. Install the storage or lighting components within the framework, making sure wiring and hardware are concealed. Finish with a sleek surface—paint, laminate, or textured panels—to match your decor. Finalize with soft, indirect lighting and test for even illumination and accessibility. Professional help is recommended for complex setups.
Add smart controls or dimmable LEDs to customize lighting scenes. Incorporate hidden compartments for personal or seasonal items, blending form and function. Use decorative trims or contrasting finishes to emphasize the floating effect. Personal touches like engraved handles or custom lighting effects personalize the space further.
A floating ceiling with concealed features elevates your home’s style while adding practical storage or subtle lighting. It’s an innovative upgrade that combines aesthetics with function, making your space smarter and sleeker. With some planning, you can achieve a cutting-edge look that’s both beautiful and useful. Embrace the future of ceiling design!
Conclusion
“conclusion”: “Exploring these diverse ceiling design ideas shows just how much potential there is to elevate your space with creative touches. Whether you prefer a minimalist look or something more dramatic, these ideas provide plenty of inspiration to bring your vision to life. Don’t hesitate—try out a new ceiling design and watch your room transform into a stunning showcase of style and personality. Your dream space is just one creative ceiling away!”

Post Comment