21 Kitchen Ideas for Small Spaces that Inspire Efficiency
Ever find yourself wishing your tiny kitchen could do more? Small spaces are often overlooked, but with the right ideas, they can become efficient and charming hubs in your home. Kitchen ideas for small spaces are gaining popularity because they show us how to maximize every inch with clever storage, smart layouts, and stylish touches that don’t compromise on function.
In this article, you’ll explore a variety of inventive tips and tricks designed to transform your compact kitchen into a practical and inviting space. From space-saving storage solutions to visually appealing design hacks, these ideas will inspire you to make the most of your small kitchen and turn it into a place you’ll love to cook and gather in.
1. Maximize Vertical Storage with Wall-mounted Shelves
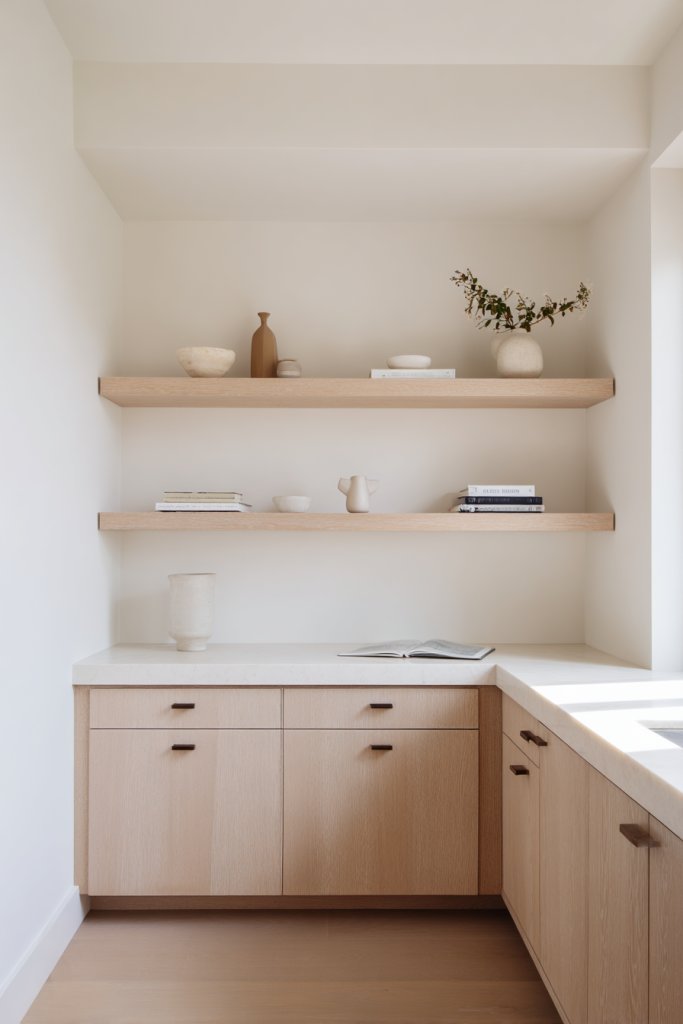
Small kitchens often feel overwhelming because there’s never enough space. Clutter piles up, and it becomes a constant battle to keep counters clear. Do you wish you could squeeze more storage without sacrificing style? Vertical storage offers a simple yet powerful solution to make your tiny kitchen feel more spacious and organized.
Imagine sleek, open shelves mounted high on the wall, lined with colorful containers and neatly stacked dishes. The shelves draw the eye upward, creating the illusion of height and openness. Soft natural light reflects off ceramic jars and textured textiles placed nearby, adding warmth and personality. The open design keeps everything within easy reach while freeing up valuable counter space.
You can customize wall-mounted shelves with different materials—wood for rustic charm or metal for an industrial vibe. For seasonal flair, swap out decorative containers or add small baskets for specific items like spices or utensils. In a rental, adhesive shelves work well without damaging walls. Tall, narrow shelves maximize vertical space in tight corners, while floating units suit modern aesthetics.
Start by measuring available wall space and selecting sturdy brackets or mounts. Choose open shelving units that hold your most-used items for quick access. Install at a height that suits your reach, keeping frequently used ingredients at eye level. Use wall anchors if attaching to drywall to ensure stability. Arrange items by category for easy retrieval—think matching jars for spices, and coordinating dishware. Regularly check mounting hardware to prevent accidents.
Add personality with colorful or textured shelf liners, and incorporate decorative storage bins that match your kitchen’s theme. Install under-shelf lighting to illuminate work areas and highlight your display. Use labels on jars for quick identification, or add small decorative accents like vintage signs or small art pieces on the shelves. This not only boosts functionality but makes your space uniquely yours.
Vertical storage transforms clutter into a curated display, giving your kitchen a fresh, organized look. It boosts confidence in your ability to manage small spaces stylishly. With a little effort, your kitchen will become more functional and inviting. Remember, smart storage solutions are a key trend in modern home design, proving that less can truly be more.
2. Incorporate Multi-functional Furniture Pieces
Limited space often forces you to choose between style and practicality. Wouldn’t it be great if one piece of furniture could serve multiple purposes? Multi-functional furniture is the perfect hack to maximize your small kitchen’s potential without sacrificing aesthetics or convenience. It’s like having your cake and eating it too, but for your tiny space.
Picture a compact island that doubles as a storage container, with drawers filled with utensils or pantry items. Think of a fold-down countertop that folds away when not in use, revealing extra space for other tasks. These pieces feature sleek, minimalist designs that blend seamlessly into your decor. Materials range from warm wood finishes to modern laminates, creating a cozy yet functional vibe.
Choose furniture that adapts to your lifestyle—like a rolling cart that can serve as a prep station or extra storage. In small apartments, a wall-mounted fold-out desk provides workspace without cluttering the floor. For larger kitchens, extendable tables offer flexibility for entertaining or daily use. Decorate with colorful cushions or covers to match your style, and swap out hardware for a fresh look.
Start by assessing your space and identifying your biggest needs—extra prep area, storage, or seating. Look for pieces with hidden compartments or collapsible features. Invest in quality that can withstand daily use, especially for frequently used surfaces. Mount fold-down tables or desks securely to walls, ensuring proper anchors. Use portable carts with lockable wheels for easy repositioning, and choose designs with durable finishes for longevity. Regularly clean and inspect moving parts.
Personalize with colorful fabrics, stylish hardware, or decorative stickers on your furniture. Add a small cushion or throw blanket to make seating more inviting. Incorporate modular pieces that you can rearrange as your needs evolve. Use decorative trays or baskets on rolling carts for added organization. This flexibility allows your space to adapt over time while reflecting your personality.
Multi-functional furniture turns tiny spaces into versatile zones, making your home feel larger and more livable. It proves that clever design can overcome space limitations and boost your confidence as a DIY decorator. With just a few smart choices, your kitchen becomes a stylish hub of efficiency and comfort. It’s all about working smarter, not harder.
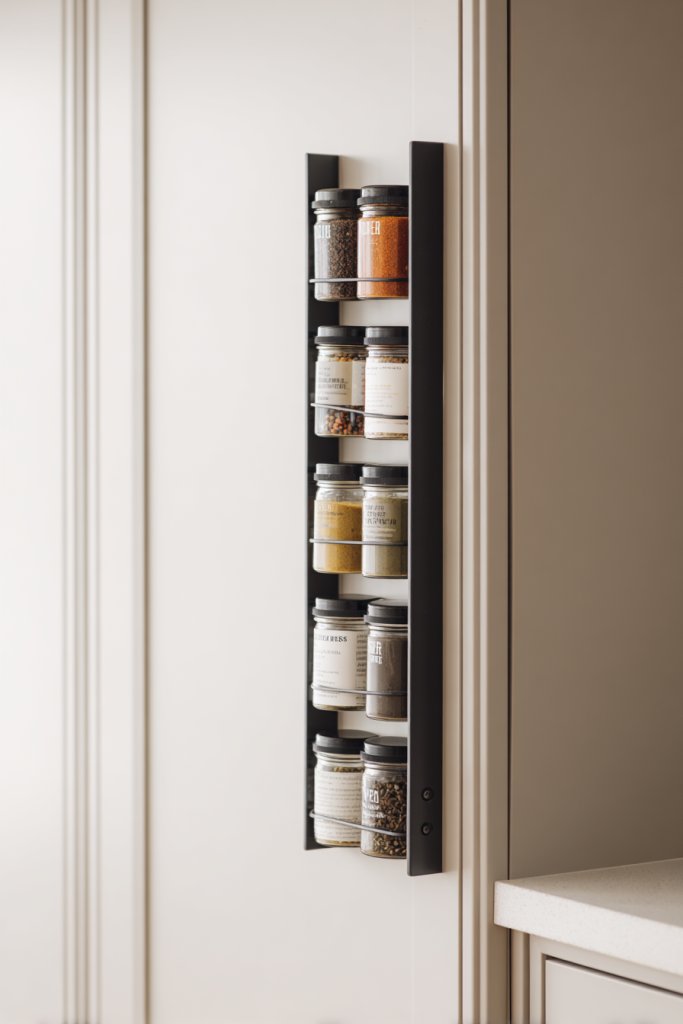
3. Install Over-the-Door Organizers for Small Items
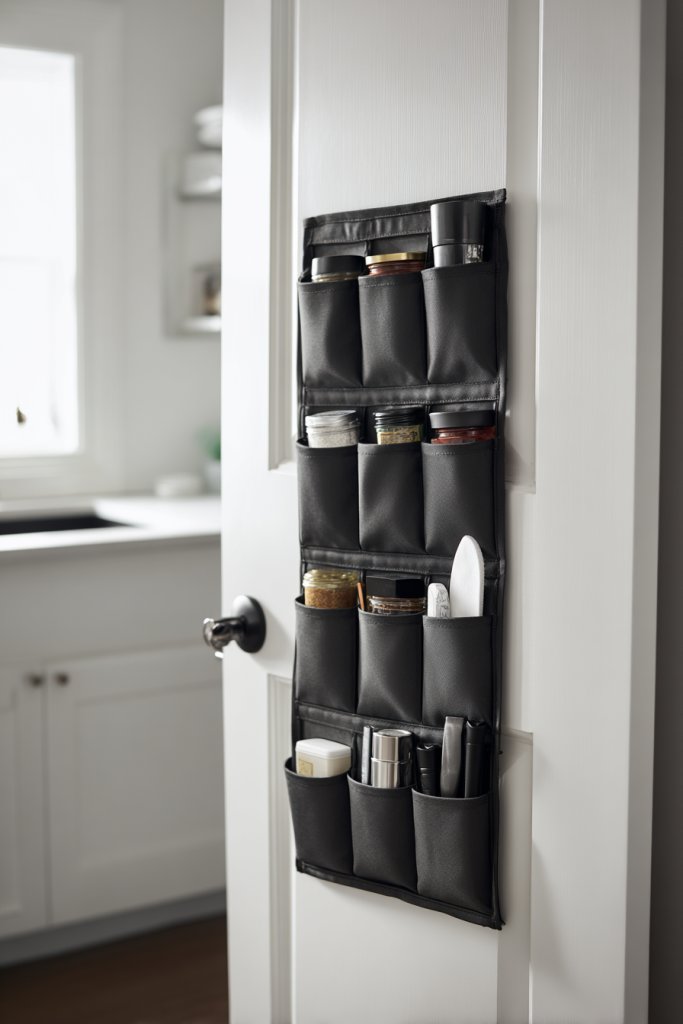
Cluttered countertops and jam-packed cabinets make small kitchens feel chaotic. Ever wish there was a secret space to store spices, utensils, or cleaning supplies? Over-the-door organizers are the sneaky solution to free up precious space and keep your essentials within arm’s reach. They’re like hidden treasure chests for your kitchen gear.
Visualize a sleek rack hung inside a pantry or cabinet door, holding spice jars in perfect alignment. Hooks underneath hold utensils or cleaning tools, all organized and visible at a glance. The door itself becomes a functional display, with labels or color-coded containers adding personality. This setup keeps clutter off counters and makes everything easy to find without rummaging.
Choose from fabric pockets, wire racks, or plastic bins depending on your needs. Use clear containers for ingredients or small gadgets, and label each pocket for quick identification. For a more decorative touch, select organizers with colorful trims or patterns that match your kitchen theme. In rental spaces, adhesive hooks or removable strips make installation damage-free. Adjust the size and number of pockets based on your collection of small items.
Begin by measuring your door’s dimensions and selecting an organizer that fits snugly without obstructing hinges or handles. Install hooks or adhesive strips securely, following manufacturer instructions. Organize items by frequency of use—most-used items at the top, less frequent ones lower down. Use small baskets or containers within the pockets for tiny items like bottle openers or measuring spoons. Regularly tidy and rotate items to prevent clutter buildup.
Personalize by adding decorative labels or using colored baskets that complement your decor. You can hang small decorative charms or tags for easy identification. Incorporate scent sachets or fabric softeners in fabric pockets for a fresh smell. Swap out organizers seasonally to keep the storage feeling fresh and aligned with your style.
Over-the-door organizers are a game-changer for small kitchens, turning wasted space into valuable storage. They boost your confidence in keeping things tidy and accessible. With minimal effort, you create a more functional and stylish environment. Remember, smart organization is the secret to making tiny spaces work for you.
4. Use Clear, Stackable Containers for Pantry Organization
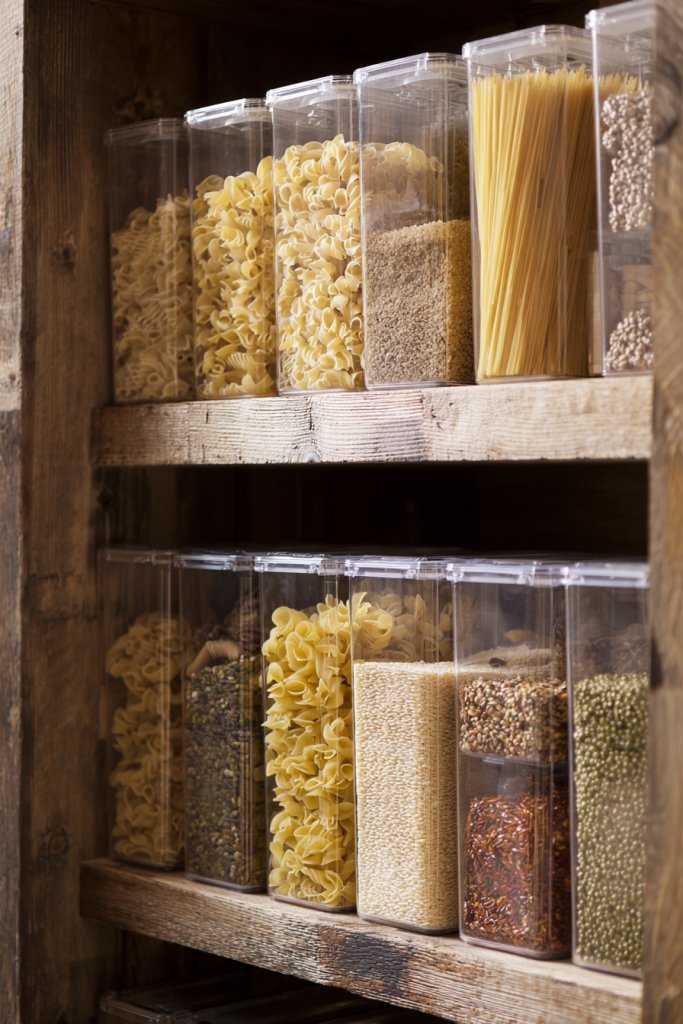
Nothing’s more frustrating than hunting for that bag of rice or a specific spice in a cluttered pantry. Clear, stackable containers promise a quick, satisfying solution to keep everything visible and neat. They’re the secret weapon to transforming chaos into order, making meal prep less stressful.
Envision a series of uniform, transparent jars lined up on a shelf, each labeled with crisp, modern tags. The clear plastic or glass lets you see exactly what’s inside, so you never buy duplicates or run out unexpectedly. Stacked efficiently, these containers maximize vertical space and create a streamlined, cohesive look that invites you to cook with confidence.
Choose from various shapes and sizes—wide-mouth jars for grains, tall cylinders for pasta, or small containers for spices. Decorate labels with stylish fonts or add color-coded caps for quick identification. For seasonal or special items, use decorative tins or vintage-style containers to add charm. Modular stacking options help tailor your pantry to your specific needs, whether in a small cabinet or a walk-in.
Start by emptying your pantry and sorting items into categories. Purchase uniform containers with airtight seals to keep food fresh longer. Label each container with a clear, bold font—either handwritten or printed for a polished look. Use a ruler or level to ensure labels are straight and containers are aligned. Stack containers carefully to prevent tipping, and place frequently used items at eye level. Regularly review and toss expired items for ongoing freshness.
Add decorative touches like patterned labels or chalkboard tags for a rustic vibe. Incorporate small risers or shelf inserts to make accessing items easier. Use colorful or themed containers to match your kitchen decor. Consider investing in a label maker for a clean, uniform appearance, and update labels seasonally for a fresh look. Personal touches make pantry organization both functional and fun.
Organized pantries boost confidence and turn cooking into a more enjoyable experience. Clear containers mean no more surprises or last-minute grocery runs. It’s satisfying to see everything at a glance and know exactly what you have. Small changes like this prove that even tiny spaces can be transformed into efficient, beautiful storage zones.
5. Create a Compact Coffee Station or Beverage Nook
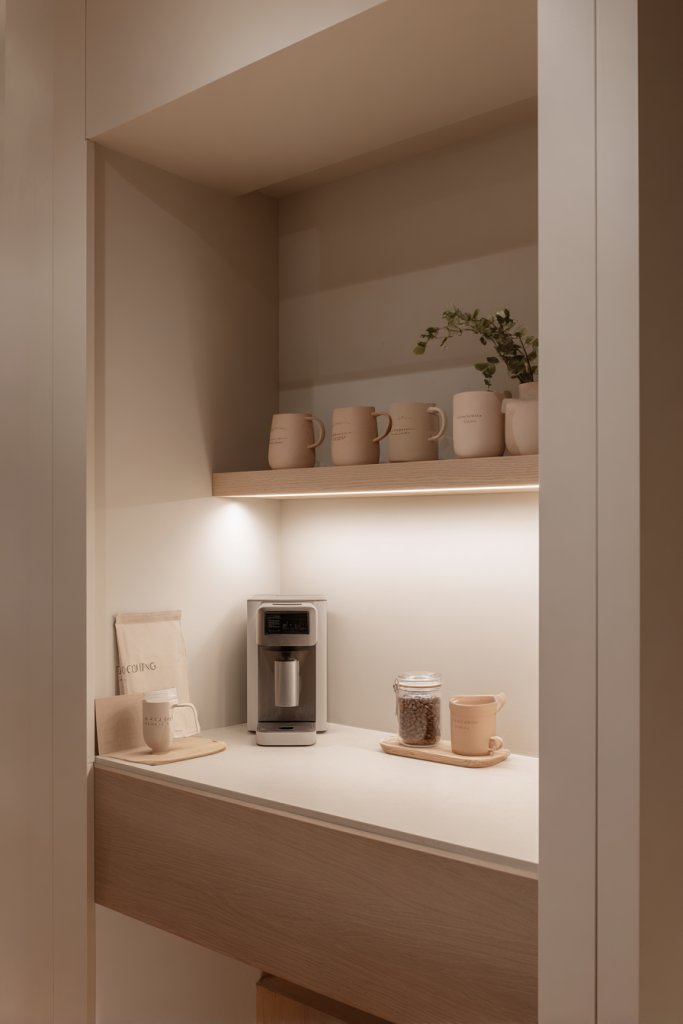
Starting your day with a quick coffee ritual can feel chaotic if your kitchen counter is cluttered. Wouldn’t it be nice to have a dedicated, organized spot for your morning brew? A compact beverage nook keeps everything you need within reach without sacrificing valuable counter space. Plus, it adds a cozy, personalized touch to your small kitchen.
Picture a small corner with a wall-mounted shelf holding your favorite mugs and a sleek coffee maker. Nearby, a narrow tray holds sugar, stirrers, and small jars of spices or flavorings. Hooks beneath the shelf hang your mugs, while a small basket stores reusable stirrers or napkins. Soft lighting and a textured wall behind create a warm, inviting atmosphere that makes every morning special.
Use floating shelves, countertop caddies, or wall-mounted racks depending on space. Incorporate decorative elements like a soft fabric mat or a textured wall panel for visual interest. For seasonal variation, swap out mugs or add themed accessories. For tiny kitchens, consider a fold-out shelf or a slim cart that can be tucked away when not in use, maintaining a clutter-free space.
Choose a dedicated corner or wall space that’s easy to access. Install a small floating shelf or a slim wall-mounted unit to hold mugs and essentials. Use small containers or jars to organize sugar, creamer, and flavorings, keeping them together for convenience. Hang hooks underneath for mugs or utensils. Keep the setup simple and clutter-free by choosing compact appliances and storage solutions that blend with your decor.
Add a decorative tray or woven basket to contain loose items, and incorporate a small plant or decorative element (not restricted items) to add personality. Use labeled jars or cups to make everything look cohesive and tidy. Personalize with themed mugs or a chalkboard label for daily specials or reminders. Change accessories seasonally to keep the station fresh and inviting.
A dedicated coffee nook makes mornings smoother and your space more charming. It shows that even small kitchens can have special zones that boost daily routines. With a little effort, you turn an ordinary corner into a delightful, functional spot. It’s proof that smart organization and a personal touch go a long way.
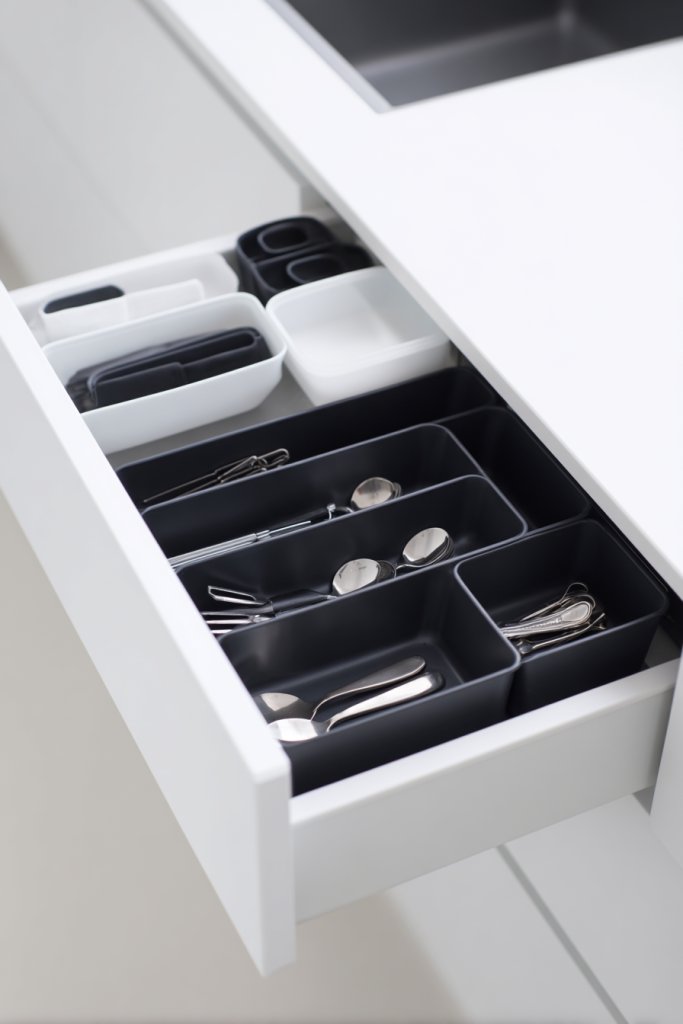
6. Implement Pull-Out Drawer Dividers
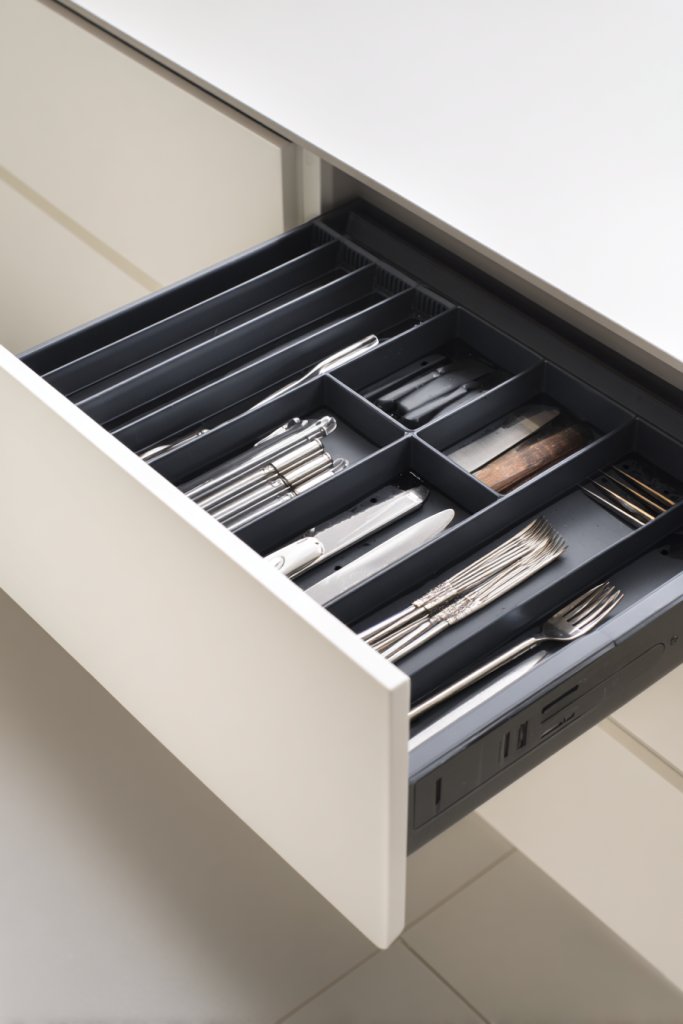
Messy drawers full of utensils, notepads, or cleaning supplies are a common small kitchen nightmare. Wouldn’t it be great if everything had its place and you could find it at a glance? Pull-out drawer dividers are the ultimate organizational hack to keep small items tidy and accessible. No more digging through clutter—just smooth, easy access.
Visualize a deep drawer neatly segmented with adjustable dividers, each slot filled with measuring spoons, knives, or cleaning tools. The dividers slide smoothly, keeping everything separated and easy to find. When you pull out the drawer, each item is perfectly organized, like a well-arranged toolbox. The sleek design enhances the overall look of your kitchen, making storage feel intentional and tidy.
Opt for adjustable or expandable dividers to customize your space. Use colorful or textured materials for a more decorative touch, or go minimalist with clear plastic. For small drawers, prioritize thin, space-saving dividers; for larger drawers, opt for wider, more robust options. Incorporate labels or color coding for quick identification, especially for frequently used items. These dividers work well in utensil drawers, spice drawers, or even cleaning supply bins.
Start by removing everything from your drawer and assessing what needs organizing. Measure the interior dimensions and select dividers that fit snugly without crowding. Install or assemble the dividers according to manufacturer instructions, adjusting for the best fit. Group similar items together—think all your measuring spoons, then all your knives. Place the most used items at the front for quick access, and regularly tidy to maintain order. Upgrade to modular systems if your needs change.
Personalize by choosing dividers with attractive finishes or colors that match your decor. Use small labels or icons for different categories, making it even easier to find what you need. Incorporate small containers within larger sections for tiny items like clips or rubber bands. Keep spare dividers on hand for future adjustments and seasonal reorganization. The result is a sleek, customized storage system that makes your life easier.
Pull-out drawer dividers turn cluttered drawers into organized showcases, saving time and reducing frustration. They boost your confidence in managing small spaces and show that smart storage solutions are within reach. With tidy drawers, you’ll feel more in control and ready to tackle any cooking challenge. Small changes like this can dramatically improve your kitchen’s functionality and vibe.
7. Hang Pot Racks or Hooks for Cooking Utensils
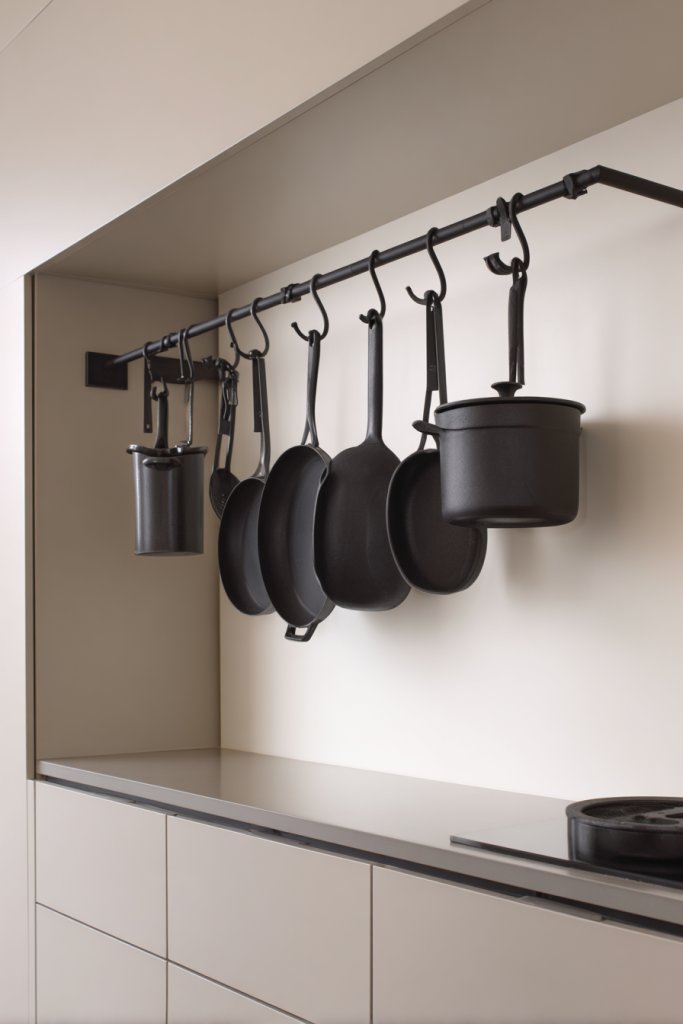
Counter space is precious, and cluttered drawers can make cooking feel like a scavenger hunt. Ever considered suspending your pots, pans, or utensils for instant access? Hanging racks and hooks free up drawer space and add a touch of industrial charm. Plus, they keep your most-used tools within easy reach, making cooking faster and more enjoyable.
Imagine a sleek metal pot rack mounted above your stove, with pots and pans hanging in perfect alignment. Hooks hold spatulas, ladles, or whisks, all organized and visible. The open display introduces a restaurant-inspired vibe, with shiny cookware reflecting ambient light. The setup not only saves space but also creates a dynamic, functional focal point that adds character to your kitchen.
Choose between ceiling-mounted racks, wall-mounted rails, or free-standing models based on your ceiling height and wall space. Use decorative hooks or painted metal for a personalized look. For small kitchens, opt for compact, multi-tier racks that maximize vertical space without overwhelming the room. Mix and match materials—wood for warmth, metal for a modern edge—to suit your style. Seasonal swaps of cookware can refresh the look easily.
Identify a sturdy wall or ceiling point near your stove or prep area for installation. Use appropriate anchors and hardware for secure mounting—avoid cheap hooks that might bend or fall. Arrange your cookware systematically—heavy pots at the bottom, lighter utensils higher up. Keep frequently used items at eye level for quick access. Regularly clean and inspect the hardware to ensure safety and longevity. Consider hooks with decorative finishes for added style.
Add decorative touches like colorful silicone grips or custom-painted hooks to match your decor. Use labeled containers or small baskets underneath for additional storage. Incorporate a few stylish accents like a vintage kettle or colorful utensils to inject personality. Change out hooks seasonally or for special occasions to keep the setup fresh. This approach turns a simple storage idea into a statement piece.
Hanging your cookware not only saves space but also elevates your cooking environment’s vibe. It shows that small kitchens can be both practical and stylish. With everything organized and within reach, you’ll cook more confidently and efficiently. Remember, a well-designed kitchen reflects a well-organized mind—so start hanging!
8. Use Corner Shelves to Optimize Dead Spaces
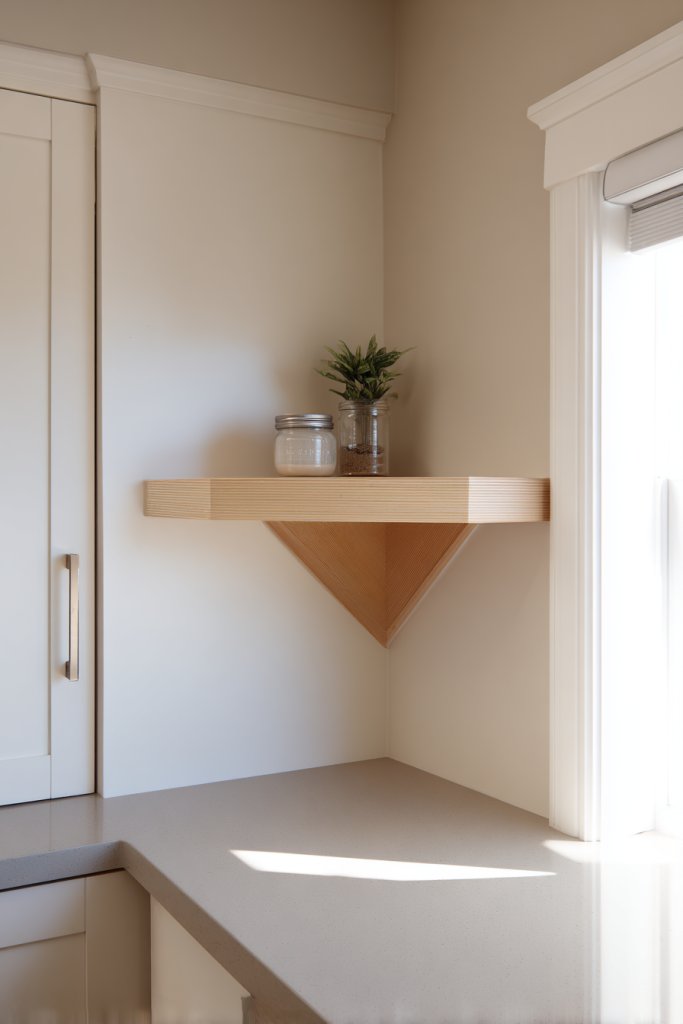
Corners in small kitchens are often wasted zones that collect dust and clutter. Wouldn’t it be brilliant to turn these awkward spaces into functional storage? Corner shelves are the perfect fix, transforming dead space into prime real estate. They make your kitchen look more cohesive and maximize every inch of your limited footprint.
Picture a stylish triangular shelf snugly fitted into a corner, holding spice jars, small appliances, or decorative jars. The shelves add architectural interest with their clean lines and varied materials—like wood, metal, or glass—matching your style. Items are easily accessible without crowding the main counters. The layered effect creates depth and visual appeal, making the space feel thoughtfully designed.
Choose from modular corner units, tiered shelves, or floating triangular panels. Use baskets or small containers for organization, or display decorative items that add personality. In small apartments, compact corner shelves fit perfectly into tight spaces. For a rustic look, opt for reclaimed wood, or go sleek with glossy lacquered finishes for a modern vibe. Seasonal accessories or color schemes can change the mood easily.
Measure your corner space carefully and select shelves that fit precisely without obstructing doorways or windows. Mount with appropriate hardware—brackets for heavier items or adhesive strips for lighter loads. Organize items logically: spices at eye level, small gadgets in baskets. Use labels or color coding to keep everything neat. Regularly check stability and adjust as needed to maintain safety and aesthetic balance. Consider adding soft lighting underneath for nighttime visibility.
Add decorative touches such as patterned fabric liners or small LED lights for ambiance. Use themed containers or jars that match your decor to elevate the look. Incorporate small plants or decorative stones for a natural touch (avoiding restricted items). Change accessories seasonally or for different occasions, keeping the space lively and engaging. Customize the arrangement to suit your cooking habits and style.
Corner shelves unlock hidden potential in small kitchens, making storage both practical and stylish. They help create a more open, organized space that feels less cramped. With a little effort, you can turn an overlooked area into a focal point of design and functionality. Confidence grows as you see how small tweaks can dramatically improve your daily routine.
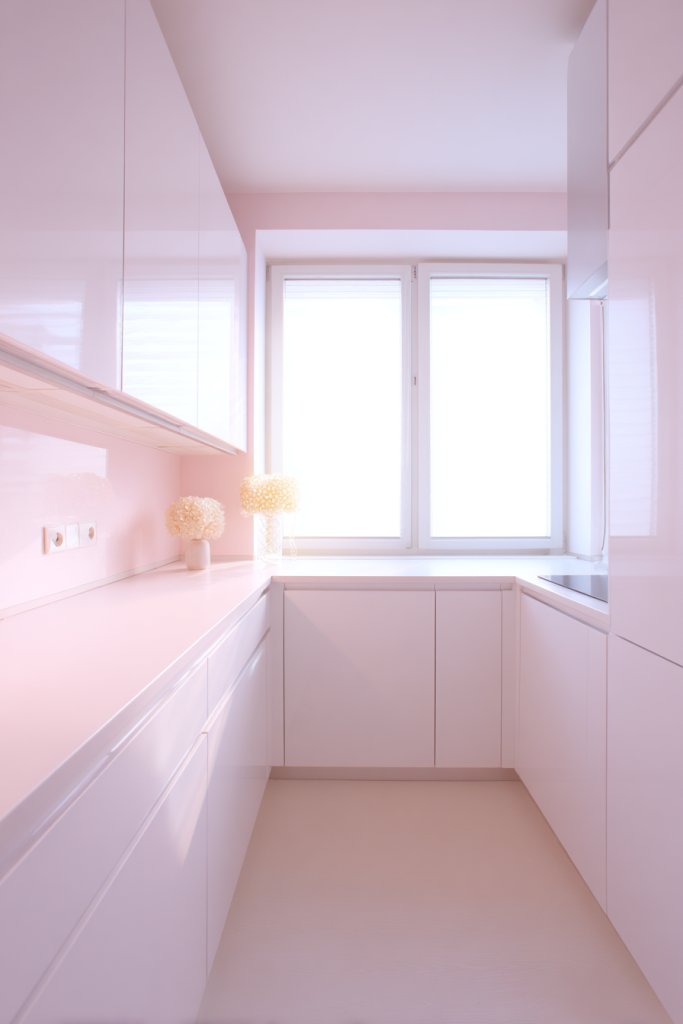
9. Opt for Light, Reflective Color Palettes
Dark, cramped kitchens can drain your energy and make cooking feel like a chore. Wouldn’t it be fantastic to make your space feel larger and more inviting instantly? Light, reflective colors are your secret weapon to brighten up even the tiniest kitchens. They create an airy, fresh vibe that boosts mood and productivity.
Visualize a kitchen painted in soft whites and pale grays, with glossy cabinets and a marble backsplash that reflects light beautifully. The reflective surfaces bounce natural and artificial light around, making the room appear more expansive. Textured textiles, like a linen curtain or a subtle patterned rug, add depth without overwhelming. The overall effect is a space that feels open, clean, and calming.
Choose pastel shades, whites, or light neutrals for walls, cabinets, and backsplashes. Use glossy or semi-gloss finishes to maximize reflectivity. Incorporate metallic accents—like brushed nickel or chrome hardware—to catch and reflect light subtly. For a cozy feel, add textured textiles like a soft cream throw blanket with chunky knit texture or plush cushions. Seasonal accents like light-colored ceramics or pastel accessories keep the look fresh.
Start by selecting a light color palette that complements your existing decor. Paint walls and cabinets with high-gloss or semi-gloss finishes for maximum reflection. Use reflective surfaces like glass or ceramic tiles for backsplashes or countertops. Incorporate lighting that enhances brightness—LED strips under cabinets or recessed ceiling lights. Avoid dark or matte finishes that absorb light, and keep clutter minimal to preserve the airy feel. Regularly clean surfaces to maintain their reflective quality.
Introduce personal touches with light-colored textiles, decorative panels, or subtle metallic accents. Use mirrors strategically to bounce light into shadowy corners. Incorporate seasonal decor in pastel shades or metallics to stay current. Keep accessories minimal but impactful—think sleek containers, light-colored ceramics, or soft textiles—avoiding visual clutter. This approach keeps your kitchen feeling spacious and welcoming year-round.
A light, reflective palette transforms your tiny kitchen into a bright, inviting space that feels larger and more comfortable. It proves that color choice has a powerful impact on perception, boosting confidence in your design choices. With a few easy updates, you’ll enjoy a fresh, contemporary look that encourages you to cook and entertain more often. Brighten your space, brighten your day.
10. Incorporate Slim, Space-saving Appliances
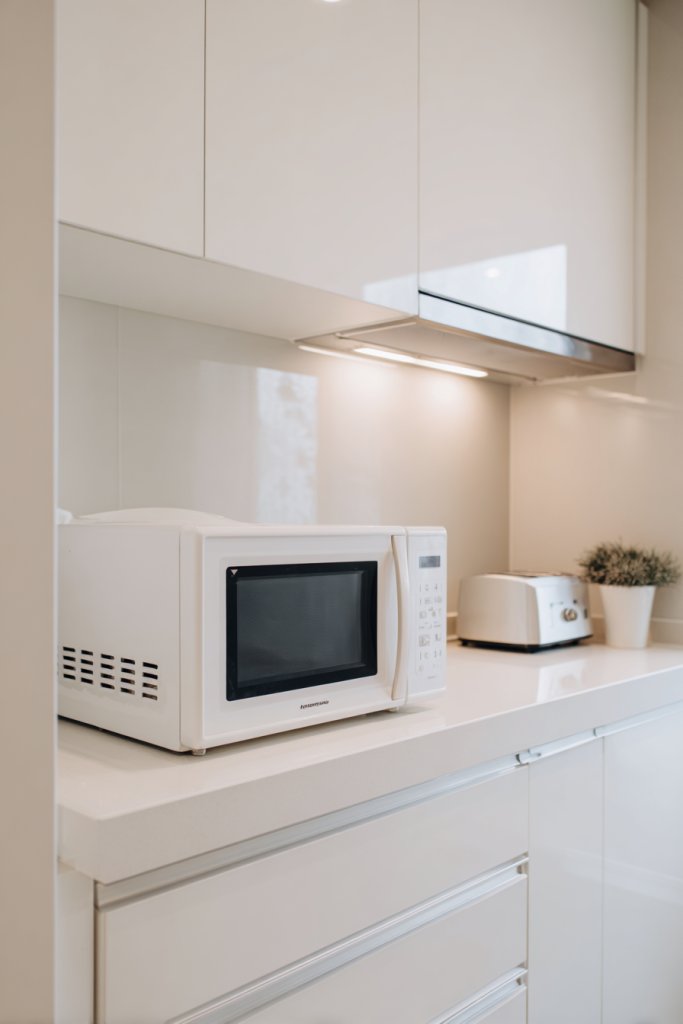
Small kitchens are often choked with bulky appliances that take up precious space. Ever wish your microwave or toaster could hide away when not in use? Slim, space-saving appliances are a lifesaver, offering functionality without sacrificing valuable counter space. They make your kitchen look cleaner and feel more open.
Imagine a sleek, narrow microwave installed inside a shallow cabinet or a compact toaster tucked into a pull-out tray. These appliances have minimalist designs with smooth, flat surfaces and muted colors that blend seamlessly into your cabinetry. When not in use, they practically disappear, creating a clutter-free countertop that’s both stylish and practical. The overall aesthetic is modern, clean, and highly functional.
Select appliances designed specifically for small spaces—like under-counter refrigerators, slim coffee machines, or compact blenders. Look for multi-use devices that combine functions, such as a microwave that also toasts or bakes. Consider built-in options that integrate into cabinetry for a seamless look. Choose neutral tones or matching colors to unify the design, and add decorative panels or covers to hide appliances when idle.
Measure available space carefully before purchasing. Opt for appliances with flat fronts or that can be built into existing cabinetry. Install under-cabinet or recessed models to save surface area. Use outlet strips or power hubs to keep cords tidy and hidden. Prioritize appliances with easy-to-clean surfaces and durable finishes. Regularly wipe down surfaces to maintain a sleek, clutter-free appearance.
Coordinate appliances with cabinet finishes or wall colors for a cohesive look. Add decorative hardware or trim to make built-ins more stylish. Incorporate small, attractive accessories like colorful silicone mats or matching containers. Change out appliance covers seasonally or for special occasions to keep the vibe fresh. Personal touches like these make your small kitchen both functional and inviting.
Slim appliances prove that smart design can make small spaces highly functional without sacrificing style. They help you create a kitchen that works smarter, not harder, boosting your confidence in your decorating skills. With less clutter and more efficiency, cooking becomes less a chore and more a joy. Embrace the power of space-saving tech to elevate your home.
11. Install Under-cabinet Lighting for Better Visibility
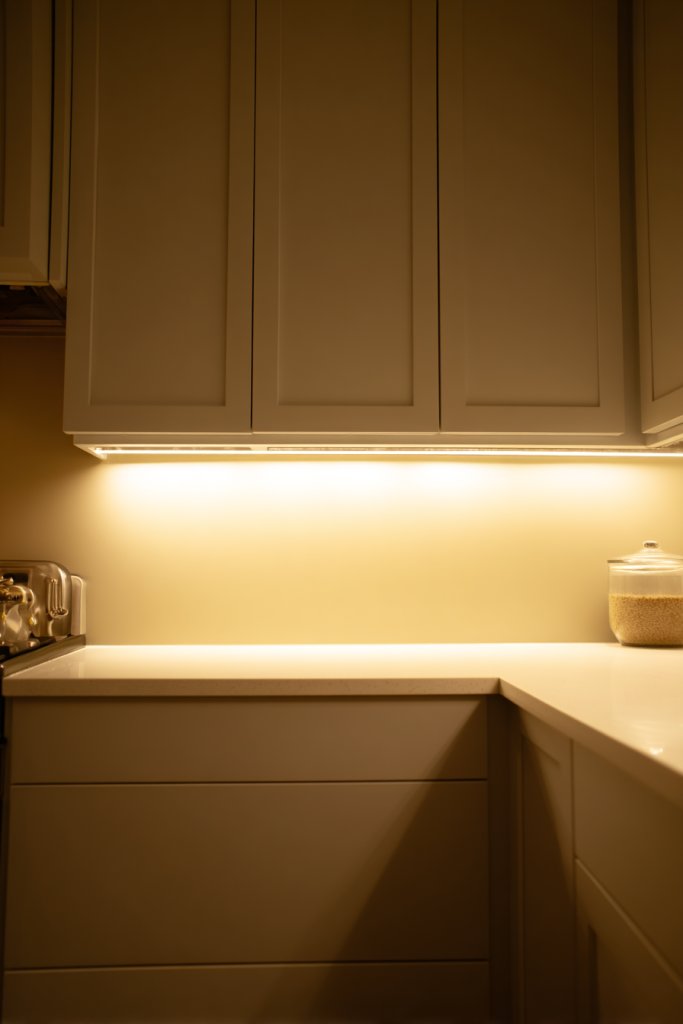
Dimly lit kitchens make cooking and prep work frustrating and unsafe. Ever considered adding lighting right where you need it most? Under-cabinet lighting is a simple upgrade that brightens your workspace and makes everything easier to see. It transforms your tiny kitchen into a functional, well-lit haven.
Visualize sleek LED strips installed beneath upper cabinets, casting a soft, even glow onto countertops. The light enhances the color and texture of your surfaces while reducing shadows. It creates a layered lighting effect that adds depth and warmth to the space. The glow highlights your organized setup, making everything look more appealing and easier to work with.
Choose between LED tape lights, puck lights, or strip lights depending on your style and budget. Opt for dimmable options for adjustable brightness, and consider color temperature—warm for cozy, daylight for task clarity. Use motion sensors or remote controls for convenience. Install them with a professional or DIY if you’re comfortable with basic wiring. Position lights to eliminate dark corners and enhance visibility.
Start by measuring under-cabinet areas and selecting appropriate lighting fixtures. Follow manufacturer instructions for installation—most are straightforward with adhesive backing or mounting clips. Connect to power sources with extension cords or direct wiring, considering safety and code compliance. Test each light before sealing everything in place. Adjust placement to ensure even illumination across all work surfaces. Regular cleaning of the lenses maintains brightness.
Customize by choosing different color temperatures or adding smart controls that sync with your home system. Use decorative covers or diffusers to soften the glow and reduce glare. Combine lighting with under-shelf organizers or small decorative elements (not restricted items) to add character. Seasonal lighting updates keep the space feeling fresh and lively. Lighting that matches your decor elevates both function and style.
Under-cabinet lighting makes your kitchen safer, more efficient, and more inviting. It demonstrates how small upgrades can dramatically improve your environment. When you see everything clearly, cooking becomes a pleasure, not a chore. It’s a simple change that shows you how thoughtful design enhances everyday life.
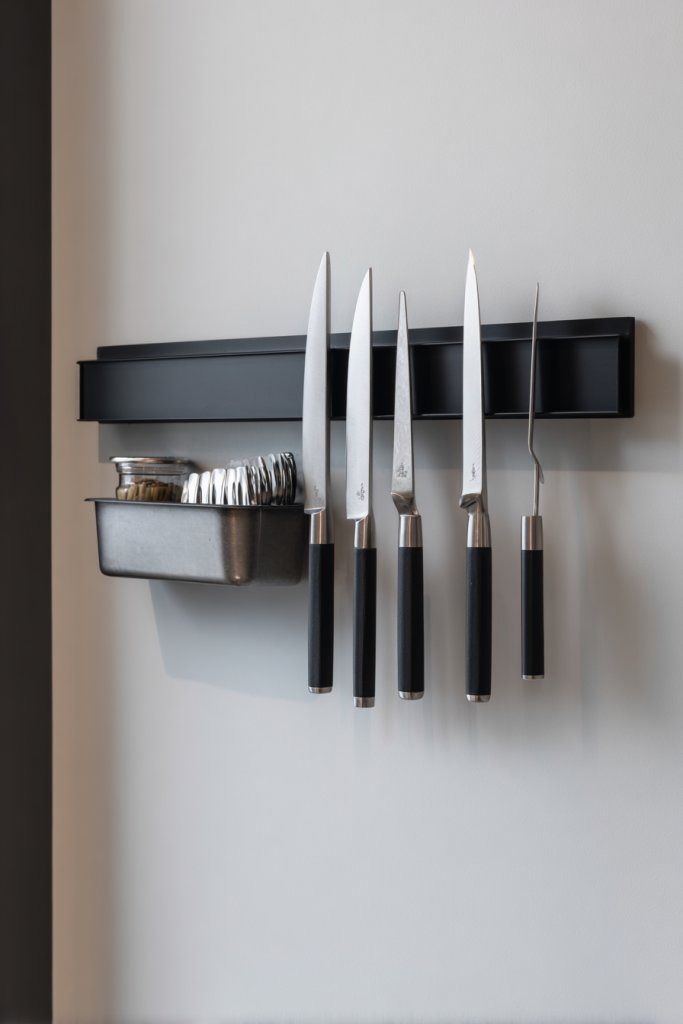
12. Use Magnetic Strips for Knives and Metal Tools
Cluttered drawers filled with knives and metal utensils can be dangerous and frustrating. Wouldn’t it be smarter to store these essentials where they’re both safe and accessible? Magnetic strips are the clever solution that keeps your tools organized, out of drawers, and within easy reach. Plus, they add a sleek, modern touch to your kitchen.
Imagine a thin metal strip mounted on the backsplash or inside a cabinet door, with your knives and tools magnetically attached in perfect alignment. The metal tools sparkle as they hang neatly, creating an orderly display. The simplicity of the setup makes access quick and safe—no more rummaging through cluttered drawers. The clean lines and shiny surfaces add a contemporary flair to your space.
Choose from stainless steel, painted, or decorative magnetic strips depending on your decor. Use different sizes and lengths to accommodate your collection, and add labels or color-coded grips for quick identification. Install strips at different heights for ergonomic access, or combine with small containers for additional organization. This system works well for knives, bottle openers, and metal spatulas.
Identify a suitable wall or inside cabinet door for mounting. Measure carefully and select a strip that fits the space. Secure with high-strength screws or adhesive strips—ensure a level installation. Arrange your knives and tools in a way that’s both functional and visually appealing. Regularly check the magnet’s strength and clean the strip to prevent dust buildup. Keep sharp edges away from children for safety.
Personalize with decorative mounting hardware or paint the strip to match your decor. Use small labels or color grips for different types of tools for quick recognition. Incorporate matching accessories like a magnetic spice tin or utensil holder nearby. Change the arrangement seasonally or when you acquire new tools for a fresh look. The system keeps your tools organized and your workspace safer.
Magnetic strips turn a chaotic collection into a sleek display, boosting your confidence in managing small kitchen tools. They free up drawer space and reduce clutter, making your environment more efficient. Seeing everything aligned and accessible inspires more organized cooking routines. Small upgrades like this prove that clever storage solutions elevate your entire kitchen experience.
13. Create a Dedicated Recycling and Waste Station
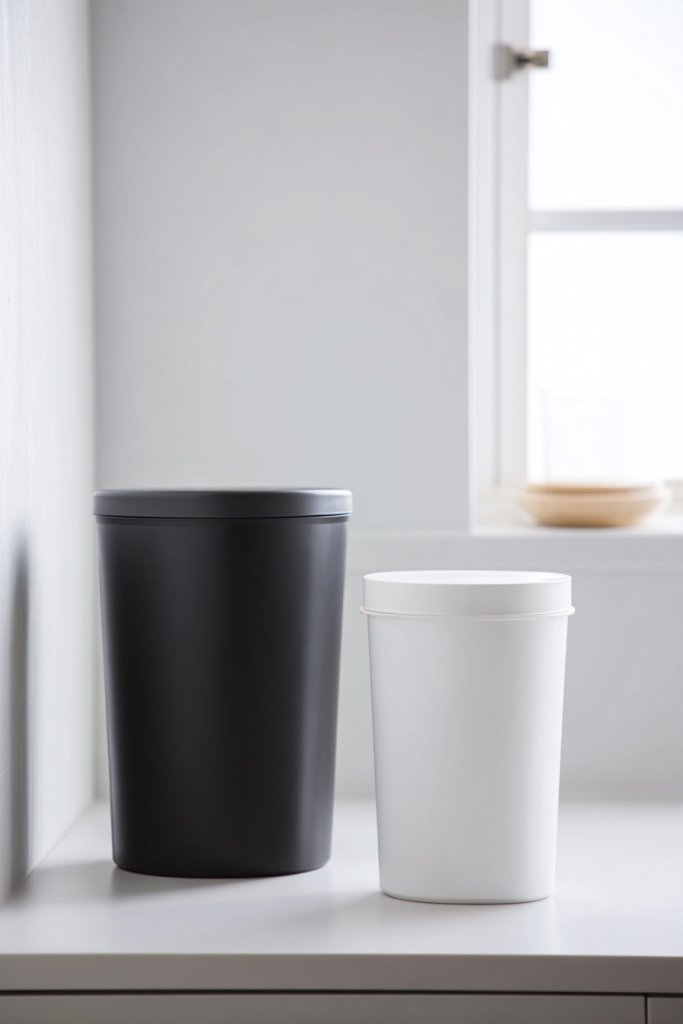
Sorting waste in a tiny kitchen often feels like a messy afterthought. Wouldn’t it be nice to have a designated, tidy spot for recycling and trash? A dedicated station streamlines waste management, keeps your counters clear, and encourages eco-friendly habits. Plus, it makes sorting quick and hassle-free.
Visualize a sleek, concealed cabinet or pull-out drawer containing labeled bins for recyclables, compost, and trash. The setup is discreet yet accessible, with color-coded bins matching your local waste system. When you open the cabinet, everything is organized and ready for quick disposal. This tidy station keeps waste out of sight but within easy reach, maintaining a clean, clutter-free kitchen.
Choose compact, stackable bins with lids to save space. Use labeled containers—recycle, compost, waste—for clarity. Incorporate removable liners or bags for easy cleanup. For larger kitchens, consider a small cart on wheels for mobile waste management. In apartments, a pull-out cabinet or under-sink solution works well. Match the design to your decor for a seamless look.
Identify a convenient location—under the sink, inside a cabinet door, or a hidden corner. Install pull-out drawers, shelves, or small cabinets with ample ventilation. Label each bin clearly and ensure lids fit securely. Use odor-absorbing materials or filters to keep the space smelling fresh. Regularly empty and sanitize bins to prevent odors and pests. Make waste sorting a seamless part of your routine.
Decorate with matching labels or color schemes that match your kitchen’s style. Add small decorative touches like a stylish bin or a custom plaque. Incorporate a small sign or reminder to encourage recycling and composting. Keep extra liners nearby for quick replacements. Personal touches motivate consistent waste management and make the process feel less like a chore.
A dedicated waste station simplifies recycling and reduces mess, boosting your confidence in maintaining a tidy kitchen. It shows that small, organized changes can have a big impact. With everything sorted neatly, your kitchen becomes more eco-friendly and efficient. Little upgrades like this turn waste management from a hassle into a hassle-free habit.
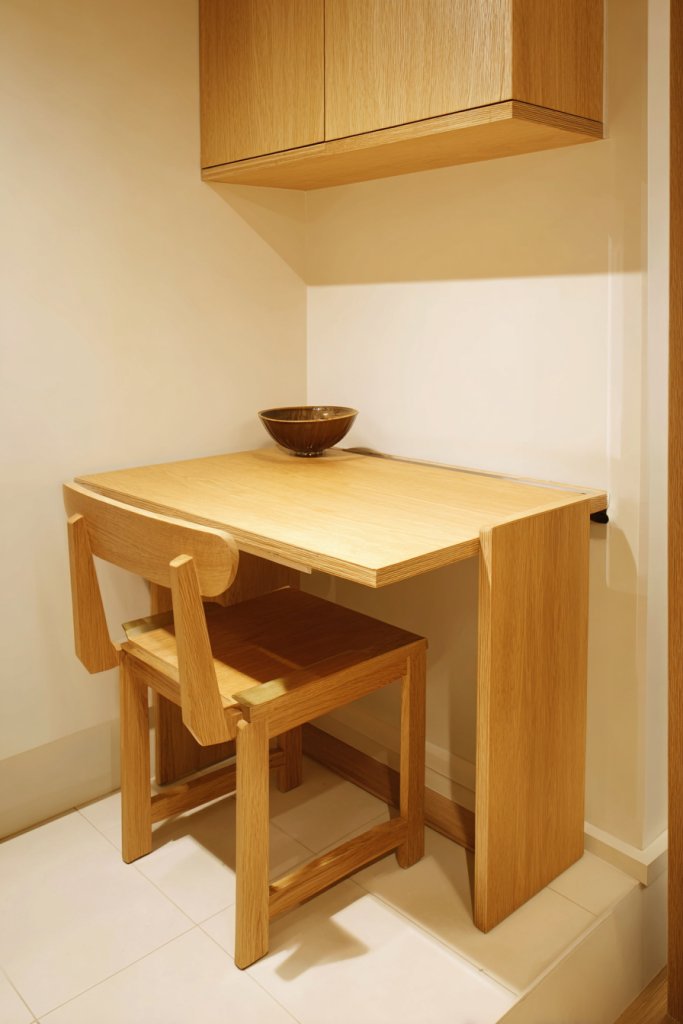
14. Add a Fold-away Table or Drop-leaf Countertop
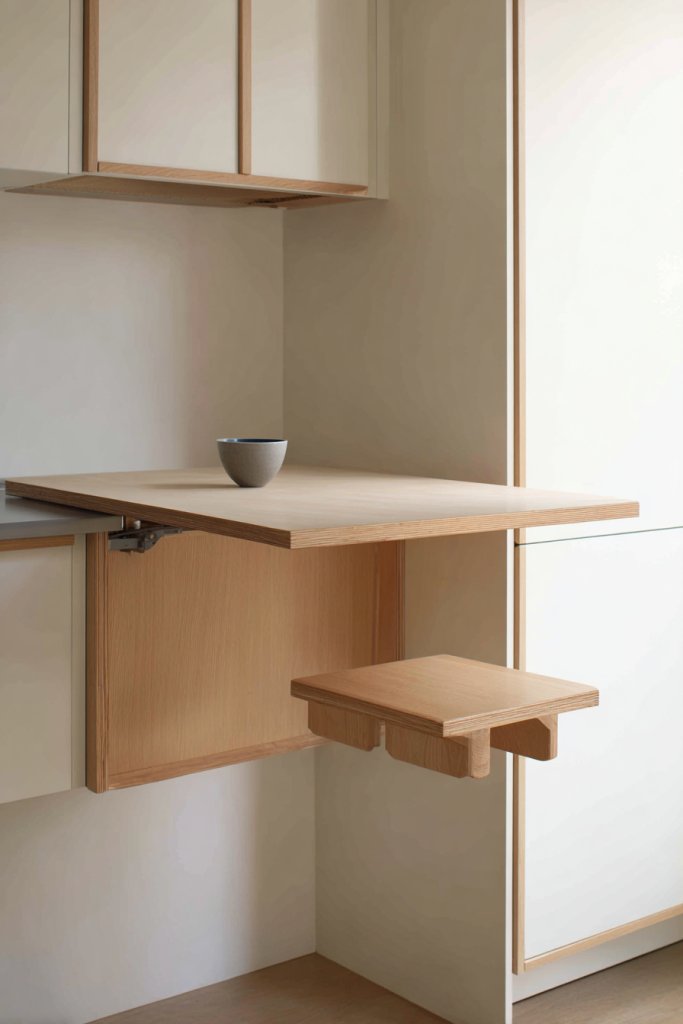
Counter space is the holy grail in small kitchens—especially when you need room for prepping, serving, or eating. Wouldn’t it be awesome if your countertop could double as a dining table or extra prep area? Fold-away tables or drop-leaf counters are the perfect space-saving hacks that give you more surface area when needed and hide away when not.
Picture a sleek countertop with a fold-down extension that seamlessly folds flat against the wall. When in use, it pops out to provide extra space for chopping vegetables or serving snacks. When finished, it folds back against the wall, leaving your kitchen looking clean and uncluttered. The smooth finish and slim profile make it feel like a natural part of your decor, not an afterthought.
Choose from wall-mounted drop-leaf counters, fold-down tables, or retractable surfaces depending on your space and style. Use durable, easy-to-clean materials like laminate or wood veneer. Incorporate locking hinges or gas lifts for stability. For small spaces, opt for a flush-mounted design that folds away flush with the wall. Decorate with a colorful tablecloth or placemats when in use to add personality.
Identify a suitable wall or corner for installation, ensuring sufficient clearance when the table is folded down. Mount the hinges or brackets securely into studs or wall anchors. Select a surface material that’s durable and easy to clean—think laminate or sealed wood. Test the mechanism for smooth operation and stability. Keep cleaning and maintenance simple by choosing wipeable finishes. Use storage underneath for small items to maximize utility.
Add decorative elements like patterned tablecloths, colorful placemats, or magnetic accessories for a personalized touch. Use the space underneath for storage baskets or small shelves. Incorporate seasonal or themed accessories for special occasions. Consider matching your fold-away surface with other foldable furniture pieces for a cohesive look. This upgrade makes your kitchen more versatile and inviting.
A fold-away table or drop-leaf countertop creates incredible flexibility in small kitchens, making every inch count. It boosts your confidence by showing how clever design can maximize limited space. With just a quick fold, your kitchen transforms from a prep zone to a dining spot or extra workspace. Small changes like this prove that practical design can also be stylish.
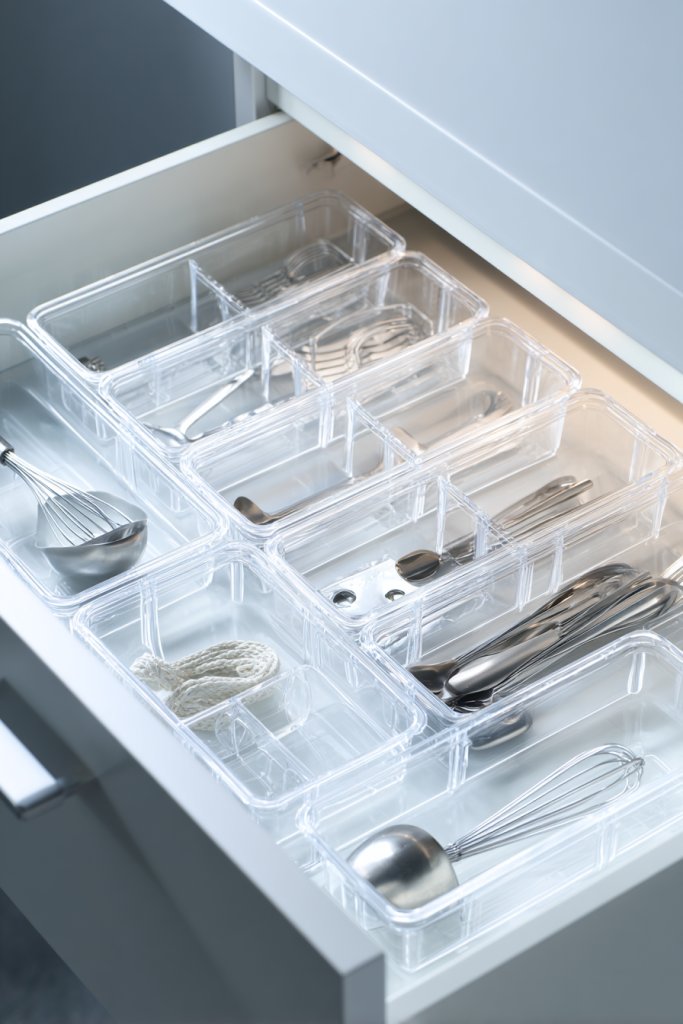
15. Utilize Drawer Organizers for Small Gadgets
Ever spent more time rummaging through cluttered drawers than actually cooking? Small gadgets like measuring spoons, bottle openers, and tiny tools often turn into a chaotic mess, wasting your precious time. Finding a simple way to keep everything neat feels like an impossible dream in tiny kitchens. But what if you could tame this chaos effortlessly?
Picture a sleek, segmented tray nestled inside your drawer, each compartment dedicated to a specific gadget. Imagine a grid of shallow plastic bins holding tiny utensils upright, no more digging around to find the right item. The drawer looks organized, with everything visible at a glance. The smooth glide of the drawer makes access quick and satisfying. It’s like having a miniature warehouse right in your kitchen.
Choose colorful, stackable trays for a playful vibe or go for minimalist clear acrylic organizers for a sleek look. For larger gadgets, deeper compartments work best, while shallow ones fit smaller items. You can customize the layout based on your collection, adding or removing sections as needed. Seasonal updates might mean swapping in different trays or labels for clarity. Even kids’ gadgets can find a designated spot, making cleanup easier.
Start by emptying your drawer and sorting your gadgets. Measure the drawer’s dimensions to select the right-sized organizers. Look for adjustable or modular options to maximize flexibility. Use small containers with lids for items that tend to spill or get lost, like loose screws or clips. Install divider inserts or stackable bins, ensuring easy access without overcrowding. Regularly declutter to keep the system effective and prevent accumulation of unused items.
Label each compartment with simple adhesive labels or chalk markers to identify contents instantly. Incorporate color coding to differentiate categories—metal tools, plastic gadgets, or baking accessories. Use decorative washi tape around the edges of the organizers for a personalized touch. For added flair, include a small container for frequently used gadgets to keep them front and center. This way, your drawer stays functional and visually appealing.
Mastering drawer organization boosts your kitchen efficiency and makes everyday cooking less stressful. It’s a small change that creates a big impact, transforming clutter into clarity. Once you see how smoothly everything flows, you’ll wonder why you waited so long. Get ready to impress yourself and others with your tidy, functional space!
16. Incorporate Clear Hooks for Hanging Dish Towels and Accessories

Ever find yourself fumbling with wet towels or losing small accessories in the chaos? Keeping things within arm’s reach can be a challenge in tiny kitchens. Dish towels, oven mitts, and lightweight cleaning tools often clutter counters or get lost behind cabinet doors. Wouldn’t it be nice to have easy access without sacrificing space or style?
Imagine a set of sleek, stainless steel hooks installed underneath a shelf or inside cabinet doors. A bright, textured towel hangs neatly, ready at a moment’s notice. Small hooks hold oven mitts and cleaning cloths, all organized and visible. The hooks blend seamlessly into the kitchen’s design, adding a touch of modern minimalism. Every item has its designated spot, making the space look tidy yet functional. It’s like giving your accessories their own little home.
Use colored or patterned hooks to add a pop of personality or match your kitchen’s color scheme. For a rustic look, opt for wooden or wrought iron hooks; for a contemporary vibe, sleek metal or magnetic strips work well. Install hooks in high-use areas, like near the sink or stove, to keep essentials handy. In small spaces, combine hooks with magnetic strips for a versatile setup. Seasonal or themed hooks can also make the routine more fun.
Select the right type of hooks based on weight and material, ensuring they hold your accessories securely. Clean the surface thoroughly before installation. Use adhesive hooks for quick setup or screw-in types for more durability. Position hooks at a height that’s easy to reach but doesn’t clutter your workspace. Group similar items together—like all towels or all oven mitts—for visual harmony. Regularly check and tighten hooks to prevent slipping or falling.
Add decorative elements like colorful ribbons or fabric covers to hooks for a personalized touch. Use labeled tags or small clips to identify each hook’s purpose, especially if multiple people share the space. Incorporate hooks into a custom-made hanging organizer or fabric panel for a cohesive look. For a quirky vibe, choose fun shapes or themed hooks matching your personality. These small updates keep your space lively and organized.
Simple hooks can totally transform your kitchen’s efficiency and style. They keep your essentials visible and accessible, saving time and frustration. Once you get used to this system, you’ll wonder why you didn’t do it sooner. It’s a small tweak with a big payoff—more order, less stress, and a kitchen that feels calmer every day.
17. Use Modular Storage Bins for Baking Supplies or Snacks
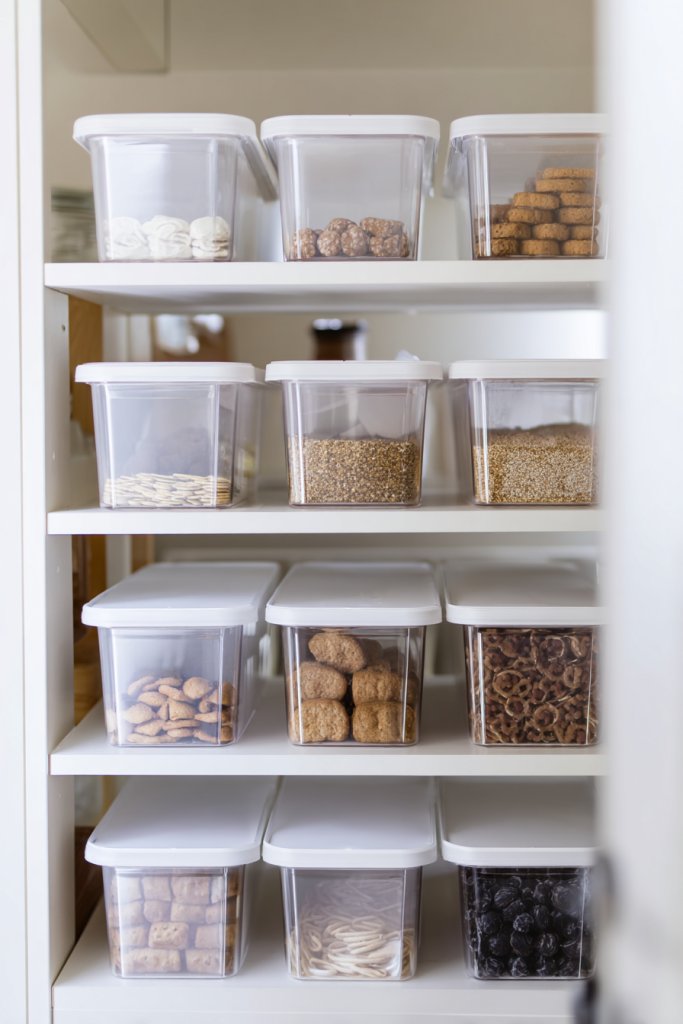
Baking supplies and snacks can turn into a cluttered nightmare, especially when they spill over in the pantry. Finding that elusive bag of flour or your favorite cookie cutters is like a treasure hunt. Wouldn’t it be awesome to have a system that categorizes everything and makes it easy to grab what you need?
Visualize a stack of clear, labeled bins neatly arranged on a pantry shelf. Each bin holds a different category—baking powders, sprinkles, or snack bars. The transparent sides let you see exactly what’s inside without rummaging. Color-coded labels make it even easier to find items at a glance. The bins are stackable, maximizing vertical space, and creating an organized, inviting look. It’s like a mini grocery store in your own home.
Choose uniform bins for a sleek, cohesive appearance or mix different sizes for a playful look. Add colorful labels or chalkboard tags for easy updates. For small spaces, opt for stackable or nesting bins that fit into tight corners. Use drawer dividers or baskets for smaller items like baking liners or measuring spoons. Seasonal adjustments might mean swapping out labels or reorganizing based on your baking or snacking habits.
Start by emptying your pantry and grouping similar items together. Measure shelf space to select appropriately sized bins that fit comfortably. Label each bin with clear, durable tags or stickers. Place frequently used items at eye level for quick access, while less-used supplies can go on higher or lower shelves. Use stackable or nesting options to make the most of vertical space. Regularly reassess and tidy up to keep the system functional.
Get creative with labels—use chalkboard paint, stickers, or handwritten tags for a personal touch. Incorporate color themes to match your kitchen decor or mood. Add small decorative tags or charms to make storage fun and inviting. Use different textures or materials like wood or metal for a more upscale look. Personal touches make the pantry both functional and uniquely yours.
Using modular bins turns a chaotic pantry into a calm, efficient space. It saves time during busy mornings and makes grocery shopping easier. Once organized, you’ll feel more confident about your kitchen’s cleanliness and order. It’s a small change that leads to big results—more fun, less stress, and a wow factor for visitors.
18. Add a Magnetic Spice Rack on the Side of Cabinets
Spice jars scattered across countertops or buried in drawers make cooking feel like a scavenger hunt. Remembering where you put that paprika or cumin can turn into a frustrating game of hide and seek. Wouldn’t it be great to have all your spices at eye level, right where you cook?
Envision a slim magnetic strip mounted vertically on the side of your cabinet or refrigerator. Brightly colored spice jars cling to the strip, creating a vibrant, organized display. The jars are within easy reach, and their labels face outward for quick identification. The sleek metal strip blends discreetly into your kitchen, adding a modern touch. The entire setup feels streamlined, leaving countertops clear and tidy. It’s like having a mini spice boutique right in your kitchen.
Choose magnetic strips in stainless steel, black, or colorful finishes to match your decor. Use small, uniform jars for a clean look, or mix shapes for a more eclectic vibe. For larger spice containers, opt for wider strips or magnetic trays. Seasonal or themed jars can add fun accents, while labels ensure consistency. You can also incorporate a small label maker for quick updates or to add cooking tips.
Clean the mounting surface thoroughly to ensure adhesion. Attach the magnetic strip at a convenient height near your cooking area. Arrange jars in a way that groups similar spices together for easy navigation. Use magnetic lids or attach small metal pieces to non-magnetic jars for compatibility. Regularly check the stability of jars, especially if you use a lot of cooking, and refill or replace jars as needed. Keep a small brush nearby to clean metal surfaces and maintain magnetism.
Customize jars with handwritten labels or printed tags for a professional look. Add a few decorative elements like spice scoops or small wooden tags. Incorporate a small chalkboard label for quick notes or spice blends. For a colorful twist, use acrylic paints or stickers on the jars. This setup makes your spice collection both functional and a visual delight.
A magnetic spice rack simplifies cooking prep and declutters your counters. It makes your entire spice collection accessible with just a glance. Once set up, you’ll cook more confidently and efficiently. It’s a small upgrade that significantly enhances your kitchen experience, making everyday cooking more joyful and less stressful.
19. Implement a Sliding Pantry Door or Pocket Doors
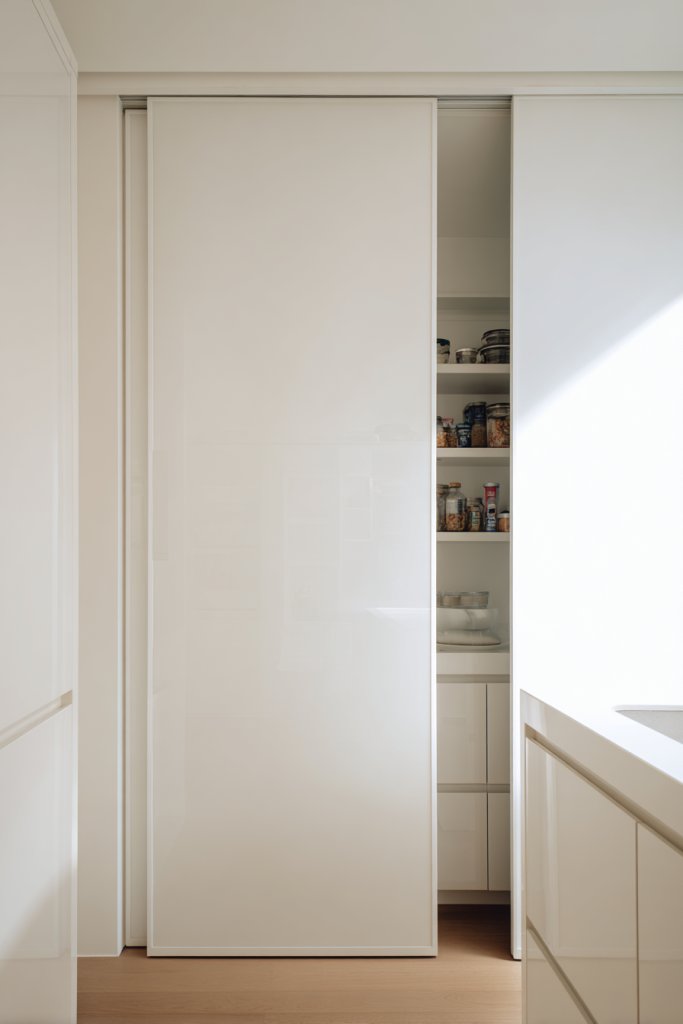
Ever feel like your pantry is closing in on you? Traditional doors eat up precious space and can make small kitchens feel even more cramped. If you love the idea of a sleek, clutter-free look that maximizes every inch, then sliding or pocket doors are your new best friends. They hide away your supplies without swinging out and taking up room, transforming chaos into calm.
Imagine a smooth, matte-finished panel gliding silently along a track as you access your pantry. The door disappears into a wall cavity, revealing organized shelves filled with colorful jars, cans, and snacks. The space feels open, inviting, and modern, with clean lines that blend seamlessly into your decor. No more awkward door swings blocking your pathway or knocking over stacks of cans.
Choose from various styles—sliding barn doors for rustic charm, sleek minimal panels for contemporary flair, or even mirrored finishes to bounce light around. For tiny spaces, pocket doors can be tucked away completely, providing a flush surface. Seasonal tweaks might include swapping out hardware or adding decorative trims to match your current aesthetic. These doors can be painted or stained to coordinate with your cabinetry or walls.
Start by measuring your doorway to determine the right size and track length. Decide whether you want a single sliding door or double panels for symmetry. Installing requires securing a sturdy track system into wall studs—this might need some DIY skills or professional help. Remove existing door hardware and prep the space for the track installation. Finish by attaching the door panels, adjusting for smooth operation, and sealing edges for durability. Consider hidden hinges or soft-close mechanisms for a polished finish.
Add decorative or functional touches like frosted glass panels for privacy or painted designs to match your kitchen theme. Incorporate magnetic strips or hooks on the door for hanging lightweight items or cleaning tools. You could also install a small chalkboard on the door to jot down grocery lists or meal plans. Personal touches make the sliding door both practical and fun to use.
Sliding pantry doors elevate your kitchen’s style while making the space more functional. They create a sleek, modern vibe that impresses guests and makes everyday tasks easier. With the right choice and installation, you can turn a simple idea into a standout feature. Ready to say goodbye to clutter and hello to streamlined living?
20. Hang a Small Chalkboard or Whiteboard for Lists and Menus
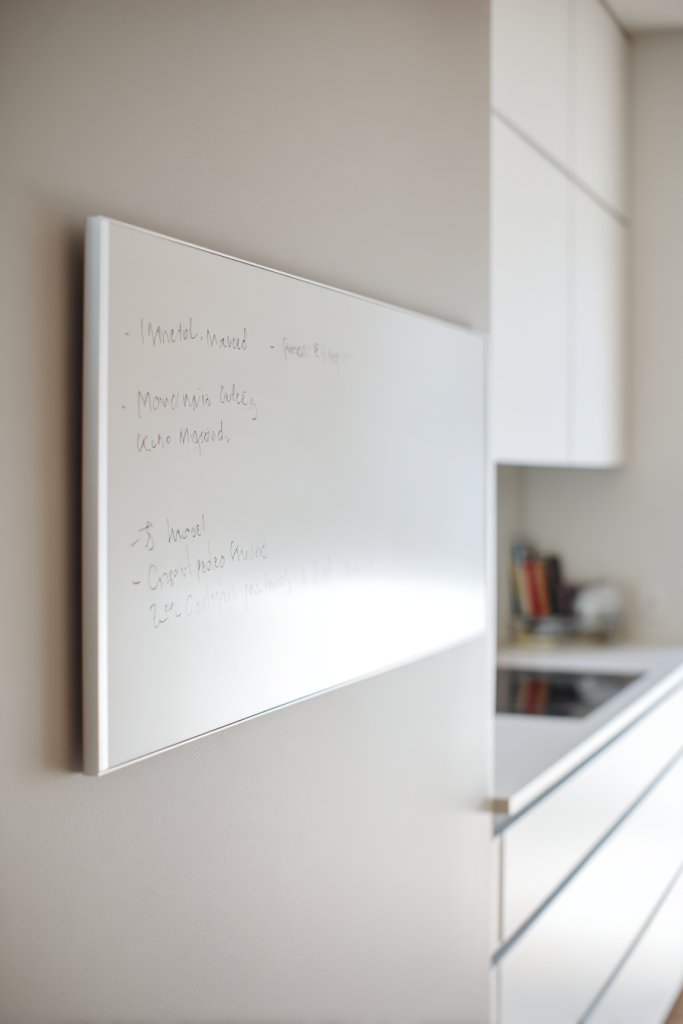
Ever forget what’s on your grocery list halfway through shopping? Or struggle to keep track of meal plans in a tiny kitchen? A small chalkboard or whiteboard is the perfect solution to keep your daily routines organized and visible. It turns an ordinary wall into an interactive hub for notes, reminders, and inspiration.
Picture a compact whiteboard mounted above your counter, filled with colorful magnets or handwritten notes. It displays your weekly menu, grocery list, or motivational quotes, adding personality to your space. The surface invites quick jotting and erasing, making it a dynamic part of your kitchen. The simplicity of a sleek black chalkboard frame or a crisp white surface complements any decor style.
Choose a magnetic whiteboard for easy attachment of notes or a chalkboard for a more rustic, vintage vibe. You can frame it with wood or metal to match your kitchen accents. For seasonal updates, switch out the marker colors or add themed stickers to keep things fresh. Small sizes work best for compact walls, but larger panels can serve as a mini command center in bigger kitchens. You might also consider adding a ledge beneath for holding markers, erasers, or small accessories.
Mount your chosen board at eye level using anchors suitable for your wall type. Ensure it’s firmly secured to handle frequent writing and erasing. Consider a surface that’s easy to clean—magnetic whiteboards are low-maintenance and versatile. Dedicate a section for your grocery list, meal ideas, or important reminders. Use colorful markers or chalks to add visual interest and clarity. Keep cleaning supplies nearby for quick updates.
Personalize your board with decorative borders, stencils, or themed stickers that reflect your personality. Incorporate a calendar or schedule section for appointments or chores. For added fun, assign different colors to family members or meal types. Use it as a motivational space by writing affirmations or goals. The key is making it functional yet fun enough to inspire regular use.
A small chalkboard or whiteboard can turn your kitchen into an organized, lively space that sparks joy and reduces stress. It’s an easy upgrade that makes everyday routines smoother and more engaging. Plus, it’s a great way to involve everyone in meal planning or chores. Ready to turn a blank wall into your new command center?
21. Use Transparent Storage for Small Kitchen Tools and Accessories
Ever open a drawer and feel overwhelmed by clutter? Finding that tiny whisk or a set of measuring spoons can turn into a scavenger hunt. Transparent storage bins are your answer to quick, easy access and clutter control. They help you see exactly what’s inside, saving time and frustration every time you cook or prep.
Imagine neatly stacked clear containers with labeled lids, each holding small gadgets like clips, twist ties, or spice scoops. You can see the contents at a glance, which makes grabbing what you need effortless. The uniformity of the containers creates a calm, organized look—no more digging through a chaotic drawer. The transparent design adds a modern, clean vibe that complements any kitchen style.
Use stackable plastic or glass bins for durability and ease of cleaning. Label each container with a label maker or handwritten tags for quick identification. For small items, compartmentalized trays inside the bins keep everything separated. These can be placed inside cabinets, drawers, or on open shelves, depending on your setup. For a more decorative touch, choose containers with colorful lids or textured surfaces to add visual interest.
Sort your small tools and accessories into categories before transferring them into the bins. Measure your space to decide on the right container sizes—stackable options save the most room. Label each container with clear, bold tags for instant recognition. Place frequently used items at the front or top for quick access. Regularly review and purge items to keep the system efficient. This method simplifies your routine and reduces clutter accumulation.
Personalize your storage with themed labels, decorative stickers, or color-coding for different categories. Use unique containers for special utensils or gadgets you want to showcase. Incorporate stacking shelves or tiered organizers to maximize vertical space. Keep a small toolkit nearby for quick adjustments or label updates. The goal is making your storage both functional and visually appealing.
Transparent storage transforms chaos into clarity, giving you confidence every time you cook or organize. It’s a simple upgrade that instantly improves your kitchen’s look and feel. Plus, it encourages regular tidying and maintenance, making your space more enjoyable. Ready to see everything at a glance and never hunt for tools again?
Conclusion
This collection of kitchen ideas for small spaces showcases how thoughtful design can turn compact areas into highly functional and beautiful kitchens. By trying out these creative solutions, you can optimize your space and create an environment that’s both practical and inspiring. Don’t hesitate—start implementing these ideas today and watch your small kitchen become a stylish, efficient heart of your home.

Post Comment