20 Small Bathroom Interior Ideas for Stylish Updates
Ever found yourself dreaming of a bathroom makeover that feels both stylish and space-efficient? Small bathroom interior ideas have gained immense popularity because they prove that you don’t need a large space to create a stunning, functional retreat.
In this article, you’ll uncover a variety of clever tips and creative ideas to maximize your small bathroom’s potential. From smart storage solutions to eye-catching decor tricks, these ideas will inspire you to transform your tiny space into a chic and cozy oasis you’ll love to start and end your day in.
1. Brighten with Mirror Accents for a Spacious Feel
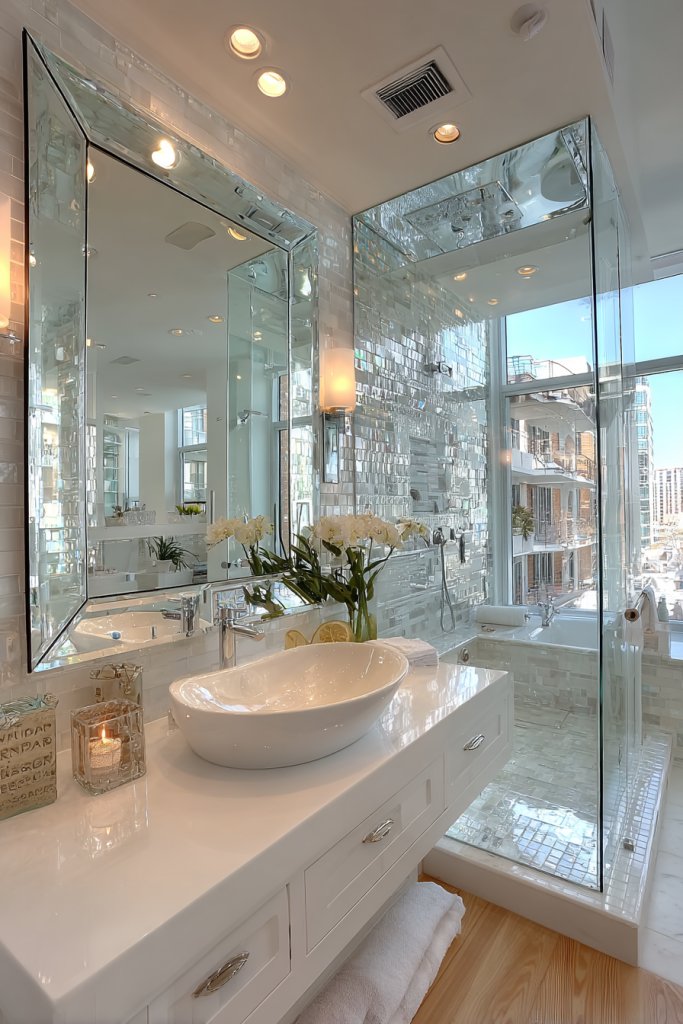
Ever felt like your bathroom is crammed and claustrophobic? It’s frustrating when small spaces feel even tighter because of poor lighting or lack of visual openness. We all want a bathroom that feels airy and inviting, not like a closet. Using clever design tricks can make a tiny bathroom seem like it doubles in size.
Imagine a large, frameless mirror mounted above your vanity, reflecting soft natural light from a frosted window. The mirror’s sleek surface creates a sense of depth, while its clean edges add modern elegance. When you step into the space, your eyes are drawn to the reflective surface, instantly opening up the room. Strategically placed mirrors bounce light around, making everything look brighter and more expansive.
You can choose oversized mirrors for a dramatic effect or opt for multiple smaller ones arranged artfully. Frameless designs keep the look minimal, but decorative frames add personality. For seasonal changes, consider adding a decorative trim or frame that matches your decor theme. In very tight spaces, mirrored panels on cabinet doors or walls work wonders for visual expansion.
Start by selecting a mirror that fits your wall and style—consider size, shape, and frame type. Mount it securely using wall anchors if necessary, ensuring it’s level for a polished look. Pair it with layered lighting, like sconces or LED strips, to maximize reflection. Clean the mirror regularly to keep the light bouncing effectively. If space allows, add a secondary mirror on a door or wall for extra depth.
Personalize with frosted or etched designs on the mirror edges, or add a subtle decorative trim. Use accessories like small wall-mounted shelves nearby to hold essentials without cluttering the space. Incorporate textured wall finishes or tiles that complement the mirror’s sleekness. Experiment with different shapes—oval, round, or geometric—to suit your style.
Mirrors are a simple yet powerful tool to transform your small bathroom into a bright, open retreat. They add a touch of sophistication while making the space more functional. With a few strategic placements, you can enjoy a room that feels twice as large. Ready to reflect some brilliance in your bathroom design?
2. Incorporate Floating Vanities for a Modern Look
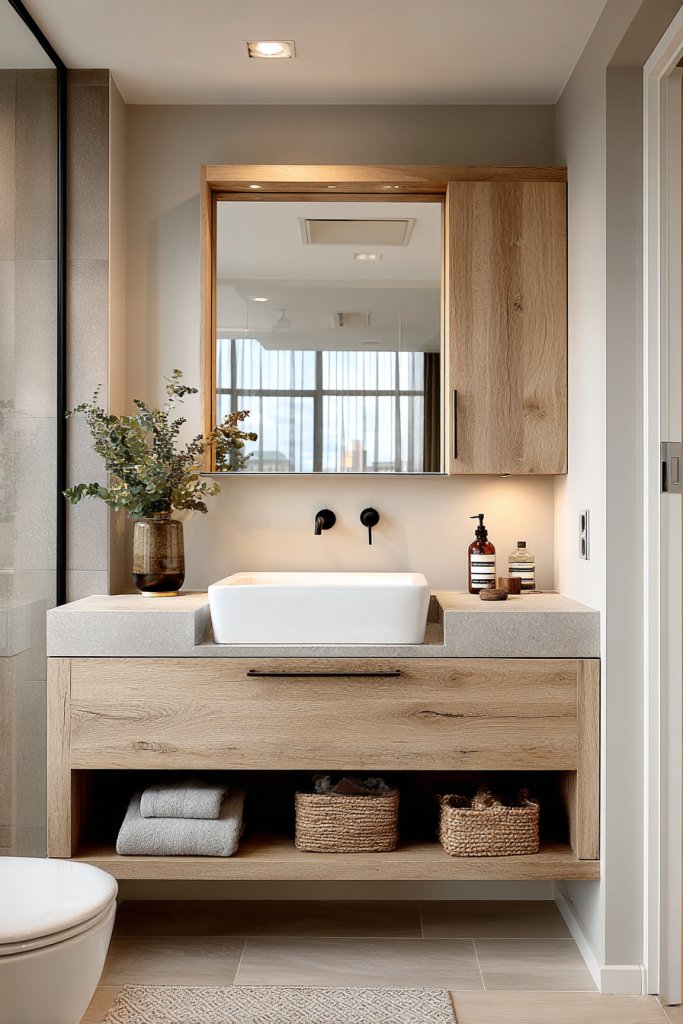
Cluttered floors and bulky furniture can make a small bathroom feel even more cramped. You want a sleek, modern aesthetic that also maximizes space. Floating vanities are the answer—they create a clean, open look while freeing up precious floor area. Plus, they make cleaning so much easier, because you can sweep or mop underneath.
Picture a streamlined, wall-mounted vanity with a smooth surface and minimalist hardware. It appears to hover just above the floor, with exposed legs or supports kept to a minimum. The open space underneath adds visual lightness, making the room seem larger. The vanity’s glossy finish reflects light, enhancing the contemporary vibe. Pair it with a vessel sink or integrated basin for a chic finish.
Floating vanities come in various sizes and materials—think wood for warmth or high-gloss acrylic for a sleek look. You can customize with open shelves or hidden drawers based on your storage needs. For a cozy feel, add textured textiles or decorative accessories on top. During holidays or seasonal changes, swap out accessories for a fresh look without cluttering the space.
Measure your wall width carefully to determine the right vanity size. Mount the vanity at a height that’s comfortable for everyday use, usually around 32 inches from the floor. Secure it with sturdy wall anchors, especially if you plan to add heavy countertop or basin. Use waterproof sealant around edges to prevent water damage. Finish by adding a matching faucet and a mirror above for a complete look.
Personalize your floating vanity with colorful or textured countertops like quartz or concrete. Decorate the space underneath with baskets or small storage bins if needed. Consider adding a decorative backsplash in bold tiles or subtle textures. You can also add LED lighting underneath for a soft glow at night, giving it a floating effect.
Floating vanities turn a small bathroom into a modern sanctuary, making every inch count. They combine style with practicality, creating a clutter-free environment. Once installed, the room looks more spacious and inviting. Are you ready to elevate your bathroom’s aesthetic?
3. Choose Light-Colored Tiles to Enhance Brightness
Dark tiles can make a small bathroom feel gloomy and confined. If you crave a fresh, airy vibe, light-colored tiles are your best friend. They reflect more light, visually expanding the space and boosting your mood every time you step in. Plus, they’re versatile enough to match almost any decor style.
Imagine walls and floors covered in soft beige, pale gray, or pastel tiles. Their matte or glossy finishes catch the light differently, but both add brightness. The subtle color palette creates a seamless, continuous look that makes the room feel larger. When paired with bright white fixtures and accents, the effect is a clean, calming oasis.
Opt for larger tiles to reduce grout lines, creating a more expansive appearance. For more visual interest, mix in textured or patterned tiles on a single feature wall or a narrow band. During different seasons, you can swap accessories to complement the light palette. For example, warm textiles in winter or fresh towels in summer enhance the light and airy feel.
Start by selecting high-quality tiles that suit moisture-prone areas—glazed porcelain or ceramic work well. Prepare your surface by cleaning and leveling it thoroughly before laying tiles. Use a light-colored grout to maintain the bright, seamless look. Consider hiring a professional for precise cuts and installation, especially around corners and fixtures. Seal the grout to prevent staining and water seepage.
Add personal touches with decorative trims or mosaic inserts that incorporate your favorite subtle hues. Use textured or matte finish tiles for a softer, more sophisticated appearance. To keep the space feeling fresh, incorporate light-colored storage solutions and accessories. Don’t be afraid to experiment with different tile sizes to create unique visual effects.
Light-colored tiles are a timeless choice that can transform even the smallest bathroom into a bright retreat. They reflect your personality’s clean, minimalist side while offering easy maintenance. With the right tiles, your bathroom will look larger, brighter, and more welcoming. Time to brighten things up?
4. Install Open Shelving for Practical Storage
Cluttered counters and cramped cabinets ruin the vibe of a small bathroom. You need a storage solution that’s both practical and stylish without taking up much space. Open shelving offers instant access to essentials and keeps your space looking organized. It’s a game-changer for small bathrooms where every inch counts.
Picture sleek wooden or metal shelves mounted safely on the wall, holding neatly folded towels, baskets, or decorative jars. The open design creates a sense of depth and prevents the room from feeling boxed in. When styled thoughtfully, they add visual interest—think textured baskets or colorful containers that pop against neutral walls.
Use floating shelves in different lengths or styles to match your decor. Combine open shelves with closed cabinets for a balanced look and extra storage. During seasonal updates, swap out accessories or towels for a fresh feel. Incorporate decorative hooks or small baskets for additional organization without clutter.
Choose durable, moisture-resistant materials like treated wood, metal, or acrylic. Mount shelves at eye level or just above counter height for easy reach. Use appropriate anchors and screws for secure installation—don’t forget to level everything! Decorate with attractive storage bins or baskets that can be easily cleaned or replaced. Keep the setup minimal for a clutter-free look.
Personalize shelves with themed containers or colorful accents that reflect your style. Incorporate decorative elements like textured ceramic jars or woven baskets for a cozy touch. During holidays, update the shelf decor with seasonal items or themed accessories. Remember, less is more—avoid overcrowding to keep the space feeling open.
Open shelving transforms your bathroom into a functional yet stylish space. It encourages organization and quick access, making daily routines smoother. With thoughtful styling, your small bathroom can feel spacious and inviting. Ready to open up your space?
5. Opt for Compact Corner Fixtures
Limited space often forces you to choose between a sink or a toilet, but not both. Corner fixtures offer a smart workaround, fitting neatly into tight spots without sacrificing function. They’re perfect for small bathrooms where every inch needs to work extra hard. Say goodbye to bulky setups and hello to efficient design.
Visualize a corner sink with a rounded basin nestled into a corner, leaving more room for movement. The toilet, designed to fit snugly into a corner alcove, leaves open space for a small storage unit or decorative element. The fixtures are sleek and minimalist, blending seamlessly into the room’s design. The overall effect is a clutter-free, open layout that feels larger.
Choose fixtures in modern, compact styles—think wall-mounted, round, or angular designs. During different seasons, you can add small accessories like textured towels or decorative mats to soften the space. For a more luxurious feel, select fixtures with matte or metallic finishes. Tailor the fixtures to suit your style, whether minimalist, industrial, or classic.
Measure your available corner space precisely to select the right size fixtures. Install wall-mounted units for a clean look and easier cleaning underneath. Use specialized anchors and brackets to ensure stability—these fixtures often require professional installation. Finish by sealing around the fixtures with waterproof caulk to prevent leaks. Add a small shelf or storage unit nearby for toiletries.
Personalize with hardware finishes—brushed nickel, matte black, or chrome—to match your taps and accessories. Add textured or patterned towels for contrast and style. Consider upgrading the toilet with dual-flush features for efficiency. Incorporate a small decorative element like a sculptural soap dish to elevate the space.
Corner fixtures optimize space without compromising on style or comfort. They’re an innovative solution for small bathrooms, making the most of every corner. Once installed, your bathroom will feel more open and functional. Ready to reimagine your space?
6. Add a Bold Accent Wall with Patterned Tile
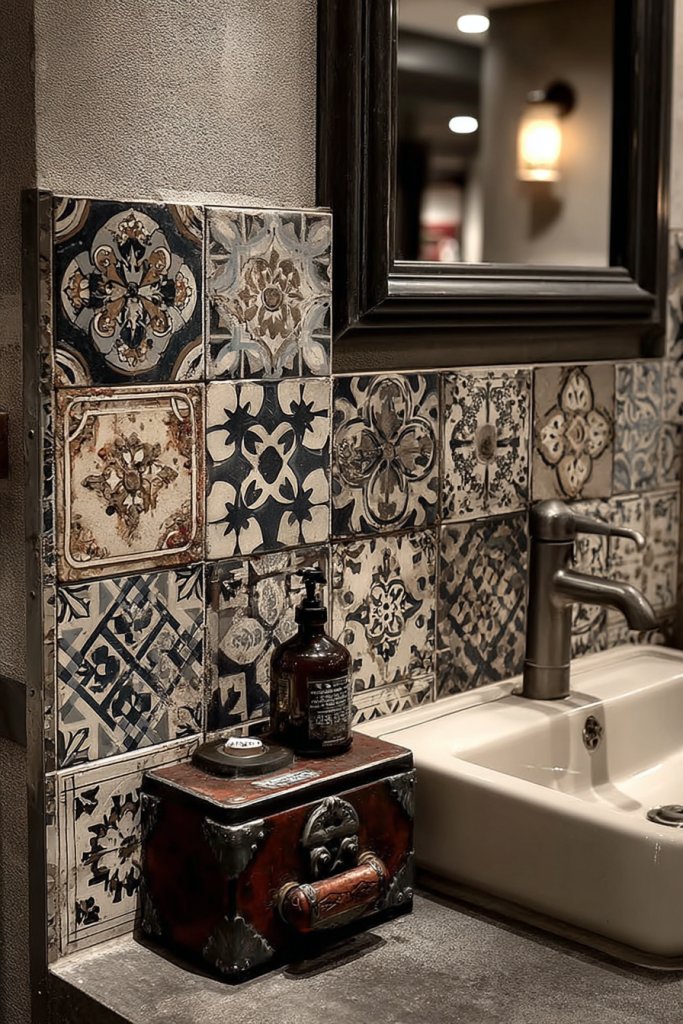
A small bathroom can feel bland and uninspired, especially if it’s all white or neutral. You want to inject personality and visual interest without overwhelming the space. An accent wall with patterned tile offers a punch of style that draws the eye and elevates the entire room. It’s a simple way to make your bathroom uniquely yours.
Picture a single wall covered in bold, geometric, or floral patterned tiles that contrast with plain walls. The intricate designs add depth and texture, creating a focal point. The pattern’s colors—be it navy, blush, or black and white—set the mood. When paired with minimal fixtures, the accent wall becomes a statement piece that transforms the ambiance.
Use patterned tiles as a backsplash behind the vanity or as a border on one wall. Mix and match different tile styles for a boho or eclectic look. During different seasons, update accessories to match the dominant colors in the pattern. Keep other elements simple to let the accent wall shine and avoid visual clutter.
Select durable, moisture-proof tiles suitable for wet environments—ceramic or porcelain are ideal. Prepare the wall by cleaning and priming it thoroughly. Use a high-quality adhesive and carefully align tiles to ensure a seamless pattern. Grout with a color that complements or contrasts, depending on your style preference. Seal the grout for longevity.
Add personal touches by choosing patterns that resonate with your personality—classic, modern, or whimsical. Incorporate decorative trims or borders for extra flair. Play with color accents in accessories like towels or rugs to enhance the patterned wall. Seasonal updates can include changing the grout color or adding decals.
A bold accent wall makes a small bathroom pop with personality without needing a complete overhaul. It’s an affordable way to add style and confidence to your space. With the right pattern, your bathroom becomes a mini gallery that impresses and inspires. Ready to make a statement?
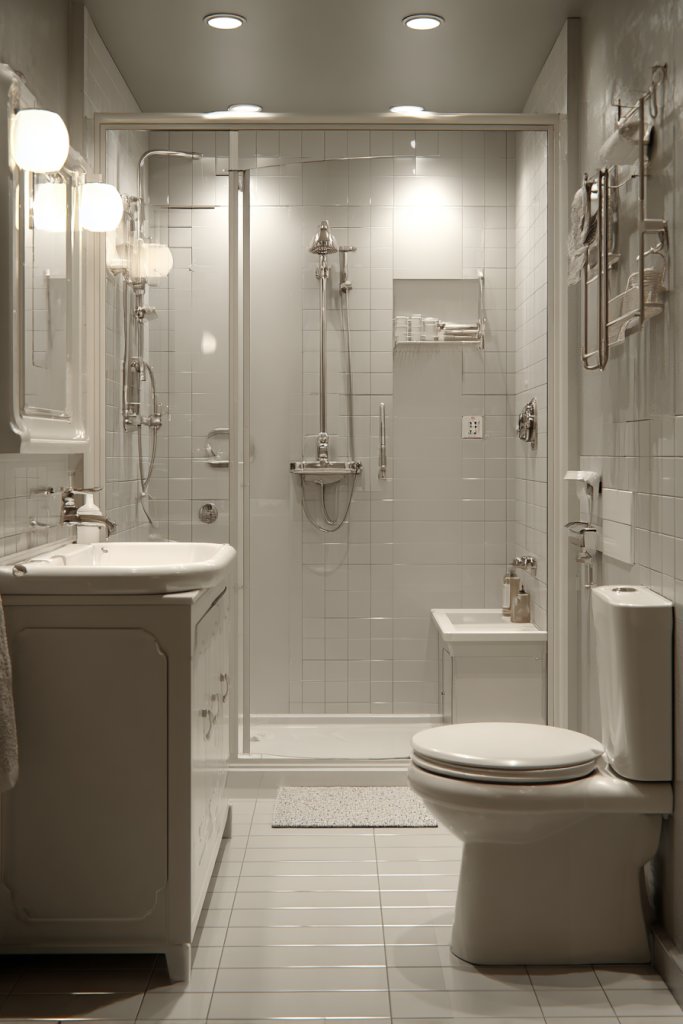
7. Use Clear Glass Shower Enclosures
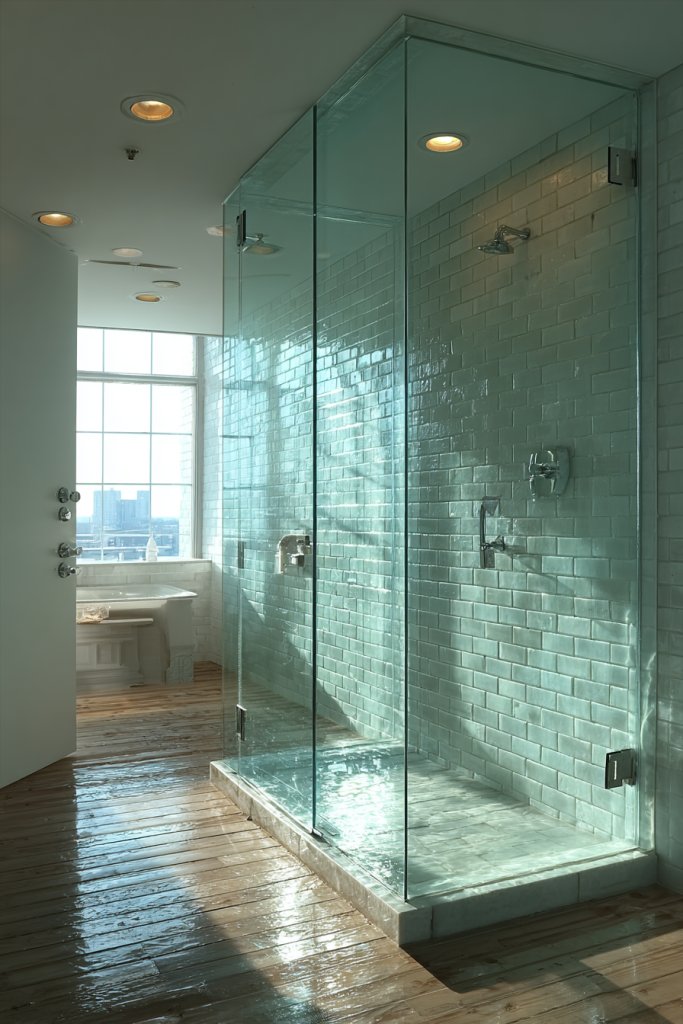
A bulky shower curtain or opaque doors can make a small bathroom feel cramped and closed off. You want a sleek, open feel that visually expands the space. Clear glass enclosures are the perfect solution—they keep the bathroom looking bright and spacious while still containing water. Plus, they add a modern touch that elevates your entire design.
Imagine a frameless glass shower with transparent panels that seem to disappear into the room. The clear glass allows light to flow freely, illuminating every corner. The minimal hardware and seamless edges create a clean, uninterrupted line that enhances the room’s openness. When the shower area is open, the entire bathroom feels larger and less cluttered.
Choose frameless or semi-frameless designs for a minimalist look, or opt for decorative hardware in matte black or brushed nickel for contrast. Incorporate textured or patterned tiles inside the shower to add visual interest without obstructing the view. During different seasons, update accessories like soap dishes or racks in complementary colors.
Measure your shower opening carefully and select a glass panel that fits snugly. Work with a professional glass installer to ensure proper sealing and support. Use tempered safety glass for durability and safety. Seal edges and joints with waterproof silicone to prevent leaks. Consider adding a low-profile threshold to maintain a sleek appearance.
Personalize the enclosure with decorative strips or subtle etching, if desired. Incorporate matching hardware that complements your fixtures and accessories. Keep the glass spotless with regular cleaning to maintain clarity and shine. Add a small bench or built-in niche with textured tiles for practical storage.
Clear glass enclosures are a simple upgrade that makes your bathroom feel more spacious and modern. They emphasize light and openness, transforming even the tiniest spaces. Once installed, you’ll love how the room feels brighter and more welcoming. Ready to open up your shower?
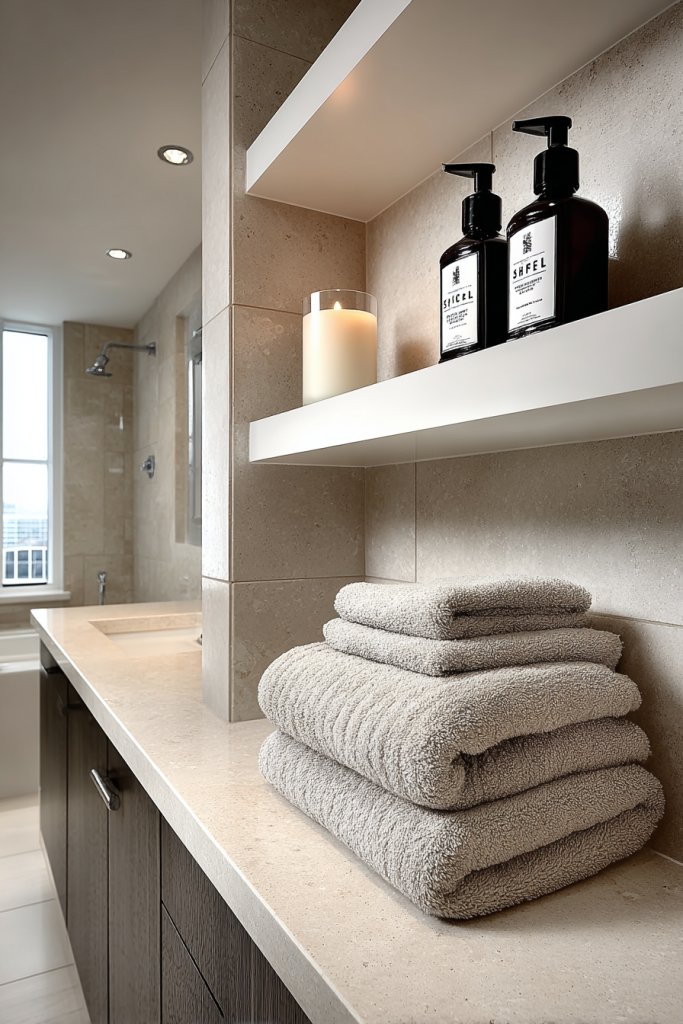
8. Integrate Under-Sink Storage Solutions
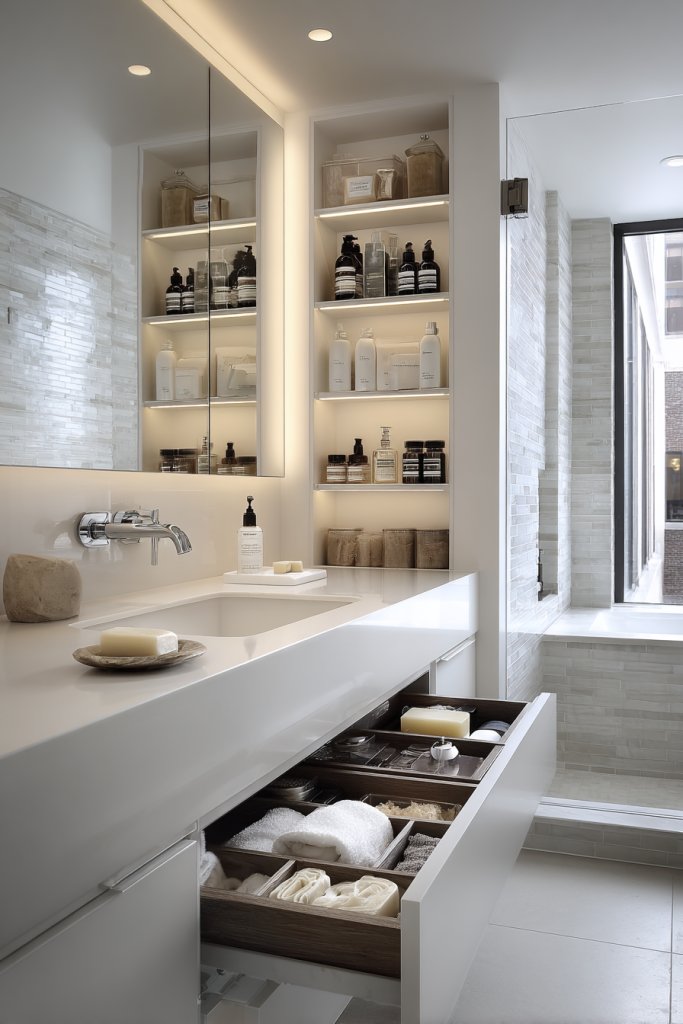
Countertop clutter can quickly turn a small bathroom into chaos. You need smart storage options that hide away essentials while keeping everything accessible. Under-sink storage is a practical solution that helps you organize toiletries, cleaning supplies, and more without sacrificing style. It’s the secret to a tidy, functional bathroom.
Visualize a sleek vanity with open or concealed storage compartments beneath the sink. Use baskets, drawers, or pull-out shelves to organize bottles, brushes, and accessories. The space is neat and clutter-free, with everything you need within arm’s reach. The cabinetry’s finish matches your overall decor, creating harmony and order.
Choose from open shelving for easy access or closed cabinets for a cleaner look. Incorporate decorative or textured storage bins for a personalized touch. During different seasons, swap out items or reorganize for a fresh vibe. Small, modular units fit better in tight spaces and can be customized with inserts or dividers.
Start by measuring your under-sink area carefully. Select cabinets, baskets, or drawers that fit your space and needs. Use moisture-resistant materials like laminate or treated wood to withstand humidity. Install the storage units securely, ensuring easy access for daily use. Clean and seal all surfaces to prevent water damage.
Personalize your storage with labels or color-coded bins for quick identification. Incorporate decorative liners or textured covers to add visual interest. Keep frequently used items at the front for convenience. During upgrades, consider adding a small pull-out trash bin or a dedicated space for cleaning supplies.
Smart under-sink storage keeps your bathroom tidy and stress-free. It transforms a cluttered chaos into organized bliss, making daily routines smoother. With a little planning, your bathroom can look effortlessly neat and stylish. Ready to tidy up?
9. Incorporate Vertical Storage with Tall Cabinets
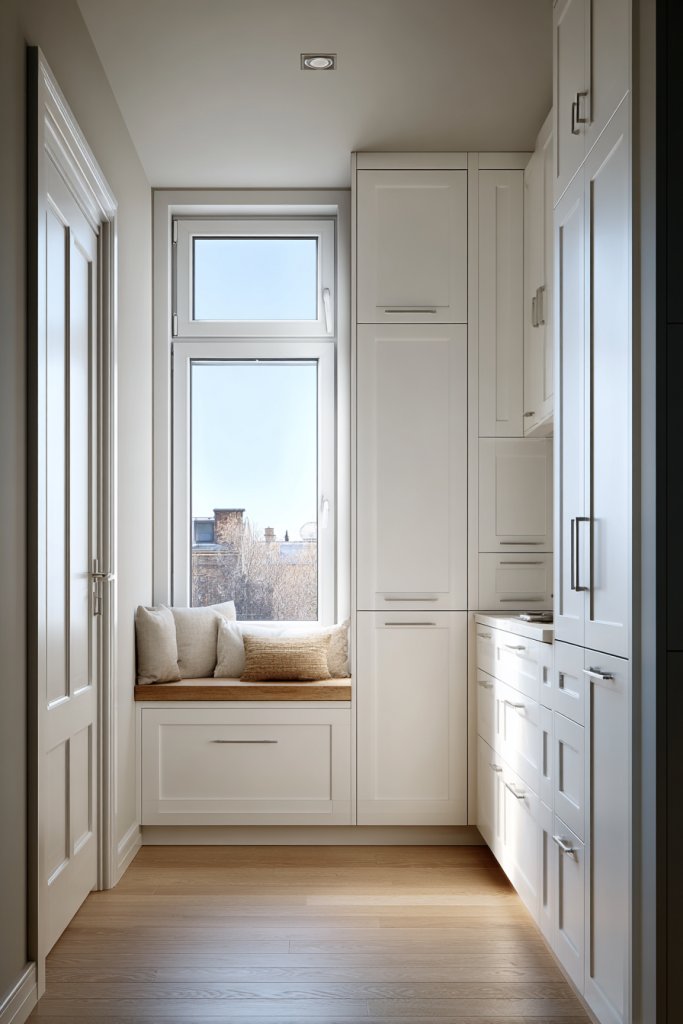
Floor space is precious real estate in small bathrooms, yet vertical space often goes unused. Tall cabinets are perfect for maximizing storage without crowding the floor. They add height and drama while providing ample room for towels, toiletries, and cleaning supplies. It’s a smart way to keep the clutter off counters.
Imagine a slim, floor-to-ceiling cabinet painted in a color that matches your walls. Its doors hide neatly folded towels, baskets, and bottles. The vertical lines draw the eye upward, making the ceiling appear higher. Shelves inside can be adjustable, accommodating larger bottles or decorative boxes. It’s both functional and a statement piece.
Choose sleek, minimalist designs for a modern look or ornate wood for a traditional vibe. During different seasons, reorganize items or add decorative storage boxes on open shelves. Incorporate hooks or small racks on the cabinet sides for additional hanging storage. You can also mount smaller open shelves above for easy access to frequently used items.
Measure your available wall height and width accurately. Select a tall cabinet that fits snugly without blocking doors or windows. Secure it firmly to the wall with brackets or anchors, especially if you live in an earthquake zone. Organize the interior with baskets or adjustable shelves for maximum efficiency. Finish with a coat of waterproof paint or sealant for longevity.
Customize with stylish knobs or handles that match your fixtures. Use decorative liners inside shelves for a polished look. Add labels to baskets or boxes for quick identification. During seasonal changes, reorganize to include new decorative elements or functional accessories.
Vertical cabinets make the most of limited space and add height to your bathroom’s design. They’re practical for storage and visually lift the room, making it feel taller. Once in place, your bathroom will look organized, spacious, and effortlessly chic. Ready to elevate your storage?
10. Embrace Minimalist Fixtures and Hardware
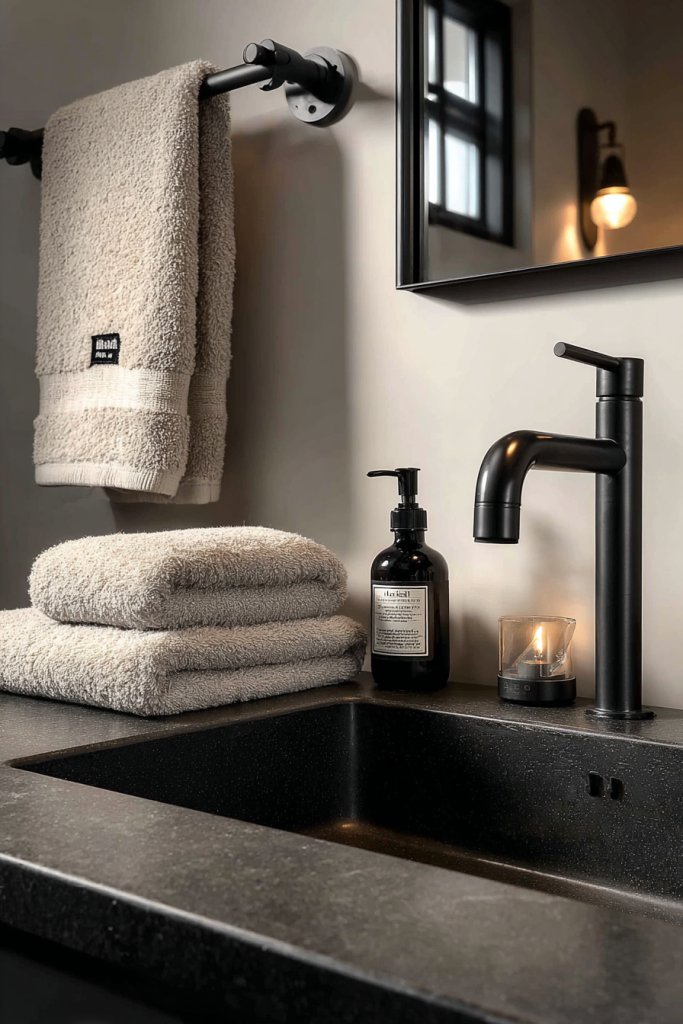
Cluttered fixtures and bulky hardware can make a small bathroom feel chaotic. You want a streamlined, modern look that reduces visual noise and feels calm. Minimalist fixtures and hardware—like sleek faucets and handles—offer a simple solution. They create a clean aesthetic that emphasizes space and function.
Imagine a bathroom with matte black or polished chrome fixtures—faucets, handles, and showerheads—all in sleek, geometric shapes. The minimalist design eliminates ornate details, giving the space a contemporary edge. The uniformity and clean lines make the room look organized and uncluttered. Subtle finishes reflect light, adding to the brightness.
Choose fixtures in neutral tones like black, white, or metallic for versatility. During different seasons, swap out hardware for finishes that match new accessories or decor updates. Incorporate handle-less cabinets or touch-activated fixtures for a cutting-edge look. Keep accessories minimal to avoid visual overload.
Select fixtures with a cohesive style that complements your overall decor. Install with precision, ensuring all handles and faucets are level and secure. Use waterproof sealant around fixtures to prevent leaks. For added convenience, opt for fixtures with water-saving features. Keep the style consistent across all hardware for a unified appearance.
Personalize with subtle details—like a textured finish or unique handle shape—that reflect your personality. Incorporate matching towel bars or robe hooks in the same finish for harmony. During updates, consider LED backlit mirrors or touchless controls for a futuristic touch. Minimalist doesn’t mean boring—be bold with subtle details.
Minimalist fixtures create a sleek, clutter-free environment that feels peaceful and organized. They reflect a modern lifestyle and are easy to maintain. Once you switch to this style, your bathroom will look polished and timeless. Ready for a clean, streamlined upgrade?
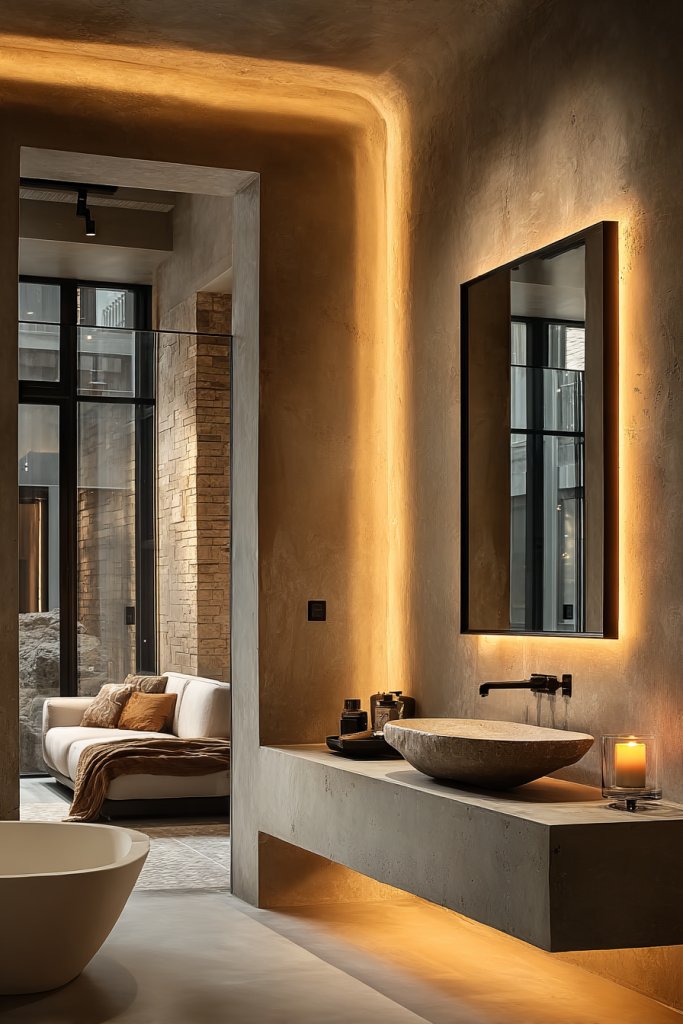
11. Install Recessed Lighting for a Soft Glow
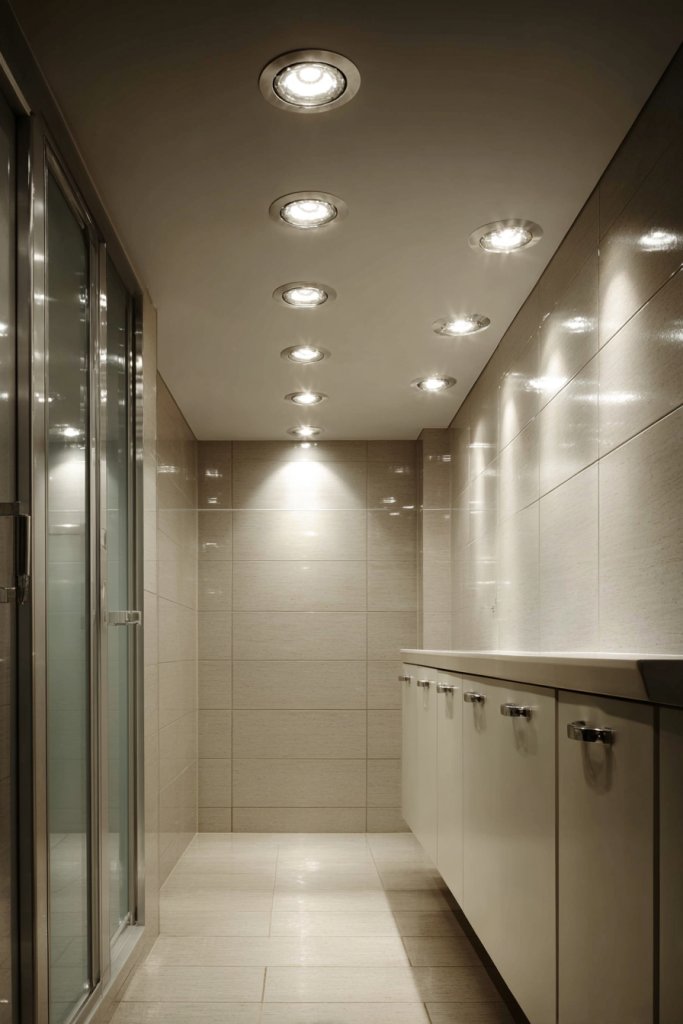
Ceiling-mounted lights can be harsh and create shadows, especially in small bathrooms. You want a lighting scheme that’s gentle, even, and unobtrusive. Recessed lighting offers a sleek solution that provides a soft glow without cluttering your ceiling. It’s perfect for creating a calm, inviting atmosphere.
Picture a ceiling with flush-mounted, round or square lights embedded seamlessly into the surface. The light distribution is even, eliminating shadows and dark corners. When switched on, the glow is warm and inviting, highlighting your fixtures and finishes. The minimalist design blends into the ceiling, making the room appear taller and more spacious.
Use dimmable recessed lights to adjust ambiance for different moods or times of day. Combine with wall sconces or LED strips for layered lighting effects. During holidays or special occasions, add colored or decorative bulbs for a festive touch. Keep the overall lighting subtle to maintain a relaxing environment.
Plan your ceiling layout carefully, spacing the lights evenly for uniform coverage. Hire a professional electrician to install the fixtures, ensuring proper electrical wiring and safety standards. Use energy-efficient LED bulbs that produce warm or cool tones depending on your preference. Seal all fixtures properly to prevent moisture damage.
Add a decorative trim or colored lens to customize the look. Incorporate smart lighting controls for remote adjustment or automation. Complement the lighting with reflective surfaces or textured finishes that bounce light around. During different seasons, adjust the lighting temperature for cozy or bright effects.
Recessed lighting offers a modern, unobtrusive way to brighten your bathroom softly. It creates a spa-like ambiance that relaxes and rejuvenates. Once installed, it elevates the overall design while improving functionality. Ready to bring subtle sophistication?
12. Use Light-Reflecting Finishes for Fixtures and Accessories
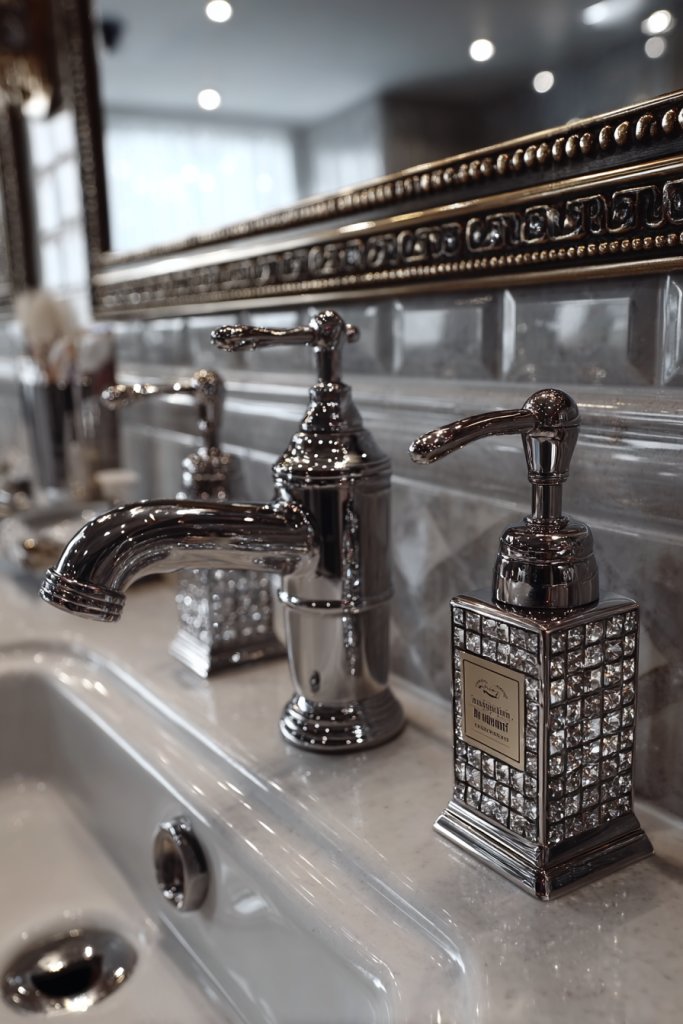
Dull fixtures and accessories can make a small bathroom look tired and flat. You want to add a touch of sparkle and brightness without a complete overhaul. Light-reflecting finishes—like metallic, glossy, or chrome—enhance light and give your space a fresh, polished look. It’s a simple upgrade with big visual impact.
Imagine faucets, handles, and fixtures in shiny chrome or brushed nickel, bouncing light around the room. The glossy surfaces catch and reflect ambient light, making everything seem brighter. Complement this with accessories like soap dishes, towel bars, or storage containers in matching finishes. The consistent shine creates a cohesive, upscale vibe that elevates your decor.
Mix different finishes—matte, satin, or high-gloss—for a layered look that adds depth. During seasonal updates, swap out dull or worn accessories for fresh, reflective ones. Use metallic accents on hardware, mirrors, and even small decor pieces like containers or trays. Keep the overall palette light and airy to maximize reflection.
Choose fixtures and accessories in finishes that suit your style—chrome, brass, or matte metals. Install fixtures carefully, ensuring they are secure and sealed properly to prevent water infiltration. Regularly clean surfaces with non-abrasive cleaners to maintain their shine. For a uniform look, match all hardware and accessories across the space.
Add decorative elements like textured or patterned metallic tiles or wall panels. Incorporate subtle contrasting finishes—like matte fixtures with glossy accessories—for visual interest. During updates, incorporate LED-backlit mirrors or fixtures with integrated lighting for extra sparkle. Personal touches elevate the overall aesthetic.
Light-reflecting finishes are a cost-effective way to add elegance and brightness. They instantly upscale your bathroom’s look, making it feel more luxurious. With a little strategic selection, your space will shine and feel more inviting. Ready to reflect some style?
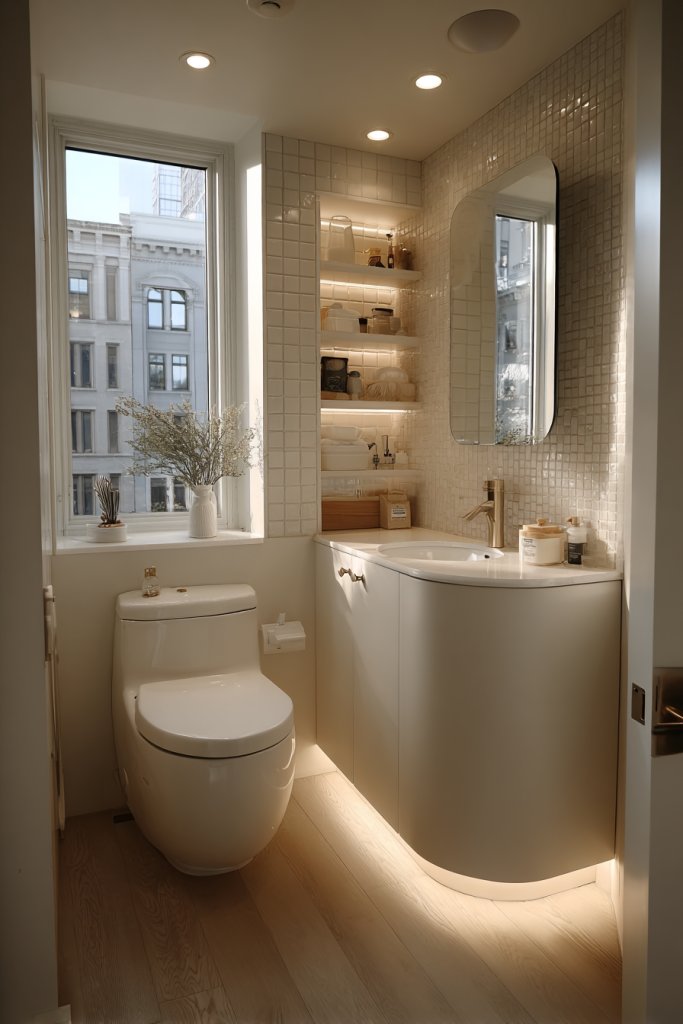
13. Add a Compact, Wall-Mounted Toilet
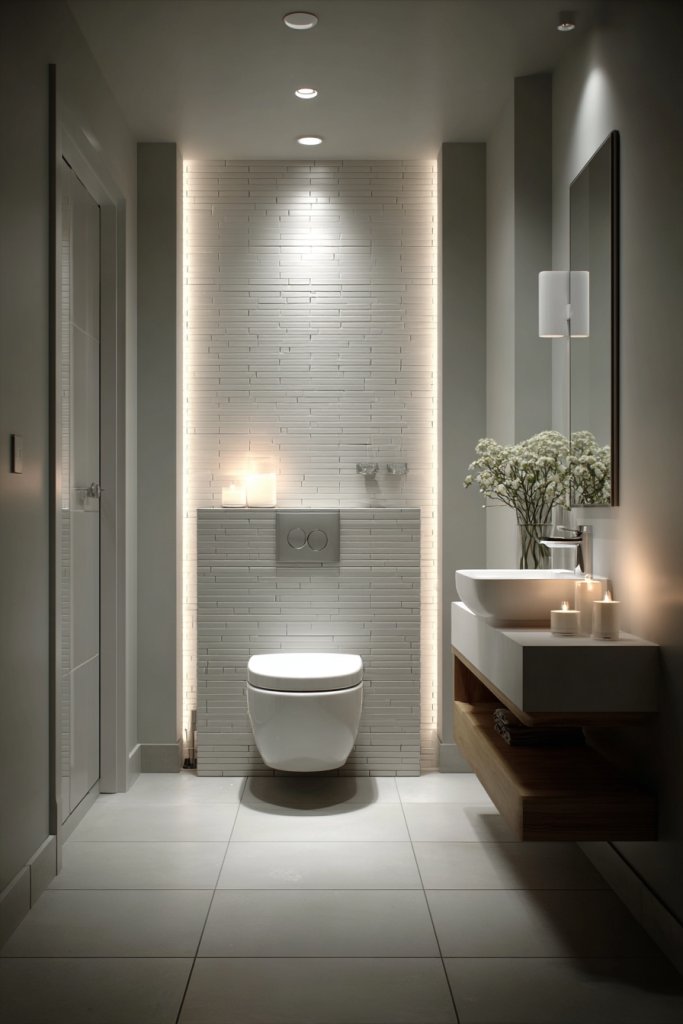
A traditional toilet can dominate a small bathroom, making it feel cramped and cluttered. You need a space-saving solution that still offers comfort and style. Wall-mounted toilets are the answer—they free up floor space and give your bathroom a sleek, modern look. Plus, cleaning underneath becomes a breeze.
Imagine a streamlined, wall-mounted toilet with a concealed tank, making the room look less busy. Its clean lines and minimalist design draw attention to the openness of the space. The flush plate is flush with the wall, adding a subtle touch of sophistication. When combined with floating vanities and open shelving, the room feels airy and uncluttered.
Choose from various colors and finishes—white, matte black, or metallic—to match your decor. Consider a soft-close seat for comfort and noise reduction. During different seasons, update the surrounding accessories with matching hardware or textiles. Keep the design simple for a timeless, elegant look.
Hire a professional plumber to install the concealed tank and wall brackets securely. Measure your space carefully to ensure the toilet fits perfectly and complies with local plumbing codes. Seal all connections with waterproof sealant to prevent leaks. Finish by adding a matching flush plate and coordinating fixtures.
Personalize with custom-colored flush plates or decorative wall panels. Incorporate a soft-close seat in a contrasting or matching finish. During updates, add a small shelf or cabinet above for extra storage. Keep the overall look minimalist and clean for maximum impact.
A wall-mounted toilet maximizes space and adds a touch of luxury to your bathroom. It’s a smart upgrade that makes cleaning easier and enhances aesthetic appeal. Once installed, the room feels more open and polished. Ready to modernize?
14. Choose Durable, Small-Scale Countertops
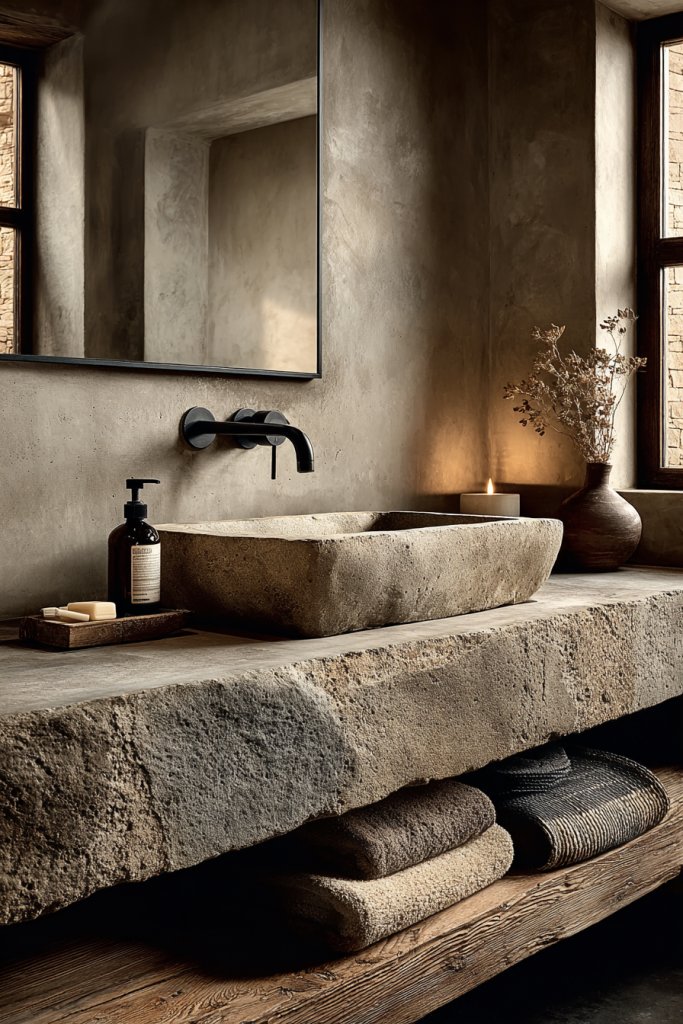
Countertops are often overlooked in small bathrooms, but they set the tone for style and functionality. Heavy, bulky surfaces can overwhelm a tiny space. Opting for small-scale, durable materials allows you to have a stylish workspace without sacrificing practicality. It’s all about balancing form and function.
Picture a compact countertop in quartz or laminate, fitting snugly into your vanity. Its sleek surface reflects light, adding brightness. The edges are smooth and rounded, preventing accidental bumps. Light-colored or subtle patterns keep the look fresh and unobtrusive, complementing your overall decor. This small surface becomes both a functional and aesthetic focal point.
Choose from a variety of finishes—matte, glossy, or textured—to suit your style. During different seasons, swap accessories like soap dispensers or trays to refresh the look. Incorporate integrated sinks for a seamless appearance or add decorative edge trims for a touch of flair. Keep the surface clutter-free for a clean, elegant vibe.
Measure your space precisely to select a countertop that fits comfortably. Opt for moisture-resistant, durable materials like quartz, laminate, or solid surface. Install with waterproof sealant along edges and around the sink to prevent leaks. Use a level during installation for a smooth surface. Finish by adding a matching or contrasting faucet for extra style.
Add personal touches with decorative trays or textured liners. Choose colors and finishes that match your fixtures and accessories. During seasonal updates, change out small decor items for a fresh look. Keep the surface clean and protected with proper maintenance.
A small, durable countertop elevates your bathroom’s practicality and style. It’s a smart investment that combines longevity with aesthetics. Once in place, it creates a sleek, cohesive look that’s easy to maintain. Ready to upgrade your surface?
15. Incorporate Soft, Neutral Color Palettes
Bright, bold colors can be overwhelming in a small bathroom. You want a calming, versatile palette that enlarges the space visually and creates a relaxing atmosphere. Soft neutrals—like beige, blush, or light gray—are perfect for this. They reflect light, soften shadows, and make the room feel more spacious.
Imagine walls painted in a gentle blush or a warm beige, paired with matching towels and accessories. The subtle hues create a seamless, airy environment that feels calming and inviting. Textured tiles or matte finishes further soften the overall look. When combined with natural light, the palette enhances the sense of openness and tranquility.
Layer different shades of neutrals—think warm and cool tones—for depth. During different seasons, add pops of color through textiles or small accessories to keep things fresh. Use metallic or textured finishes to add visual interest without overpowering the softness. Keep the decor minimal for maximum calming effect.
Choose paint, tiles, and fixtures in high-quality, moisture-resistant finishes that suit your color palette. Prepare your wall surfaces properly before painting or tiling. Use light-colored grout and sealants to maintain brightness. Pair with neutral-colored cabinetry and fixtures for a cohesive look. Incorporate layered lighting to highlight shades and textures.
Personalize with textured textiles, like a soft cream throw blanket or plush towels in coordinating shades. Add decorative storage in neutral tones to keep clutter out of sight. During seasonal changes, swap out accent pieces for more vibrant or darker hues for variety. Keep accessories minimal to preserve the peaceful vibe.
Soft, neutral palettes are timeless and versatile, making your bathroom feel more spacious and serene. They create a blank canvas for personal expression and style. Once you embrace this approach, your space will feel calm, clean, and effortlessly elegant. Ready to relax?
16. Install a Space-Saving Sliding Door
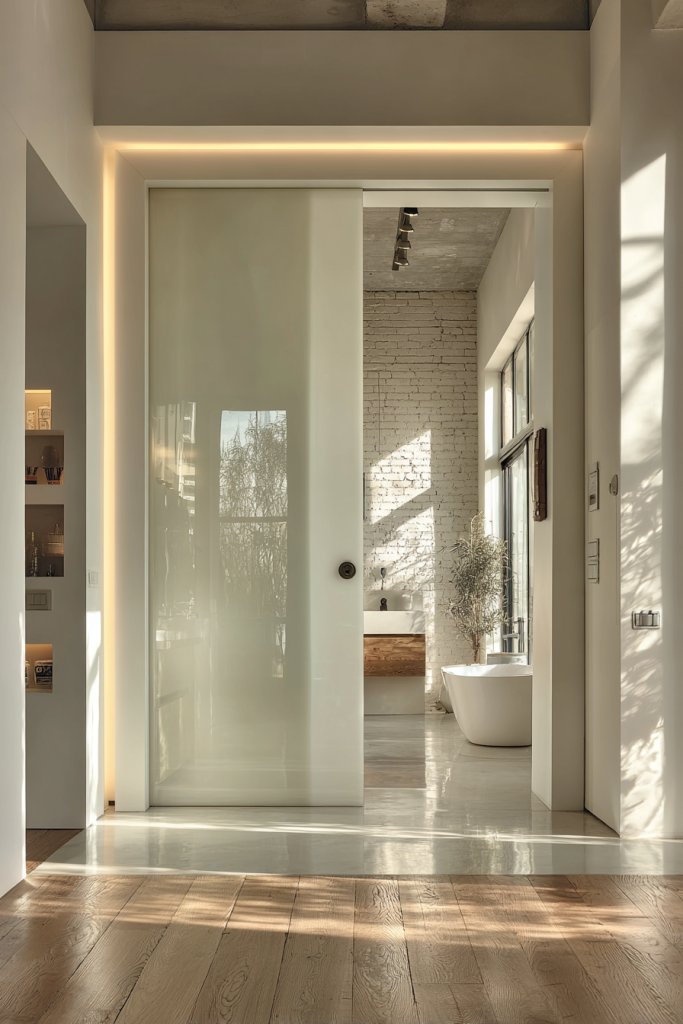
Traditional swinging doors eat up valuable space in small bathrooms, making movement awkward. You need a solution that maximizes every inch while maintaining style. Sliding doors slide neatly into the wall or along a track, saving space and providing a sleek look. It’s a smart upgrade for compact rooms.
Visualize a smooth, flush-mounted sliding door with a modern handle or frosted finish. When opened, it glides effortlessly along a track, revealing or hiding the bathroom entrance. The clean lines and minimal hardware blend into the wall, creating a seamless, uncluttered appearance. The door’s design adds a contemporary touch that complements your decor.
Choose from different materials—frosted glass, wood veneer, or mirrored panels—to match your style. During different seasons, update the door or handle for a fresh look. For privacy, opt for opaque or tinted glass. Keep the track clean and lubricated for smooth operation, and consider soft-close mechanisms for added luxury.
Measure your doorway accurately and select a sliding door system compatible with your wall. Hire professionals for installation to ensure proper alignment and support. Seal edges with waterproof caulk to prevent leaks and drafts. Finish with a handle or pull that complements your fixtures. Regular maintenance keeps it sliding smoothly.
Personalize with decorative hardware or painted finishes that match your decor palette. During seasonal updates, swap out handles or add decorative accents. Integrate a mirror on one side for added functionality. Use contrasting trim or accent colors around the door to add visual interest.
A sliding door saves space while elevating your bathroom’s style. It makes the room feel open and modern, perfect for small spaces. Once installed, you’ll wonder how you ever lived without it. Ready to slide into smarter design?
17. Use Textured Wall Panels for Visual Interest
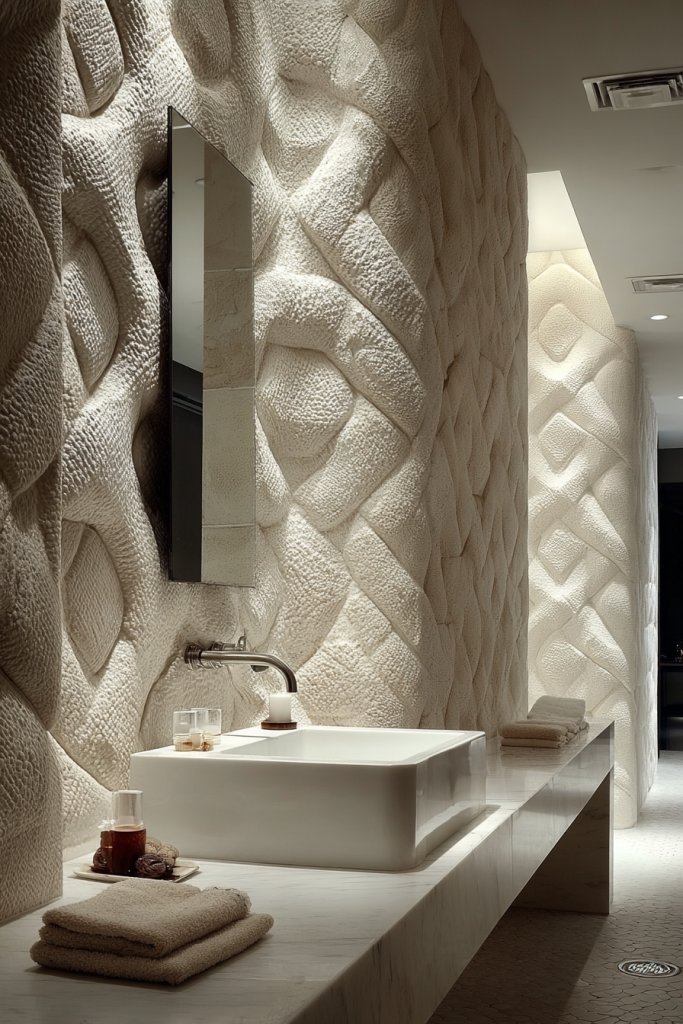
Flat, smooth walls can make a small bathroom feel dull and uninviting. You crave a design element that adds depth and personality without overwhelming the space. Textured wall panels provide a chic, sophisticated way to create visual interest. They turn plain walls into focal points and elevate your decor.
Imagine walls clad in subtly textured panels—wood grain, pebble, or geometric patterns—that catch and reflect light differently. The tactile surface adds richness and dimension, making the space more engaging. When paired with smooth surfaces and sleek fixtures, the contrast creates a refined, modern aesthetic. The textures invite touch and curiosity.
Choose from waterproof panels in various textures and patterns to suit your style—rustic, contemporary, or minimalist. Use them on one feature wall or as wainscoting for a dramatic effect. During different seasons, incorporate color or metallic accents into the panels for variety. Keep other elements simple to let the textured walls stand out.
Select moisture-resistant, waterproof panels designed for bathroom use. Prepare your wall surface by cleaning and priming it thoroughly. Attach panels using adhesive or interlocking systems as recommended by the manufacturer. Seal all edges and joints with waterproof caulk to prevent moisture ingress. Finish with paint or protective coating if desired.
Personalize panels with custom colors, metallic finishes, or embedded LED lighting for a customized look. Combine textures—like smooth with textured—to create layered depth. During updates, add decorative trims or molding to frame the panels. Incorporate subtle lighting to highlight the textures and patterns.
Textured wall panels bring a luxe, artistic touch to small bathrooms, making them feel more upscale. They add depth and personality without taking up space. With the right choice, your bathroom becomes a stylish retreat that reflects your unique taste. Ready to add texture?
18. Opt for Compact, Multi-Functional Fixtures
A small bathroom demands maximum utility from every fixture. Traditional units often waste space or lack versatility. Multi-functional fixtures combine features—like a shower and tub or vanity with storage—that maximize utility in tight spaces. They’re perfect for creating a practical, clutter-free environment.
Picture a sleek combo unit where a shower and a soaking tub share the space, separated by a glass partition. Or a vanity with built-in drawers, shelves, and even fold-out mirrors. These fixtures streamline the room’s layout and reduce visual clutter. Their modern designs blend seamlessly into your decor, making the space both functional and stylish.
Choose from a variety of multi-use options—think a vanity with integrated storage or a shower-tub combo in a compact design. During different seasons, swap accessories or update fixtures in finishes that match your decor. Consider fixtures with built-in lighting or smart features for enhanced convenience. Keep the look minimalist for a cohesive aesthetic.
Assess your space and identify your must-have features. Select fixtures that combine these functionalities without overwhelming the room. Hire professionals for precise installation, especially for plumbing and electrical components. Use waterproof sealants and secure fixtures properly. Finish with matching hardware and accessories for a unified appearance.
Add personal touches with decorative hardware or textured surfaces. During seasonal updates, change out accessories or add subtle decorative elements that match your theme. Incorporate smart technology—like motion sensors or LED lighting—for convenience. Keep clutter hidden inside drawers or cabinets for a clean look.
Multi-functional fixtures turn small bathrooms into efficient, stylish spaces. They maximize utility without sacrificing style, making daily routines smoother. Once you embrace this approach, your bathroom will be both practical and beautiful. Ready to upgrade?
19. Add Under-Eave or Ceiling Storage Nooks
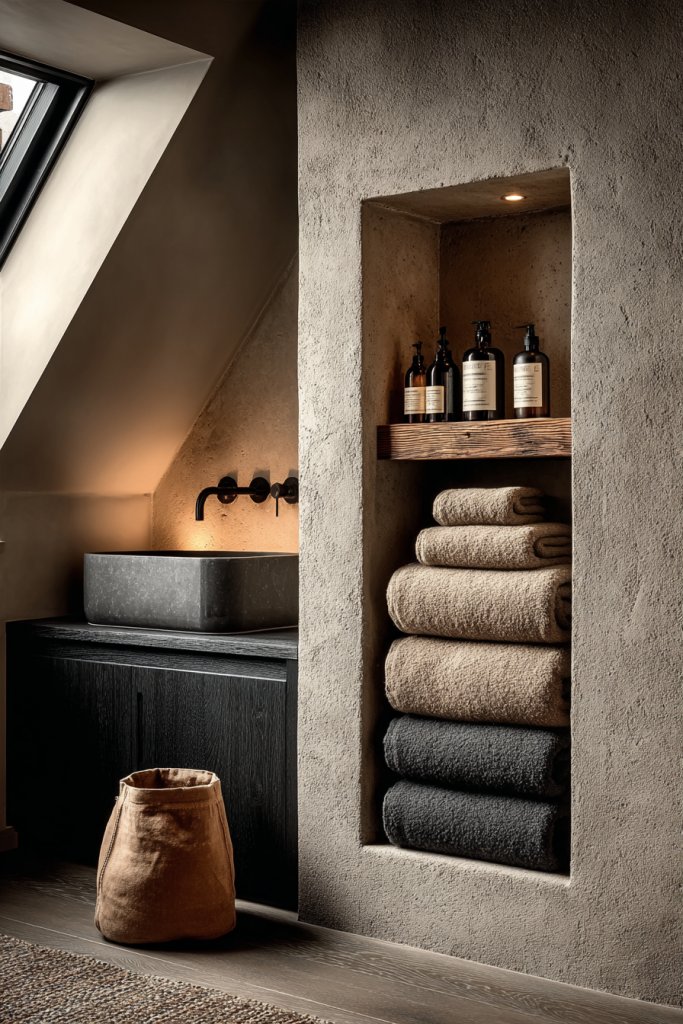
Unused ceiling or eave spaces are gold mines in tiny bathrooms. They hide away essentials without cluttering your visual space. Installing discreet storage nooks takes advantage of vertical space, keeping your bathroom tidy and organized. It’s a clever trick to free up counter and floor space.
Imagine small, built-in shelves tucked under the eaves or ceiling corners, painted to match the walls. They hold folded towels, small baskets, or toiletries, keeping everything within reach yet out of sight. The recessed design maintains a sleek, seamless look. When lit with subtle LED strips, they add a cozy glow and highlight the architectural detail.
Use wood, drywall, or waterproof panels for durability. The size and placement can be customized to fit your space and needs. During different seasons, update contents or add decorative accents inside the nooks. Keep the design simple and integrated for a clean, cohesive look.
Assess your ceiling or eave areas for suitable locations. Build or retrofit shelves with moisture-resistant materials. Ensure proper support and secure fastening to prevent accidents. Finish with paint or waterproof coating, matching your wall color. Add lighting for visibility and ambiance.
Decorate the shelves with textured fabrics, decorative boxes, or themed accessories. Incorporate small hooks or clips for towels or hanging items. During holiday seasons, add themed or seasonal decor to keep the space lively. Keep contents organized and easy to access.
Under-eave or ceiling nooks cleverly utilize overlooked space, transforming your bathroom into a more functional haven. They add architectural interest and keep clutter at bay. Once integrated, they make your small space feel larger and more organized. Ready to reach new heights?
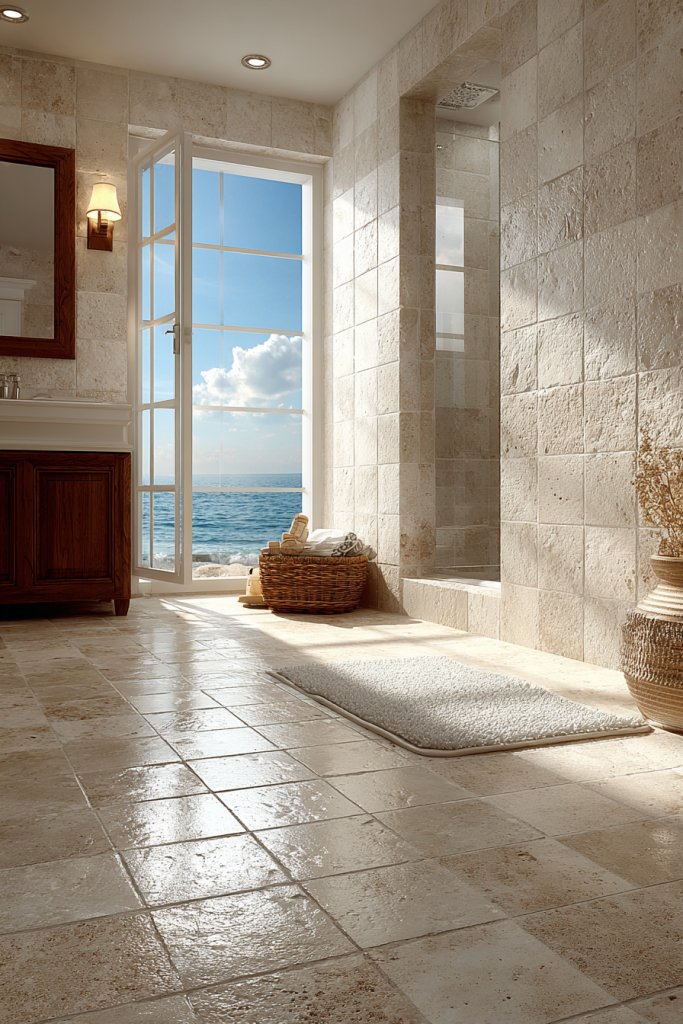
20. Enhance Natural Light with Skylights or Small Windows
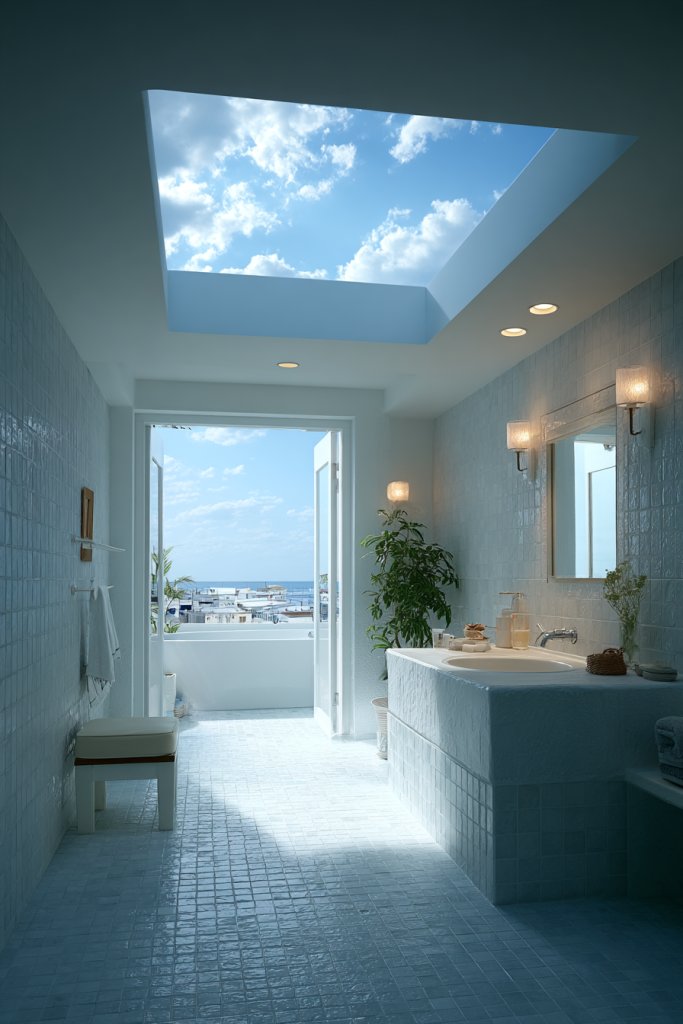
A small bathroom often feels dark and closed in, especially in windowless spaces. Bringing in natural light instantly lifts the mood and makes the room feel larger. Skylights or tiny windows are perfect solutions—flooding the space with sunlight and reducing the need for artificial lighting during the day. It’s a simple fix with a big impact.
Visualize a small skylight installed above the shower or vanity, allowing sunlight to pour in and bounce off glossy tiles. Alternatively, a frosted window in a strategic spot provides privacy without blocking light. The natural illumination highlights textures and finishes, creating a bright, airy ambiance. During the day, the room feels open and inviting, almost like an extension of the outdoors.
Choose skylights with shades or blinds for privacy and light control. Small, strategically placed windows can be combined with decorative window treatments or frosted glass. Use light, reflective wall and ceiling colors to maximize the effect. During different seasons, adjust window coverings for privacy or to control heat gain.
Consult with a professional for structural modifications needed for skylight installation, especially for roofing concerns. Ensure proper insulation and waterproofing around the opening. Use energy-efficient glass to minimize heat loss or gain. Seal all edges securely to prevent leaks, and match the interior decor with window trims or treatments.
Add subtle decorative elements like textured window film or frosted patterns for privacy and style. Incorporate ambient lighting around the window or skylight for nighttime elegance. During seasonal changes, update window coverings or add decorative valances. Keep the view outside your window or skylight clutter-free for maximum effect.
Natural light transforms your bathroom into a lively, cheerful space that energizes your day. It reduces reliance on electric lighting, saving energy and money. With the right installation, your bathroom becomes a bright retreat that feels much larger than it is. Ready to let the sunshine in?
21. Incorporate Soft, Warm Lighting for Cozy Vibes
Harsh overhead lighting can make a small bathroom feel cold and unwelcoming. You want a warm, inviting glow that creates a cozy atmosphere. Layered, soft lighting adds depth and comfort, making your space feel more like a retreat than a utility room. It’s all about creating ambiance with the right fixtures.
Visualize wall sconces or LED strips behind mirrors emitting a gentle, warm light. The glow softly illuminates your face and surroundings, eliminating harsh shadows. Dimmable lights allow you to adjust brightness for different moods or routines. Strategically placed fixtures highlight textures and finishes, adding depth and intimacy.
Choose fixtures with warm color temperatures—around 2700K to 3000K—for a cozy feel. During different seasons, brighten for winter mornings or dim for relaxing evenings. Incorporate layered lighting—think accent lights, sconces, and under-cabinet LEDs—to create a rich, inviting environment. Keep fixtures simple but elegant to complement your decor.
Install dimmable switches and compatible fixtures for versatile control. Position lights at eye level or slightly above to reduce shadows. Use warm-toned bulbs for a soft effect, and ensure all wiring is safe and compliant. Add reflective surfaces or textured finishes to amplify the warm glow. Regularly clean fixtures to maintain their warm, inviting appearance.
Decorate with textured or fabric-covered lampshades, or add candles for a romantic touch. Incorporate decorative sconces or lightboxes that match your theme. During seasonal updates, change bulb tones or fixture styles for variety. Use layered lighting to create different zones within the bathroom.
Warm, soft lighting makes your bathroom feel cozy and personalized, encouraging relaxation. It enhances your daily routines and elevates your decor. Once you achieve the perfect layered lighting scheme, your bathroom will be a comforting haven. Ready to create ambiance?
Conclusion
Exploring these small bathroom interior ideas reveals a world of possibilities to make even the tiniest space feel luxurious and inviting. Embrace these creative solutions to refresh your bathroom and reflect your personal style. Don’t hesitate—try out one or more of these ideas and watch your small bathroom become a standout feature in your home. Your stylish upgrade awaits!

Post Comment