25 Small Kitchen Ideas for Compact Living
Imagine transforming your tiny kitchen into a clever, functional space that feels much bigger than it actually is! Small Kitchen Ideas have gained popularity because they unlock the potential of limited spaces, making daily cooking and entertaining a breeze.
In this article, you’ll find a delightful mix of creative tips and practical solutions to maximize your kitchen’s efficiency and style. From smart storage hacks to space-saving layouts, these ideas will inspire you to make the most of your compact kitchen and turn it into a cozy, efficient haven.
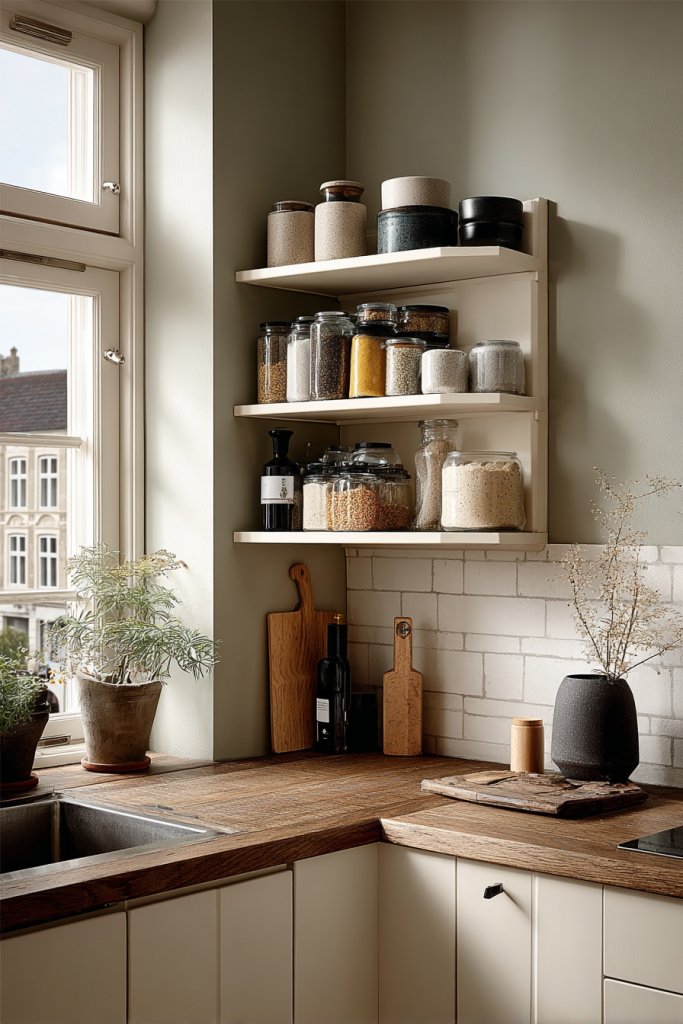
1. Maximize Vertical Storage with Open Shelving Solutions
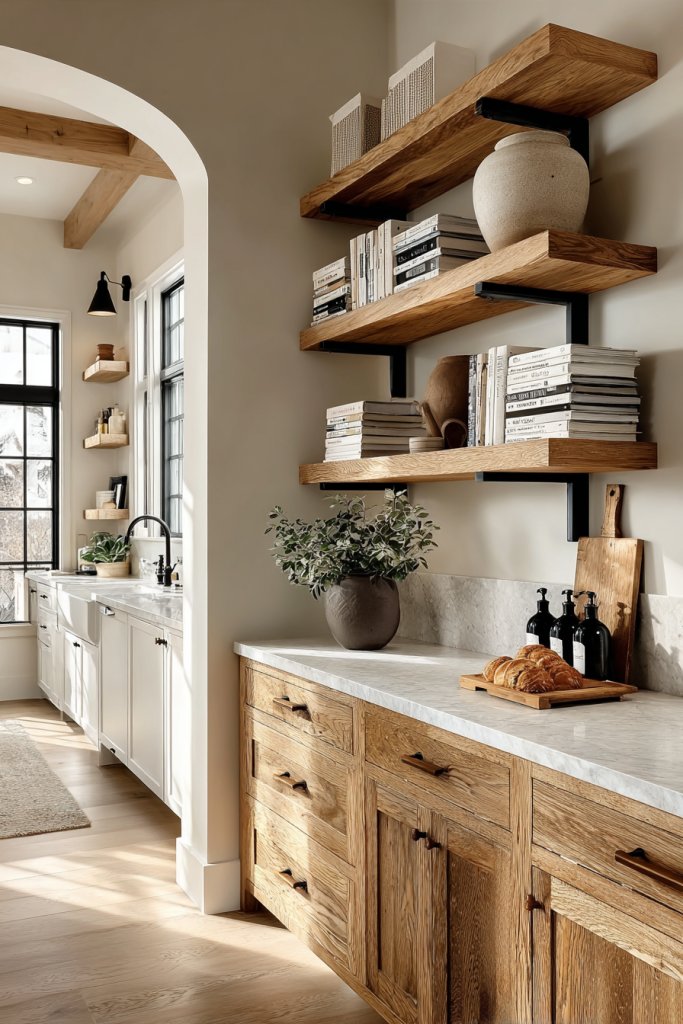
Living in a small kitchen often feels like a constant battle against clutter. Countertops get overwhelmed, and it seems like everything needs to find a home. The desire to keep things accessible without sacrificing style is real. Open shelving offers a way to organize smartly while adding a dash of charm.
Imagine sleek wooden planks mounted high on the wall, lined with colorful dishware and neatly stacked jars. The open shelves create a layered look, making the space appear taller and more inviting. The textures of metal brackets and ceramic dishes contrast beautifully with the wall behind them. It’s like turning your kitchen into a mini boutique of essentials.
Adjust open shelving to match your style—go rustic with distressed wood or ultra-modern with glass and metal. In smaller spaces, stagger shelves at different heights for visual interest and functionality. During holidays, swap out everyday items for seasonal decor or themed dishware. Shelves can also be installed in narrow corners or above windows for maximized use.
Start by measuring your wall space and choosing sturdy brackets suited for your weight needs. Select open shelves made from durable materials like hardwood, metal, or high-quality MDF. Secure the shelves into studs or wall anchors for safety. Arrange your most-used items at eye level for convenience, and consider adding lip edges to prevent items from falling.
Personalize with decorative storage baskets, colorful bowls, or vintage containers. Use labels to organize spices, snacks, or utensils for quick access. Incorporate textured textiles like woven placemats or fabric liners on the shelves for a cozy feel. You could also install small LED puck lights underneath for extra illumination at night.
Vertical open shelving turns clutter into a feature and boosts your kitchen’s style quotient. It’s a simple upgrade that makes everything feel more curated and intentional. With a few shelves and some creative styling, your small kitchen will feel more spacious and inviting, inspiring you to cook more often.
2. Install Multi-Functional Furniture for Space Efficiency
Small kitchens often leave us craving more space without the luxury of expanding walls. Multi-functional furniture promises to maximize every inch by combining purpose and style. It’s like having a secret weapon against clutter and limited space. Who wouldn’t want a table that doubles as storage or a sofa that folds out into a bed?
Picture a sleek fold-down table attached to the wall that opens up when you need it and tucks away when you don’t. Nearby, a rolling cart functions as both a prep station and a serving trolley, ready to move around. A compact sofa with hidden compartments offers a cozy seating area during the day and extra bedding at night. These pieces blend seamlessly into the room, making it look stylish and spacious.
Choose furniture that suits your decor—minimalist metal and wood for a modern look, or vintage-inspired pieces for cozy charm. Adapt fold-away tables for different needs, like a breakfast nook in the morning and extra workspace in the afternoon. Use lightweight materials for easy mobility, and incorporate wheels for quick rearrangement. In larger apartments, consider multi-use storage beds or convertible dining benches.
Start by identifying your biggest space constraints and what furniture pieces can serve dual purposes. Look for wall-mounted fold-down tables or drop-leaf designs that are easy to install. Select rolling carts with locking wheels for stability. For seating, opt for stackable or foldable stools that tuck away neatly. Assemble or install these pieces carefully, ensuring they can handle daily use and weight.
Add colorful cushions or slipcovers to make seating more inviting. Use decorative trays or fabric-lined baskets inside storage furniture for organization. Incorporate personal touches like a vintage spice rack or a custom-painted cart to reflect your style. Regularly update accessories to keep the look fresh and tailored to your evolving taste.
Multi-functional furniture transforms a tiny kitchen from cramped to clever. It’s proof that you don’t need extra space—just smart design. With these versatile pieces, you’ll enjoy more room to cook, entertain, and relax, all while maintaining a sleek aesthetic.
3. Use Magnetic Strips for Knife and Tool Organization
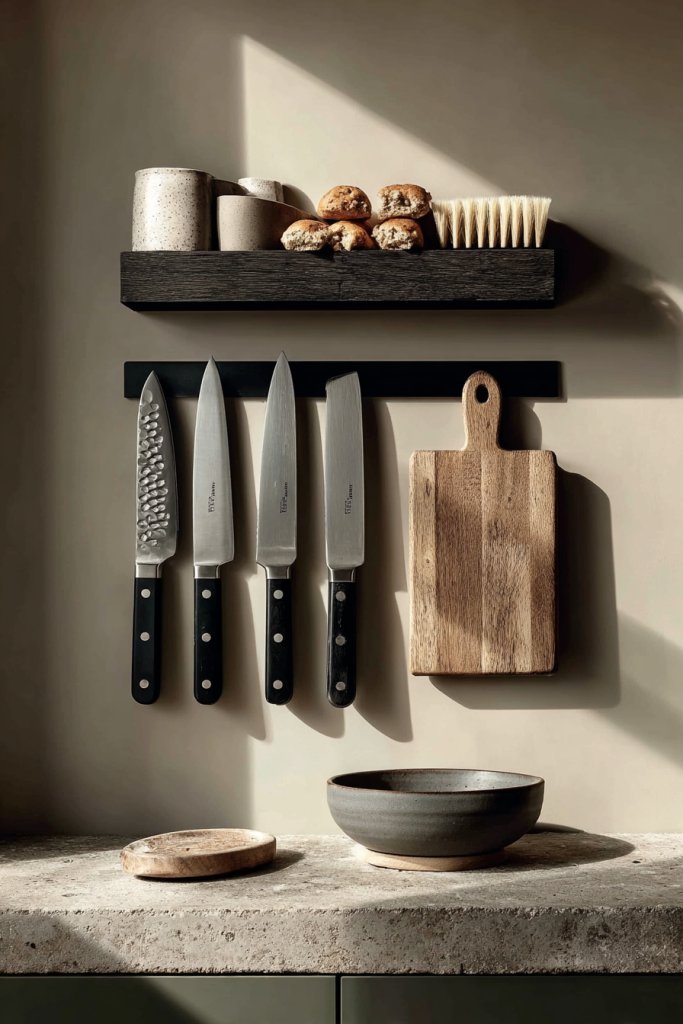
Cluttered drawers are the bane of every small kitchen, especially when it comes to knives and metal tools. Digging through a jumble for that one spatula or favorite knife is frustrating—and dangerous. Magnet strips offer a simple, efficient way to clear drawer space and keep essentials within reach. It’s about turning chaos into order with just a strip of metal.
Visualize a sleek metal strip mounted on the backsplash or wall, with knives and utensils hanging neatly in a row. The metallic sheen contrasts with colorful ceramic tiles or painted walls, adding a modern edge. The tools hang securely, with their handles easily accessible for quick cooking. The arrangement not only looks tidy but also creates a focal point that’s both functional and stylish.
Choose magnetic strips in different finishes—brushed stainless, matte black, or colorful coated options—to match your decor. Install multiple strips for different tools or separate categories like knives, spatulas, and scissors. For small spaces, combine with wall-mounted pegboards for extra storage. Seasonal or themed kitchen setups can also incorporate decorative magnets or labels.
Start by measuring your most-used tools to select a strip length that fits your space. Mount the strip at a comfortable height—usually eye level or slightly below on a backsplash or wall. Use appropriate anchors or screws depending on the wall material. Arrange your knives and tools logically, grouping similar items for quick access. Regularly clean the strip to prevent metal buildup and ensure safety.
Personalize with colorful handles or engraved labels to differentiate tools. Add small decorative magnets or custom hooks to hold other essentials like measuring spoons or peelers. You could also incorporate a magnetic strip into a magnetic knife block for a seamless look. Keep the display tidy by rotating seasonal or seldom-used tools to lesser-used areas.
Using magnetic strips elevates your kitchen’s organization game instantly. It transforms cluttered drawers into sleek, functional spaces. Plus, it’s a visual cue that your kitchen is designed for efficiency—making cooking more enjoyable and less stressful.
4. Incorporate Under-Cabinet Lighting to Brighten and Expand the Space
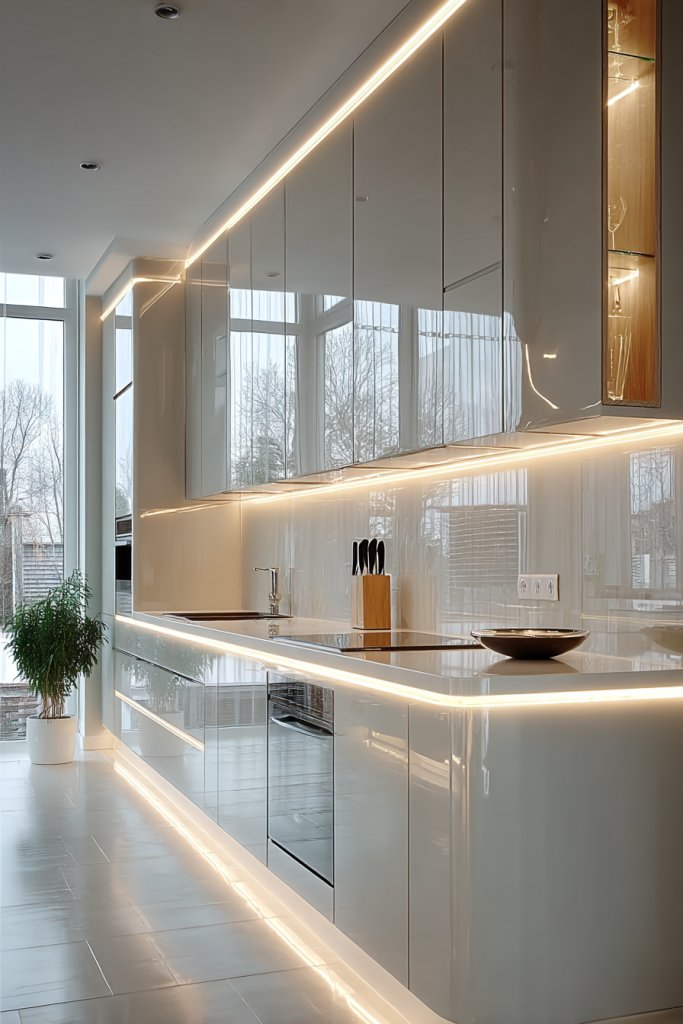
Dimly lit kitchens can feel cramped and uninspired, especially during evening cooking. Good lighting makes a huge difference in how spacious and welcoming your space appears. Under-cabinet lighting provides targeted illumination that boosts visibility and adds ambiance. It’s the secret ingredient to making a small kitchen feel larger and more functional.
Imagine a soft glow emanating from sleek LED strips tucked beneath your upper cabinets, casting light directly onto your countertops. The light reflects off glossy surfaces and brightens dark corners, creating a sense of depth. The warm or cool glow enhances the color of your walls and cabinetry, making the space feel alive. It’s like turning on a gentle spotlight on your culinary stage.
Choose from various lighting options—warm white for cozy vibes or daylight tones for a crisp, clean feel. Install flexible LED strips for adjustable angles and brightness. For seasonal changes, incorporate dimmable options to set the mood. In small kitchens, consider integrating lighting into shelves or above the backsplash for a seamless look.
Start by measuring the length of your cabinets to select the appropriate LED strip. Turn off power and install mounting brackets or adhesive backing for easy attachment. Connect to a power source, ideally with a dimmer switch for control. Test the lighting before finalizing the installation. Consider adding motion sensors or remote controls for convenience.
Customize with color-changing LED options for different moods. Pair lighting with reflective surfaces or textured walls to amplify the glow. Use dimmers or smart controls to adjust brightness based on activity or time of day. Incorporate decorative elements like small under-cabinet sconces or vintage filament bulbs for a personalized touch.
Under-cabinet lighting transforms your small kitchen into a bright, inviting space. It’s an easy upgrade that adds both style and practicality. With better lighting, cooking becomes safer and more enjoyable, making your space feel bigger and more vibrant.
5. Opt for Compact Appliances with Sleek Designs

Clunky, bulky appliances can dominate a tiny kitchen, making it feel even smaller. The solution? Compact, sleek-designed appliances that pack a punch without taking up much space. They blend seamlessly into your decor, freeing up precious counter and storage areas. Who says small can’t be mighty?
Picture a slimline mini fridge tucked into a corner, its smooth surface matching the cabinetry. Next to it, a single-serve coffee maker with a minimal footprint sits unobtrusively. These appliances showcase a modern, streamlined look, with subtle curves and matte finishes. The result is a clutter-free countertop that still offers all the essentials.
Choose appliances in neutral tones like black, white, or stainless for versatility, or opt for bold colors to make a statement. Look for multi-function appliances that combine features such as oven and microwave or toaster and grill. Compact versions are perfect for tiny apartments, RVs, or dorms, but work just as well in larger spaces seeking a minimalist aesthetic.
Start by assessing your most-used appliances and their size requirements. Measure available space carefully, considering clearance for ventilation. Select models with energy-efficient ratings to save power and money. Place appliances in designated zones to streamline workflow, and use cord management solutions to maintain a tidy appearance. Regularly clean and maintain to keep them running smoothly.
Add personalized touches like custom decals or removable skins to match your interior theme. Use stackable or modular units to create a cohesive look. Incorporate small appliances into decorative storage containers or baskets to keep the countertop visually clean. Keep favorite gadgets accessible but out of the way.
Choosing sleek, compact appliances proves that small kitchens can be both functional and stylish. They maximize your space without sacrificing performance. With the right tools, you’ll enjoy a clutter-free, efficient cooking zone that feels just right for your lifestyle.
6. Create a Vertical Herb Garden on a Wall-mounted Planter
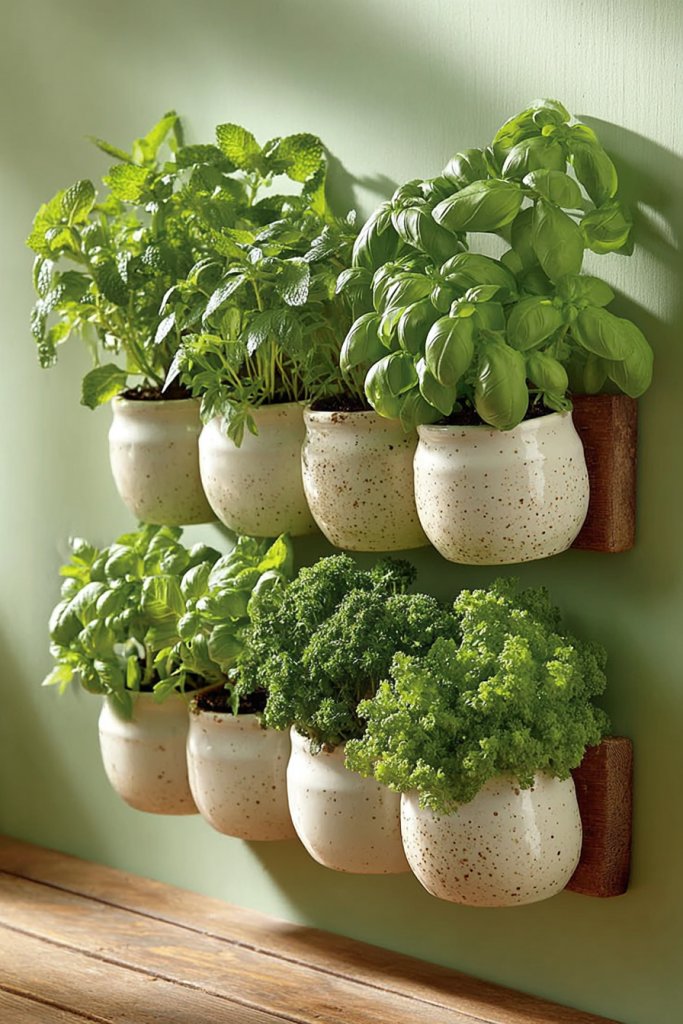
Fresh herbs elevate any dish, but small kitchens often lack counter space for potted plants. A vertical herb garden offers a solution—bringing greenery and flavor without sacrificing space. It’s a clever way to add life and function to your tiny culinary corner. Plus, it’s a fun project for green thumbs and novices alike.
Envision a narrow panel mounted on the wall, filled with small, labeled pots of basil, thyme, and mint. The plants hang or sit neatly in a tiered system, creating a lush, textured display. The vibrant green contrasts beautifully with painted walls or backsplash tiles, making your kitchen feel fresh and lively. The soft scent of herbs fills the space, turning cooking into a sensory experience.
Use wall-mounted planters in various styles, from sleek metal grids to rustic wooden boxes. For a more minimalist look, opt for sleek metal or ceramic containers. You can also incorporate a small watering system or self-watering pots for low-maintenance care. Seasonal herbs can rotate in and out, keeping your garden dynamic and fresh.
Start by selecting a wall with good light exposure—near a window or under grow lights. Mount the planters securely using anchors or brackets suitable for your wall material. Choose healthy, organic soil and high-quality seeds or starter plants. Arrange the containers in an accessible manner for watering and harvesting. Maintain consistent watering and pruning to keep herbs lush.
Label each pot with stylish tags or paint names directly onto containers. Incorporate decorative elements like small stones or pebbles for aesthetics. Use colorful or patterned planters to add personality. Create a small, easy-to-access harvesting station nearby for convenience.
Vertical herb gardens are a game-changer for small kitchens, combining practicality with beauty. They allow you to grow fresh flavors year-round, even in tight quarters. With a little effort, your cooking space becomes a lush, fragrant oasis that impresses all your guests.
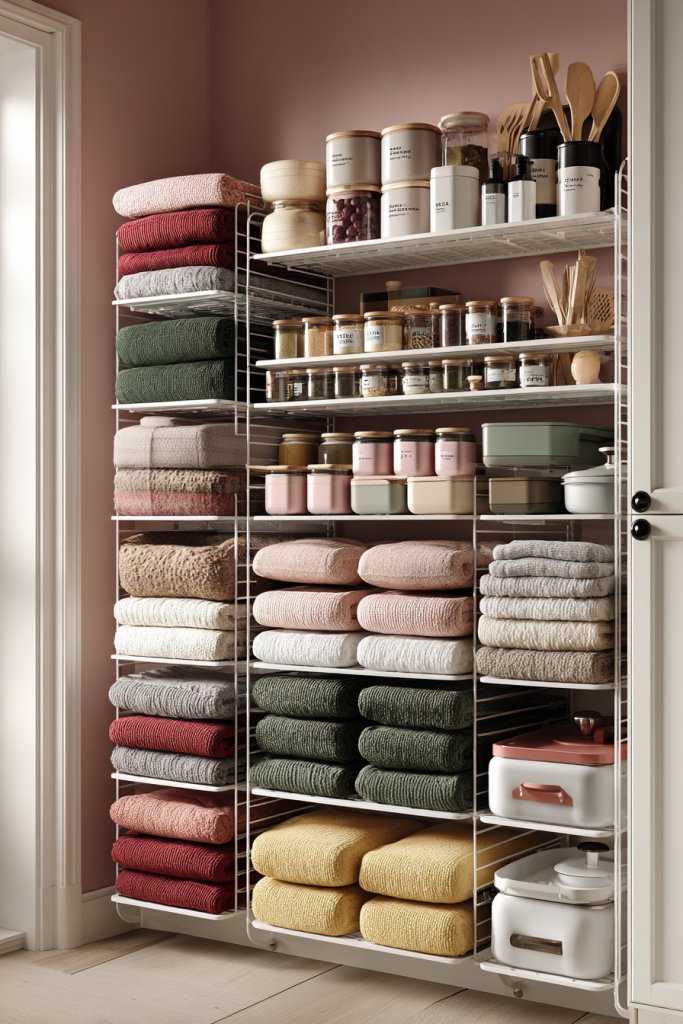
7. Use Clear Containers for Pantry Organization
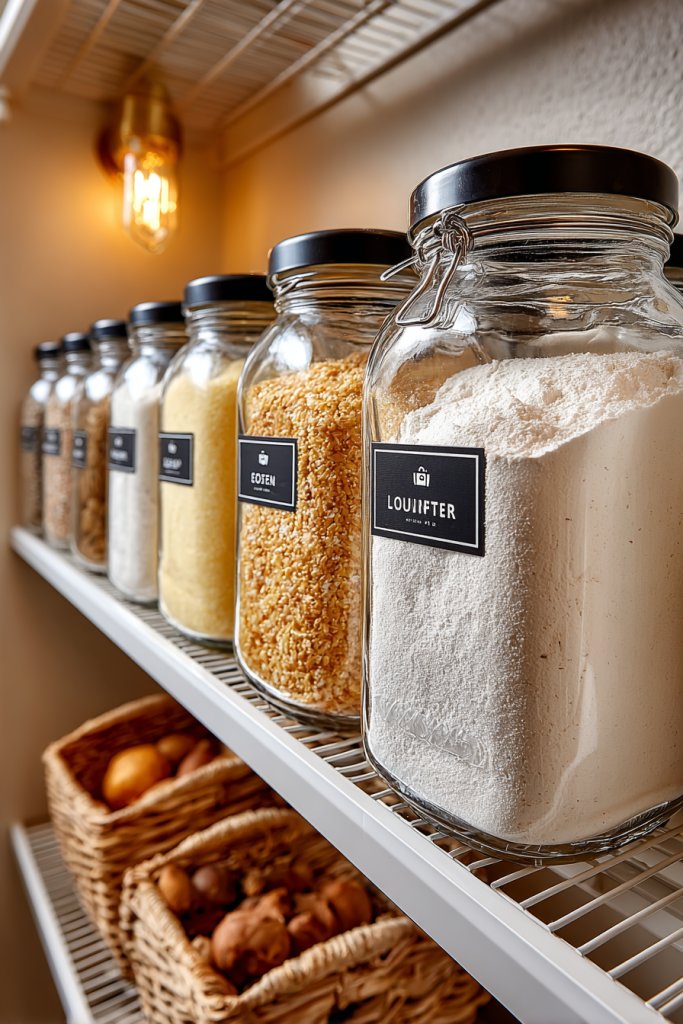
Pantry chaos is a common small kitchen nightmare—spilled flour, mismatched jars, and endless rummaging. Clear containers offer an easy fix—streamlining storage and making everything visible at a glance. No more digging through opaque bags or guessing the contents. It’s time to turn clutter into clarity.
Imagine uniform glass jars filled with colorful rice, pasta, legumes, and spices, all lined up neatly on open shelves or inside cabinets. The transparency reveals the contents instantly, and the uniformity creates a sleek, organized look. Light reflects softly through the glass, giving your pantry a clean and bright feel. Everything is accessible, and spills are minimized.
Choose containers in different shapes and sizes that suit your storage needs—wide-mouth jars for grains, tall bottles for oils, and small round containers for spices. Use airtight seals to keep food fresh longer. Label each container with simple tags or chalkboards for quick identification. For seasonal ingredients, switch to stackable or stackable-tier containers for compact storage.
Start by decluttering your pantry, discarding expired items. Select containers made from glass or BPA-free plastic that are easy to clean and durable. Arrange items by category—baking, snacks, grains—for intuitive access. Fill each container, leaving room for expansion, and label them clearly. Regularly check for freshness and rotate stock to keep everything fresh.
Add decorative touches like patterned labels, colorful lids, or chalkboard tags for a playful vibe. Incorporate small risers or tiered trays inside cabinets to maximize vertical space. Consider using reusable silicone bags or eco-friendly options for bulk items, reducing plastic waste. Personalize with a theme—vintage, modern, or rustic—to match your overall decor.
Using clear containers turns a chaotic pantry into a showcase of efficiency. It encourages better food management and reduces waste. Plus, it’s satisfying to see your ingredients organized and easily accessible—making meal prep faster and more enjoyable.
8. Hang Pots and Pans from Ceiling Racks or Wall Hooks
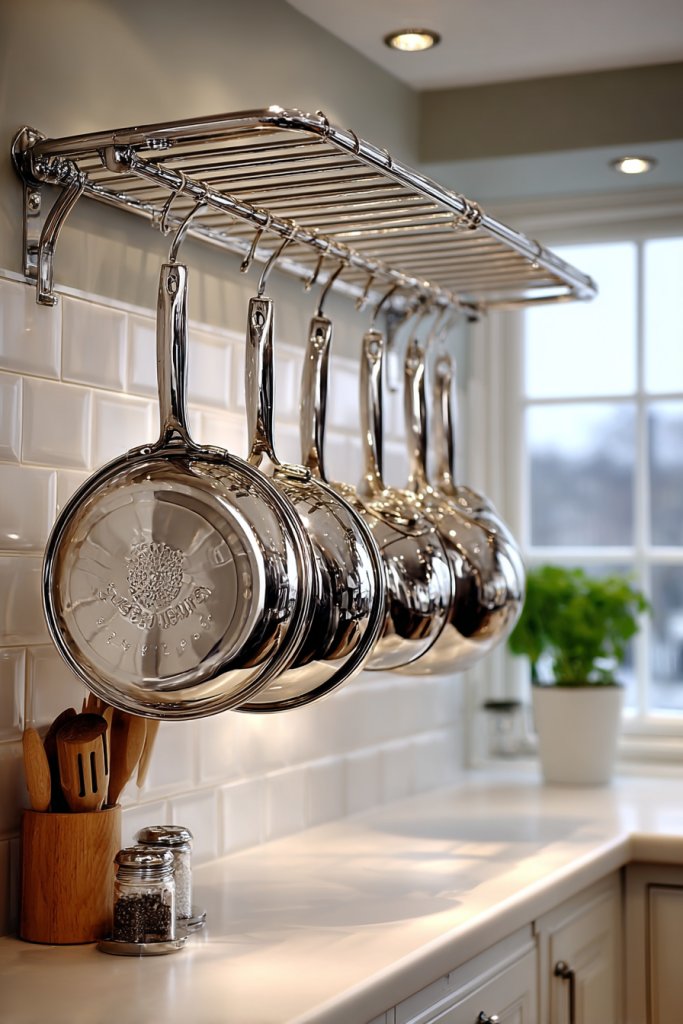
Counter space is precious in small kitchens, especially when pots and pans clutter every surface. Hanging them from ceiling racks or wall hooks keeps your cookware within arm’s reach and frees up precious drawer and cabinet space. It’s like turning your ceiling into a functional art installation. Who said practicality can’t be stylish?
Visualize a sturdy metal rack suspended above your stove or prep area, with shiny pots and pans hanging in a neat row. The metallic finish adds an industrial chic vibe, contrasting with colorful backsplash tiles. The sound of clinking cookware as you cook adds a lively, inviting atmosphere. It turns your kitchen into a professional-looking space with a touch of flair.
Select hooks or racks in finishes that match your decor—matte black, brushed steel, or vintage copper. Use multi-tiered racks for different sizes and types of cookware. For smaller kitchens, opt for wall-mounted hooks that attach directly to cabinets or walls. Incorporate magnetic strips or ceiling-mounted rails for a flexible, customizable setup.
Choose a sturdy ceiling or wall point capable of supporting the weight of your cookware. Install heavy-duty hooks or rails using appropriate anchors or screws. Arrange pots and pans by size or frequency of use—keep your favorites at the front. Regularly check that hooks remain secure and clean the hanging hardware to prevent tarnishing. Consider adding a small step stool for easy reach of higher items.
Decorate the hanging setup with colorful silicone grips or decorative chains. Add small baskets or caddies for lids, utensils, or cleaning supplies. Incorporate lighting, like under-cabinet LEDs, to highlight your cookware display. Mix and match finishes for a personalized industrial or rustic look that complements your overall style.
Hanging cookware elevates your kitchen’s functionality and aesthetic, making everyday cooking more inspiring. It’s a simple trick that keeps everything organized and within reach, turning a cluttered space into a chef’s haven. Once installed, you’ll wonder why you didn’t do it sooner.
9. Install Pull-Out Pantry Shelves for Easy Access

Small kitchens often lack pantry space, and digging through cramped cabinets is a chore. Pull-out shelves solve this problem by making everything visible and accessible at a glance. They turn tight spots into efficient storage zones, saving time and frustration. Who knew a simple shelf could change your entire organization game?
Imagine narrow, deep shelves hidden behind a cabinet door, smoothly sliding out to reveal neatly stored canned goods and snacks. The shelves are sturdy, with lip edges to prevent items from falling. The entire system glides effortlessly, making access a breeze. It’s a sleek, hidden solution that keeps your kitchen looking tidy and modern.
Opt for adjustable shelves to customize storage per need—larger bottles or small jars. Use metal or wooden slats for durability and style. In tight spaces, consider corner pull-outs or rotating carousel shelves for maximum efficiency. Incorporate soft-close mechanisms for quiet, smooth operation, and match the finish to your cabinetry for a seamless look.
Measure cabinet openings carefully to select the right size. Install the pull-out mechanisms on sturdy side panels using screws or brackets, following manufacturer instructions. Organize your pantry items by frequency or category before filling the shelves. Test the glide and locking features, ensuring smooth operation. Reinforce mounting points if needed for heavy loads.
Label each shelf or section for better organization. Add small baskets or dividers for separating items like spices or snacks. Incorporate decorative contact paper or paint the shelves to match your kitchen’s decor. Keep frequently used items at the front for quick access and rotate stock regularly.
Pull-out pantry shelves turn a tricky corner into a practical feature, making your small kitchen more efficient. They reduce clutter, save time, and add a touch of sophistication. With a little effort, your pantry becomes a tidy, user-friendly space you’ll love to use every day.
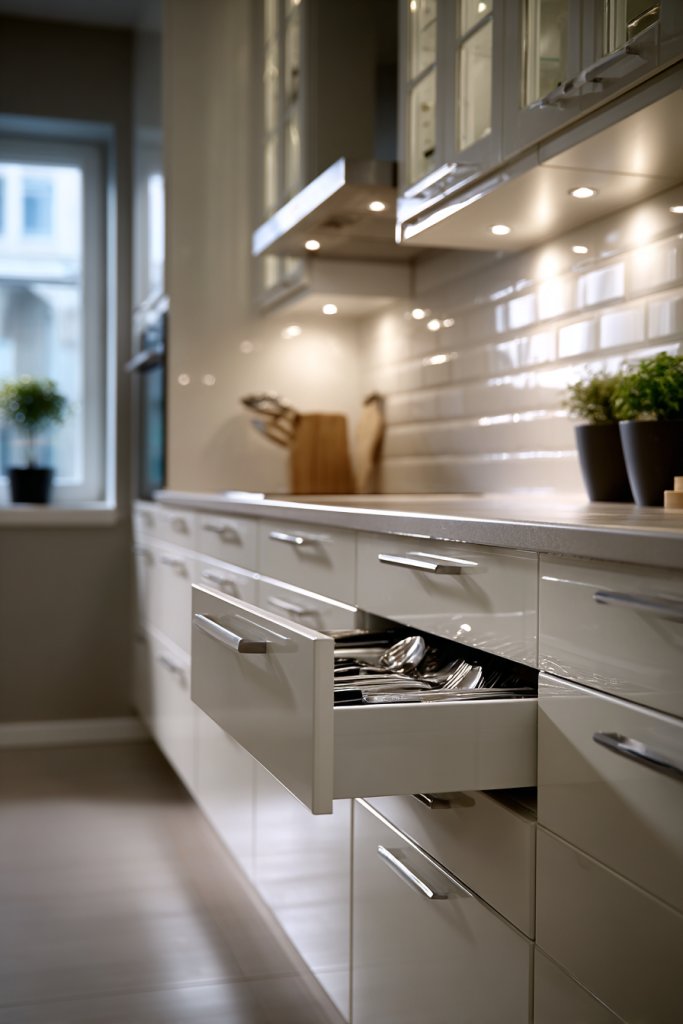
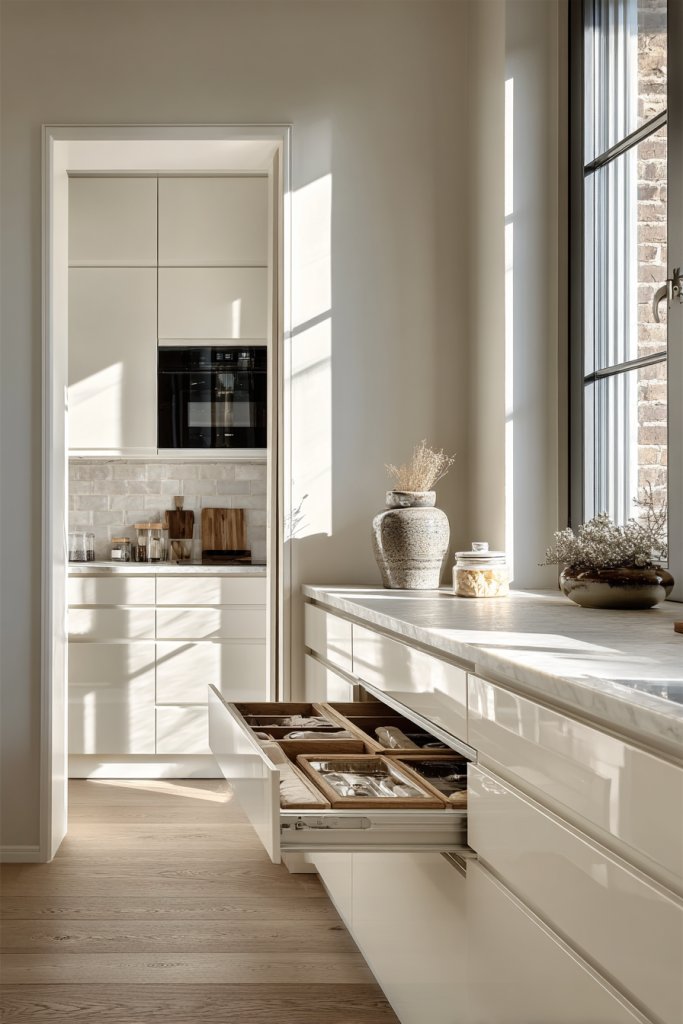
10. Incorporate Slimline Drawers and Cabinets for Hidden Storage
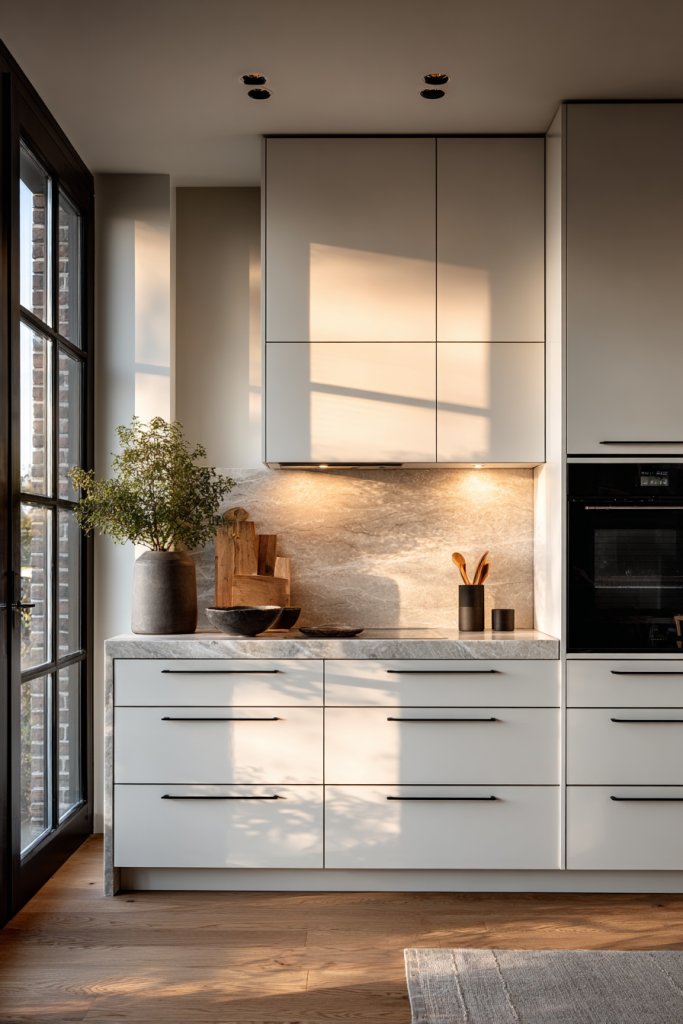
Counter clutter in small kitchens is relentless—utensils, gadgets, and small appliances fighting for space. Slimline drawers and cabinets provide a sleek solution, hiding mess and maximizing storage. They keep your counters clean and your essentials within easy reach. It’s a win-win for style and function.
Picture a narrow vertical drawer filled with neatly organized cutlery, utensils, or spices—hidden yet instantly accessible. Slim cabinets beneath counters or along walls hide small appliances and cleaning supplies, maintaining a clean aesthetic. The minimalist handles and smooth finishes create a seamless look that visually expands the space. It’s like magic: everything you need, out of sight but never out of reach.
Choose handleless push-to-open systems for a handle-free, modern look. Opt for high-gloss finishes or textured laminates to add visual interest. Use internal organizers, dividers, or trays inside drawers for better separation. In tight corners, install slim pull-outs or corner cabinets to utilize every inch effectively.
Measure your available space carefully to select appropriate sizes. Install soft-close runners or hinges to ensure quiet, smooth operation. Organize items logically—daily essentials in upper drawers, less-used gadgets below. Use labels or color-coded containers inside drawers for quick identification. Regularly declutter and reconfigure to keep everything functional.
Add decorative touches like matte black or brushed nickel handles for a contemporary vibe. Incorporate small trays or nested containers inside for utensils or spices. Use colorful or patterned liners inside drawers for a personal touch. Keep frequently used items at the top for convenience.
Slimline drawers and cabinets streamline your kitchen, making it feel larger and more organized. They turn clutter into a clean, cohesive look that’s easy to maintain. You’ll find cooking and cleaning less stressful and more enjoyable with every inch optimized.
11. Use Light Colors and Reflective Surfaces to Create an Open Feel
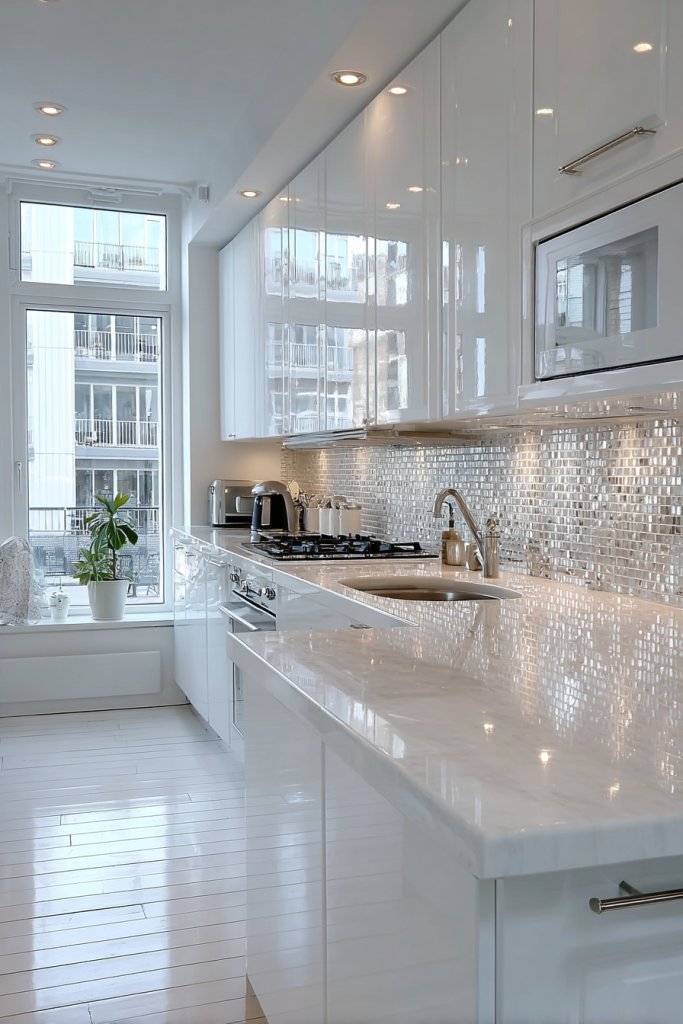
Dark, heavy colors make small kitchens feel cramped and oppressive. Bright, light hues open up the space visually, creating a fresh, airy environment. Reflective surfaces amplify this effect, bouncing light around and making everything seem larger. It’s like magic—brightening even the tiniest of spaces.
Imagine crisp white cabinets paired with a glossy backsplash that reflects ambient light. The light-colored countertops and walls work together to bounce daylight or artificial light, eliminating shadows. The subtle sheen of the surfaces adds depth and dimension, making the room feel expansive. Simple decor in pastel or neutral tones enhances the effect without cluttering the eye.
Mix matte and glossy finishes to add texture without darkening the space. Incorporate large mirrors or mirrored tiles to reflect light and create a sense of depth. Use light-colored textiles like curtains, rugs, or chair cushions to soften the look. Seasonal changes can be made by swapping darker accessories for brighter, pastel options.
Opt for cabinetry in soft shades like white, cream, or pastels, and select high-gloss or reflective backsplash tiles. Install reflective surfaces carefully, ensuring they’re properly sealed and aligned. Use lighting strategically—under-cabinet LEDs, pendant lights, or recessed fixtures—to enhance brightness. Keep clutter minimal to maintain a clean, open appearance. Regular cleaning of reflective surfaces keeps them looking pristine.
Add textured textiles in light colors for warmth and coziness. Incorporate subtle metallic accents—like brushed nickel or chrome hardware—to complement reflective surfaces. Use clear glass jars or containers to keep storage visible and light. Personal touches like light-colored art or minimalist accessories tie the look together.
Light colors and reflective surfaces make your small kitchen feel much bigger and more welcoming. They create a bright, positive atmosphere that encourages you to cook and entertain. With just a few simple updates, your space transforms into a cheerful, spacious haven.
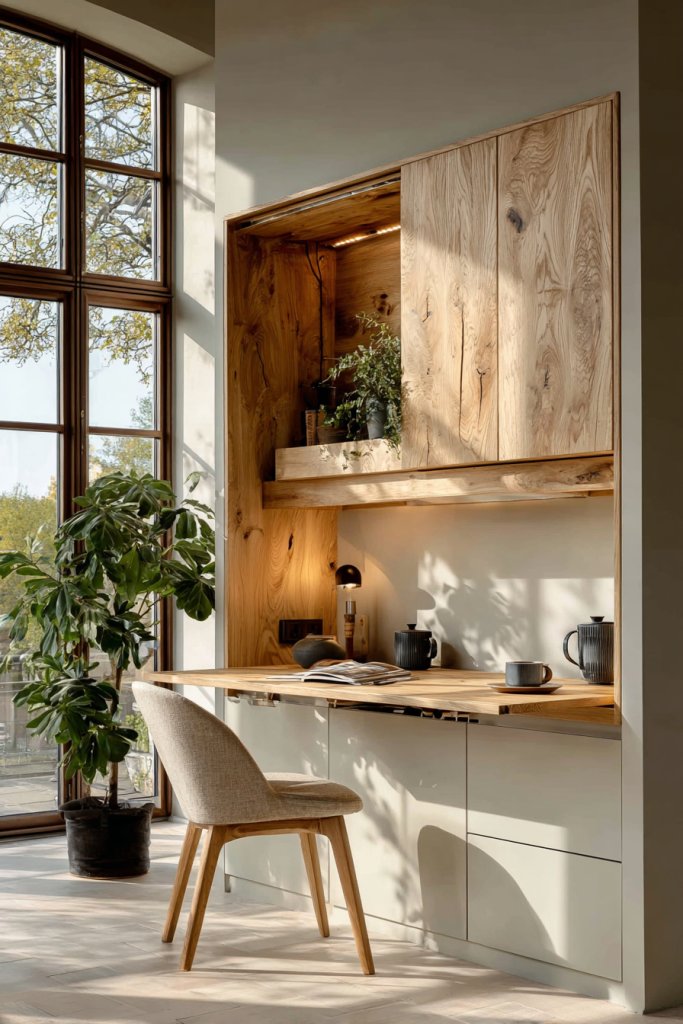
12. Incorporate a Fold-Down or Slide-Out Counter Extension
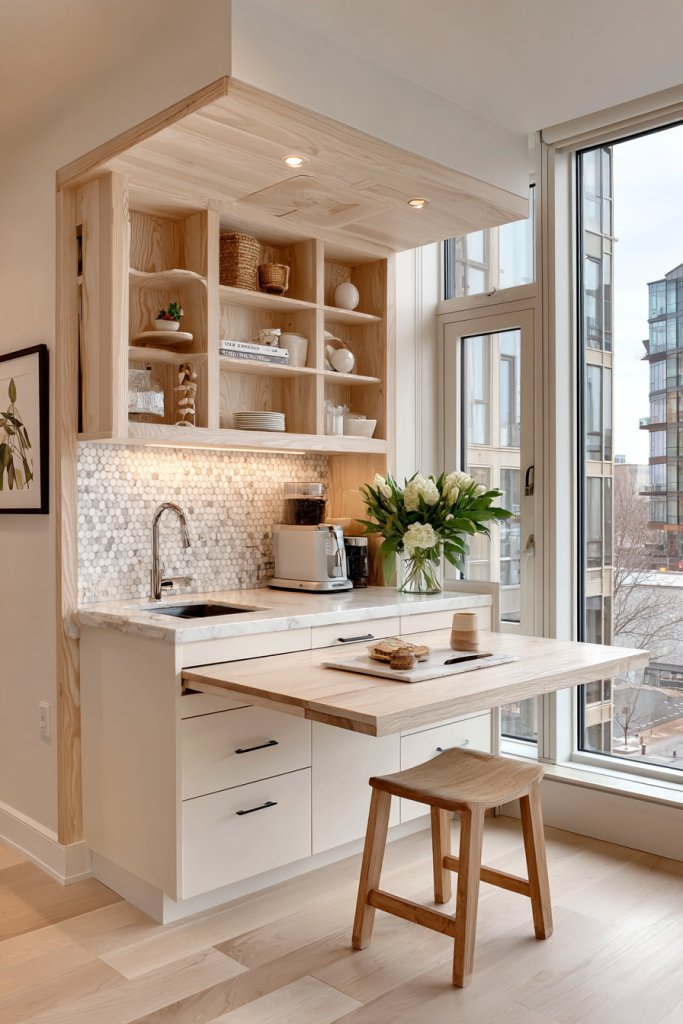
Counter space is queen in small kitchens, yet it’s often in short supply. A fold-down or slide-out counter extension offers an instant solution—extra workspace whenever you need it, hidden away when you don’t. It’s like adding an island without sacrificing your entire room. Who wouldn’t love that kind of flexibility?
Picture a sleek, foldable countertop tucked into the side of your cabinetry, ready to unfold when needed. It provides a sturdy surface for chopping, mixing, or serving. When not in use, it folds neatly against the wall, maintaining your room’s clean lines. The smooth hinges and minimal design blend seamlessly into your decor.
Choose between fold-down or slide-out options depending on your space and aesthetic preference. Use durable materials like butcher block, laminate, or quartz for the extension. Incorporate locking mechanisms or gas struts for stability. Match the design with your existing cabinetry to keep the look cohesive.
Measure your available space precisely to select a suitable fold-down or slide-out unit. Install brackets or tracks securely into wall studs or cabinetry. Reinforce the countertop with a sturdy hinge or slide mechanism. Test for stability and ease of use, ensuring it can handle typical kitchen tasks. Seal edges properly for safety and longevity.
Add a decorative edge or trim to match your kitchen style. Use a contrasting or coordinating surface material for visual interest. Incorporate small hooks or magnetic strips on the side for utensils or tools. Regularly clean and maintain the hinge or slide mechanism for smooth operation.
A fold-down or slide-out counter extends your workspace without crowding your tiny kitchen. It’s a clever, cost-effective way to boost functionality and style. Once installed, you’ll wonder how you ever managed without it—making cooking more efficient and enjoyable.
13. Install Corner Shelves or Lazy Susans for Hard-to-Reach Spaces
Corners in small kitchens are often wasted or cluttered, making access a challenge. Corner shelves and Lazy Susans turn these awkward spots into practical storage solutions. They maximize every inch and keep essentials within easy reach. It’s a simple fix that makes your kitchen smarter and more organized.
Imagine tiered corner shelves fitted snugly into tight corners, holding spices, oils, or small gadgets. A Lazy Susan spins smoothly, revealing all your supplies without the need to dig through clutter. The circular design adds a decorative element, especially with colorful jars or neatly labeled containers. It’s a smart way to keep things accessible and tidy.
Choose from open wire racks, solid wood shelves, or glass versions depending on your style. Incorporate colorful or patterned liners on shelves to add personality. For Lazy Susans, select those with multiple tiers or adjustable shelves. Use in cabinets, on counters, or inside pantry corners for maximum versatility.
Measure the corner space carefully before purchasing. Install corner shelves with appropriate brackets or adhesive for easy attachment. For Lazy Susans, assemble the rotating base and secure it in the corner or inside cabinets. Organize items by frequency of use for quick access. Regularly clean to prevent dust or food debris buildup.
Label jars or containers on shelves for better organization. Add decorative touches like colorful liners, small plants, or themed labels. Use matching colors or materials to tie the corner storage into your overall decor. Rotate stored items seasonally or as needed for freshness and variety.
Corner shelves and Lazy Susans make small kitchens more functional and less cluttered. They turn wasted space into a useful feature, elevating your organization game. With these simple upgrades, your kitchen becomes a more efficient, inviting space to cook and entertain.
14. Use Compact, Stackable Dish Racks and Storage Bins
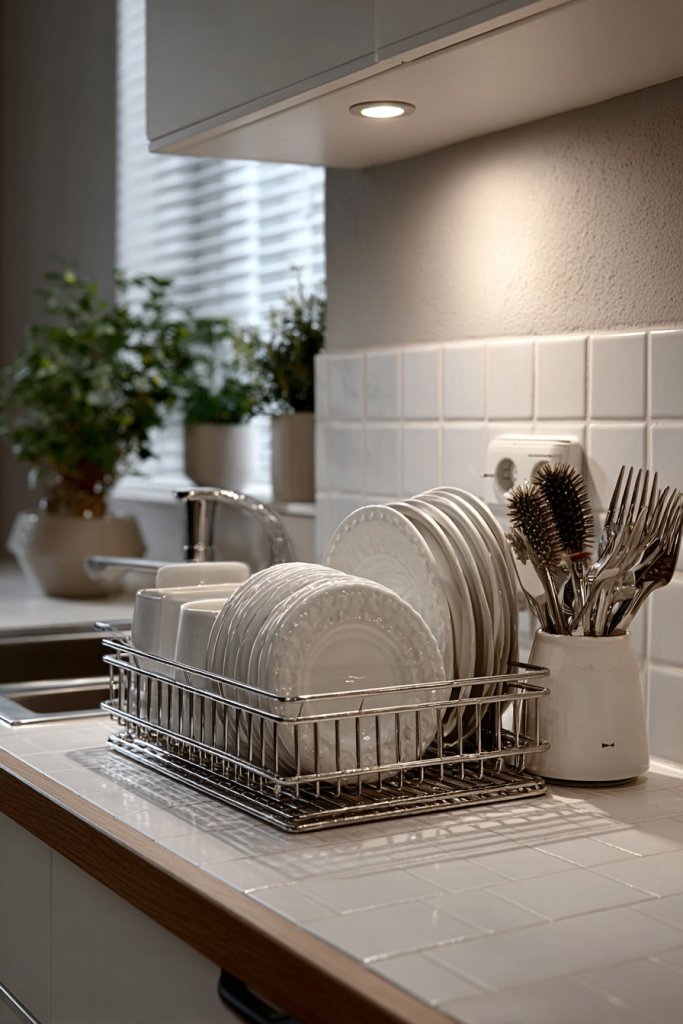
Dish drying racks and storage solutions often take up too much space, cluttering counters and cabinets. Compact, stackable options offer a smarter way to organize your dishes and utensils. They keep everything tidy, dry, and accessible without sacrificing precious space. Who needs a cluttered counter anyway?
Picture a small, sleek dish rack with multiple tiers, stacking vertically to save width. It holds plates, bowls, and utensils in an organized, vertical layout. Storage bins nest inside each other or stack on shelves, holding everything from cutting boards to cleaning supplies. The uniform look creates a clean, minimalist aesthetic that feels calm and organized.
Choose racks made from stainless steel, silicone, or plastic in neutral or bright colors. Use nested or stackable containers for different categories—utensils, sponges, or baking tools. In small kitchens, opt for wall-mounted or over-the-sink racks to free up counter space. Incorporate collapsible or foldable options for seasonal storage.
Measure your available space to select appropriate sizes. Install wall-mounted racks or place on countertops where needed. Use stacking trays or containers that lock together for stability. Arrange dishes and utensils by frequency of use for quick access. Regularly clean and reorganize to maintain order.
Add colorful or patterned liners inside bins for a playful touch. Label containers for better organization, especially if you share your kitchen. Incorporate silicone or bamboo mats underneath to prevent slipping. Regularly purge unused or duplicate items to keep the system efficient.
Using compact, stackable dish storage transforms cluttered counters into sleek, functional surfaces. It simplifies cleanup and enhances your kitchen’s overall look. With these solutions, your cooking and cleaning routine becomes smoother—and your space looks magazine-ready.
15. Choose Minimalist Cabinet Hardware for a Clean Look
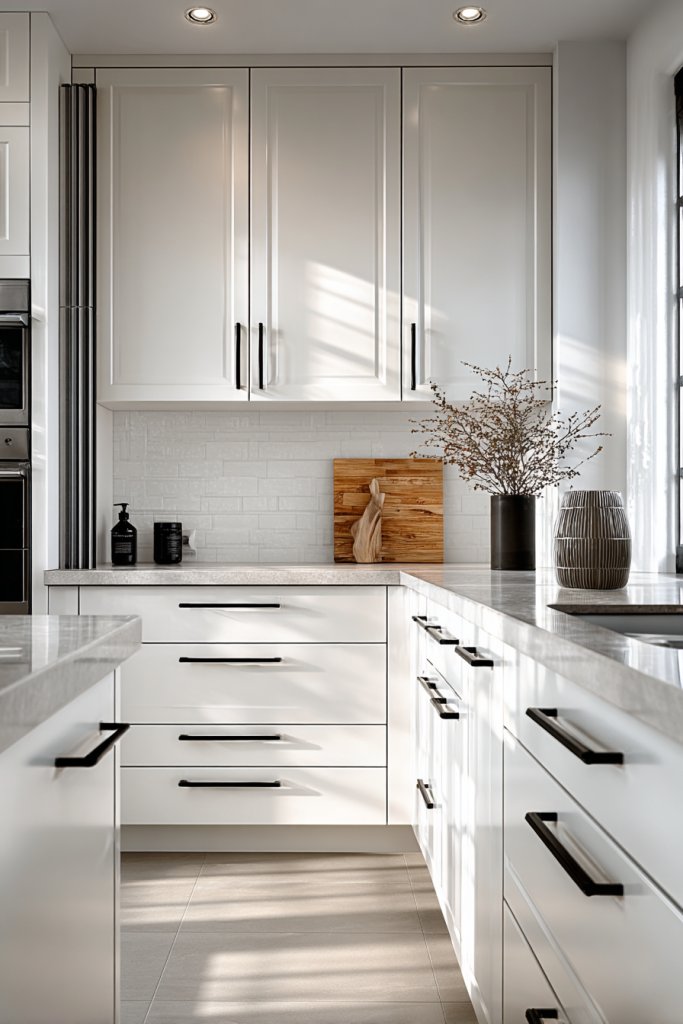
Clunky, ornate cabinet hardware can make small kitchens feel busy and overwhelming. Minimalist hardware offers a sleek, streamlined appearance that visually declutters and modernizes your space. It’s a subtle upgrade with a big impact—making your kitchen look organized and sophisticated.
Imagine cabinets with handleless push-to-open mechanisms or slim, unobtrusive pulls in matte black or brushed nickel. The clean lines draw the eye outward, creating a sense of continuity and openness. The hardware’s subtle shine or matte finish complements your overall decor, adding a touch of elegance. It’s almost like your cabinets are floating in a calm, clutter-free environment.
Opt for handleless designs for a futuristic, seamless look, or choose slim bar pulls for a minimalist vibe. Match hardware finishes with fixtures and appliances for harmony. Replace large, traditional knobs with tiny, discreet ones to reduce visual weight. For a rustic look, choose matte black or antique brass handles with simple shapes.
Remove existing hardware carefully, keeping screws and parts organized. Measure and drill new holes precisely if needed. Select hardware that fits your cabinet door or drawer dimensions, and tighten securely. Test each piece to ensure smooth operation without sticking or looseness. Regularly tighten or clean hardware to maintain the sleek appearance.
Mix and match hardware styles for an eclectic yet cohesive look. Use decorative accents like leather or fabric pulls for a unique touch. Incorporate subtle textures or patterns in the hardware for added visual interest. Consider custom engraved or painted hardware for a more personalized vibe.
Minimalist hardware creates a polished, clutter-free aesthetic that elevates your entire kitchen. It reflects a modern lifestyle focused on simplicity and elegance. With just a small change, your cabinets look sleek and fresh, inspiring confidence in your design choices.
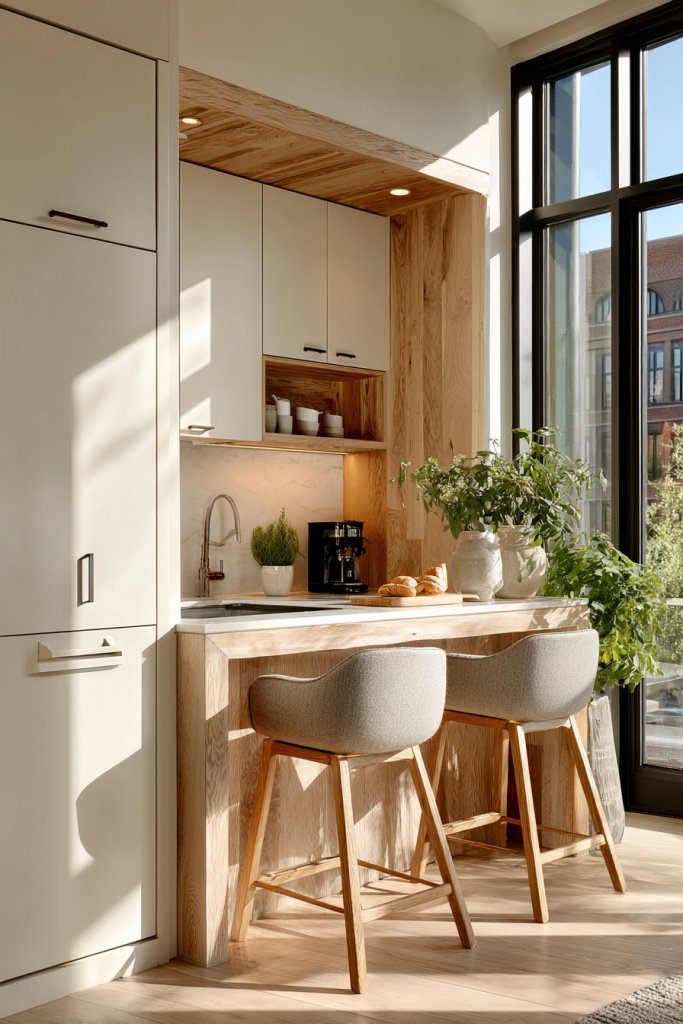
16. Create a Drop-In Breakfast Bar for Dual Functionality
Counter space in small kitchens is always at a premium, especially if you love hosting breakfast or quick meals. A drop-in breakfast bar offers a clever solution—adding a dedicated eating or prep area without sacrificing space. It’s like having a mini dining room built right into your kitchen.
Picture a sleek, integrated counter extension flush with your existing cabinetry, with a comfortable stool tucked underneath. The surface is durable and easy to clean, perfect for mornings or casual gatherings. When not in use, it seamlessly blends into the overall design, maintaining a tidy look. The bar adds visual interest and functionality to the room.
Choose materials like quartz, laminate, or wood veneer that match your cabinetry for a seamless look. Incorporate a slightly raised lip to contain spills and prevent items from falling. Use adjustable or fold-away stools for space-saving seating. For a more rustic feel, consider reclaimed wood or distressed finishes.
Measure the available space to determine the size and placement of the drop-in bar. Cut the countertop to size, ensuring a flush fit with existing cabinets. Reinforce the base structure underneath for stability. Seal edges properly to prevent water damage and ensure longevity. Connect to existing plumbing or electrical if needed for lighting or outlets.
Add decorative trim or edge banding to match your kitchen style. Use colorful or patterned cushions on stools for comfort. Incorporate under-counter lighting for ambiance during breakfast. Keep the surface free of clutter by adding small containers or organizers for utensils.
A drop-in breakfast bar transforms your kitchen into a multi-use space—perfect for quick bites and casual chats. It maximizes your layout’s potential, making every inch work harder. Once installed, it’s a charming, practical feature that enhances daily life.
17. Utilize Over-the-Door Hooks and Racks for Additional Storage

Every square inch counts in a small kitchen, especially when it comes to hanging storage. Over-the-door hooks and racks provide quick, easy access to utensils, towels, or cleaning supplies without taking up counter or cabinet space. It’s a simple trick to add more storage where you least expect it.
Imagine the back of a pantry or closet door outfitted with hooks holding aprons, oven mitts, or dish towels. Small racks store spice bags, cleaning sprays, or utensils, all organized and within arm’s reach. The hooks keep clutter off surfaces, creating a cleaner, more spacious look. It’s a practical, unobtrusive addition that looks neat and efficient.
Choose sleek, coated metal hooks for easy cleaning or decorative hooks for a touch of personality. Use multi-tier racks for maximizing vertical space. Install hooks on inside cabinet doors for additional hidden storage. Match hardware finishes with other fixtures for a cohesive look.
Identify high-traffic or underutilized doors suitable for hooks or racks. Mount hooks securely using appropriate anchors or screws, ensuring they can support the weight of items stored. Organize items logically—most-used at the top or front. Regularly clean and reorganize to prevent clutter buildup. Adjust placement if needed for ergonomic access.
Add decorative elements like colorful silicone grips or engraved tags. Use small baskets or fabric pouches for items like snack packs or cleaning cloths. Incorporate themed hooks—rustic, modern, or playful—to match your decor. Keep seasonal items accessible for quick swaps.
Over-the-door hooks and racks are a quick win for maximizing small spaces. They keep your essentials organized and within reach, reducing clutter and stress. With a little effort, your kitchen becomes more functional and tidy, inspiring you to cook more confidently.
18. Implement a Modular Storage System for Flexibility
Rigid storage solutions often don’t fit the dynamic needs of a small kitchen. Modular systems offer flexibility, allowing you to customize and adapt as your storage needs evolve. It’s like building blocks for your culinary space—perfectly versatile and expandable. Who wants a one-size-fits-all when you can have a tailored setup?
Visualize stackable bins, adjustable shelves, and customizable drawer units forming a cohesive storage network. They fit snugly into cabinets, closets, or open shelves, creating a clean, organized look. The modular pieces can be rearranged easily, accommodating new appliances or changing habits. It’s a smart, adaptable system that transforms chaos into order.
Choose materials and finishes that match your decor—metal, wood, or plastic in neutral or bold colors. Incorporate dividers or baskets for categorization. Use adjustable heights and removable panels for maximum flexibility. For seasonal storage, swap modules or reconfigure them to fit new needs.
Start by assessing your storage challenges and planning your modular layout. Install base units or wall-mounted panels first, then add drawers, shelves, or containers as needed. Use connectors or clips to secure pieces together, ensuring stability. Label compartments for easy identification. Regularly review and reorganize to keep the system functional.
Add decorative elements like colorful bins, patterned liners, or personalized labels. Incorporate clear containers inside modules for visibility. Use themed or seasonal accessories to keep the system fresh. Keep frequently used items in accessible positions for convenience.
A modular storage system adapts to your lifestyle, making small kitchens more functional and less cluttered. It offers peace of mind knowing you can easily reconfigure as your needs change. It’s a smart investment for long-term organization that keeps your space looking neat and inviting.
19. Use Compact, Stackable Bar Stools for Seating Flexibility
Seating in small kitchens is a challenge—clunky chairs take up space, and traditional stools rarely tuck away. Compact, stackable bar stools solve this dilemma with style and ease. They provide extra seating when needed and stow away neatly when not. It’s like having a portable dining solution right at your fingertips.
Imagine a set of sleek, minimalist stools stacked in a corner or slid under the counter. When guests arrive, you pull them out effortlessly, creating an intimate dining nook. Their lightweight design and uniform appearance keep the space feeling open and uncluttered. A pop of color or metallic finish adds personality and flair.
Choose stools in materials like plastic, metal, or wood, with non-slip feet for safety. Opt for designs with slim profiles that can be stacked high or nested for space-saving storage. For a cohesive look, match the finish with your countertops or hardware. Consider adjustable-height stools for versatility.
Select stools that fit comfortably under your counter or table height. Store them in a closet, under the island, or in a designated corner when not in use. When needed, stack or carry them to your dining or prep area. Use protective pads on the bottom to prevent scratching floors. Regularly check stability and cleanliness.
Add cushions or slipcovers in fun fabrics for comfort and style. Personalize with decals, paint, or custom designs to match your decor. Store in a dedicated, easily accessible spot for quick setup and cleanup. Rotate colors or styles seasonally for a fresh look.
Stackable bar stools offer flexible seating that adapts to your lifestyle—perfect for small kitchens seeking multifunctionality. They keep your space open, inviting, and ready for anything. Once you experience how easy it is to add or remove seating, you’ll wonder how you ever managed without them.
20. Incorporate a Portable Kitchen Island for Versatile Use

Counter space in small kitchens is often a precious commodity. A portable kitchen island offers a mobile solution—adding extra prep and storage capacity wherever you need it. It’s like having a flexible workspace that moves with your cooking flow. Who wouldn’t want that kind of versatility?
Picture a lightweight, wheeled island with a durable surface, ready to roll into position. It’s topped with cutting boards, bowls, or small appliances, ready for action. When not in use, it tucks into a corner, keeping your room feeling open and uncluttered. The design can range from rustic wood to sleek modern metal, matching your style.
Choose a model with shelves, drawers, or hooks for extra organization. Use materials like butcher block, stainless steel, or laminate for durability. Incorporate locking wheels for stability during use. Match the finish to your existing cabinetry for a cohesive look. For a rustic vibe, opt for reclaimed wood or distressed finishes.
Determine the best spot for your island—near the stove, sink, or prep zone. Assemble the unit according to manufacturer instructions, ensuring all wheels lock securely. Organize items on the surface or inside drawers for easy access. Use it for meal prep, serving, or even as a mobile bar. Regularly clean and inspect the wheels for smooth operation.
Decorate the top with attractive bowls, cloths, or small plants (non-greenery). Add hooks or racks underneath for utensils or towels. Paint or stain the wood to match your decor. Keep it tidy with baskets or bins for ingredients or tools.
A portable island transforms your small kitchen into a flexible, efficient space. It’s perfect for cooking, serving, or entertaining, adapting to your needs. Once you see how it enhances your workflow, you’ll wonder how you ever managed without it—extra space, anytime.
21. Install Slimline Backsplashes with Patterned Tiles for Visual Appeal
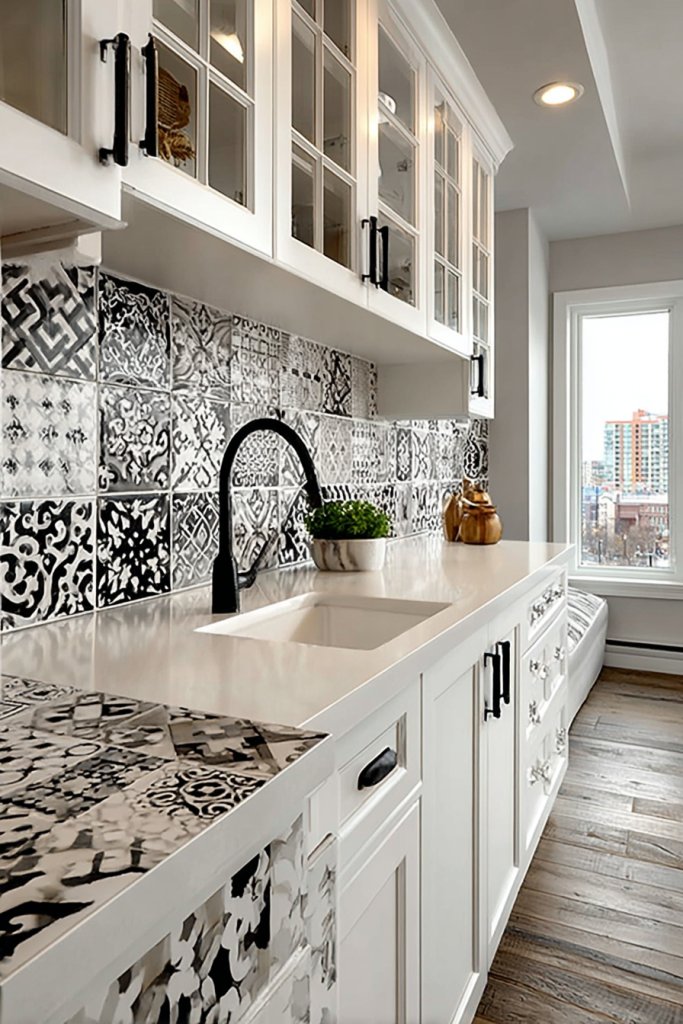
Small kitchens often lack visual interest, making the space feel dull or cramped. A patterned backsplash adds personality and depth without overwhelming the room. It’s an easy way to punch up your decor and create a focal point that draws the eye. Who says small can’t be stunning?
Imagine narrow, elongated tiles with intricate patterns or bold colors running behind your stove and sink. The glossy surface catches the light, adding brightness and dimension. The pattern adds a lively, playful vibe that complements your cabinetry and countertops. It’s like giving your kitchen a stylish facelift with just a splash of color.
Opt for classic subway tiles with a twist—geometric patterns or vibrant colors. Mix different patterned tiles for a boho chic look or stick to monochrome for elegance. Use peel-and-stick tiles for an easy, DIY-friendly upgrade. Incorporate metallic or textured tiles for added dimension and sophistication.
Choose tiles that fit your style and space, measuring the wall area carefully. Prepare the surface by cleaning and leveling it. Apply tile adhesive evenly, then set tiles with spacers to ensure uniform gaps. Use a level for straight lines and trim tiles as needed. Seal grout lines with a suitable sealant to prevent stains and moisture.
Add decorative trim or border tiles to frame the patterned area. Incorporate under-cabinet LED lighting to highlight the design. Mix in metallic or glass tiles for contrast. Regularly clean tiles with gentle solutions to maintain their vibrancy.
Patterned backsplashes turn a simple kitchen into a design statement. They showcase your personality and taste, making cooking more inspiring. A small change like this can make your entire space feel fresh and unique—proof that bold design is achievable even in tiny rooms.
22. Utilize Hidden Drawers and Pull-Out Cabinets in Base Units
Countertop clutter and disorganized base cabinets slow down your cooking routine. Hidden drawers and pull-out cabinets cleverly maximize storage space while keeping things out of sight. They help maintain a sleek, clutter-free look and improve accessibility. Who knew hidden could be so functional?
Visualize a base cabinet with a discreet handle that pulls out to reveal organized compartments for spices, utensils, or small gadgets. The drawers glide smoothly on soft-close mechanisms, and their interiors are customizable with dividers or trays. When closed, they blend seamlessly into the cabinetry, maintaining a clean aesthetic. It’s a secret storage solution that looks stylish.
Choose slim, shallow drawers for frequently used items or deep pull-outs for larger tools and appliances. Incorporate hidden compartments within drawers for valuables or delicate items. Use high-quality materials and hardware for smooth operation and durability. Match the finish with your cabinetry for a cohesive look.
Install the pull-out mechanisms on a sturdy base within your existing cabinets. Organize items inside with small containers or dividers to maximize space. Test the slides for smoothness and secure attachment. Label compartments for quick identification and easy restocking. Regular maintenance ensures long-lasting performance.
Add decorative or color-coded liners inside drawers for easy organization. Incorporate themed or patterned trays for a personal touch. Keep frequently used items at the top for convenience. Regularly declutter and reconfigure to suit evolving needs.
Hidden drawers and pull-outs make your kitchen more organized and efficient, giving you a sense of control. They hide clutter and keep your space looking polished. Once you experience the ease of access and tidy appearance, you’ll be motivated to optimize every inch.
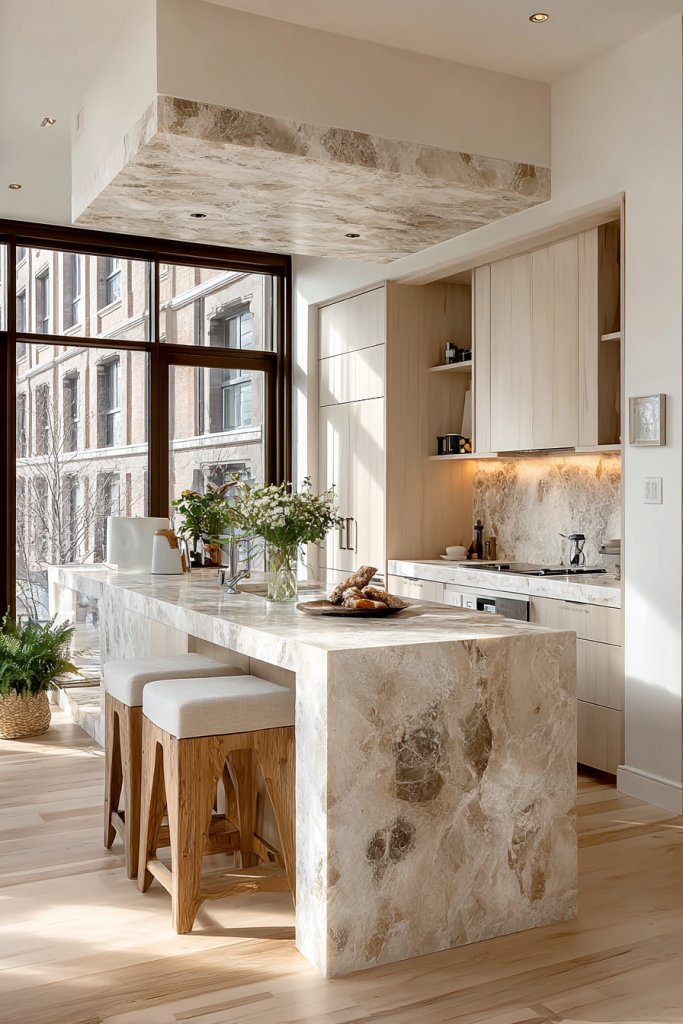
23. Opt for Clear or Light-Colored Countertop Materials
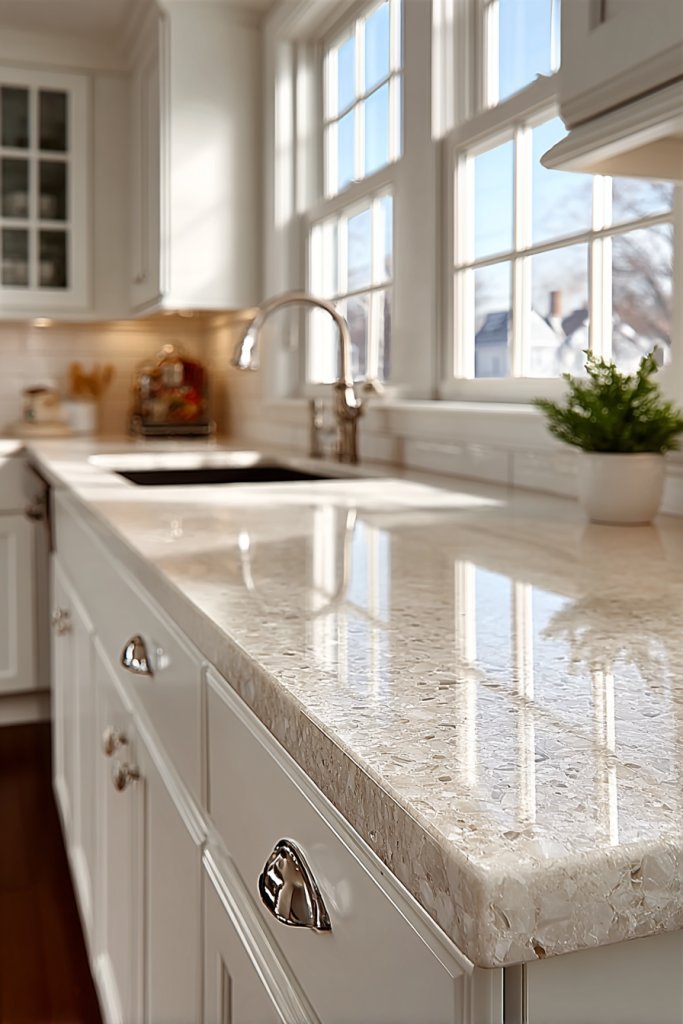
Dark countertops can make a small kitchen feel even more confined and heavy. Light-colored surfaces reflect light, visually expanding the space and creating a fresh, airy atmosphere. Clear or light countertops also make it easier to spot spills and messes, keeping your kitchen cleaner. It’s a simple upgrade that makes a big difference.
Imagine a pristine quartz or laminate surface in soft cream, white, or pale gray, bouncing ambient light around the room. The minimalistic look blends seamlessly with cabinetry and backsplash, enhancing the overall sense of openness. Subtle textures or matte finishes add depth without overwhelming the senses. The bright surface invites you to cook and entertain with ease.
Choose countertops with subtle patterns or gentle veining for visual interest. Mix with complementary light cabinetry and metallic accents for a modern look. Use lighter textiles and accessories to reinforce the open, clean vibe. For added durability, pick surfaces with stain and scratch resistance suitable for everyday wear.
Select a countertop material that fits your budget and style—quartz, laminate, or solid surface. Measure your space accurately and plan for seams if needed. Install following manufacturer instructions, ensuring proper sealing and finishing. Regularly clean with gentle, non-abrasive solutions to maintain brightness. Consider adding edge details for a polished appearance.
Incorporate decorative elements like colorful bowls or utensils to add pops of color. Use light-colored or transparent storage containers to keep everything visually light and organized. Pair with soft textiles and minimal hardware to sustain the airy feel. Rotate accessories seasonally for freshness.
Light countertops reflect your style while making your space feel larger and more inviting. They facilitate a cheerful, clutter-free environment that encourages you to cook and gather. Small changes like this prove that bright, simple designs can be both beautiful and practical.
24. Create a Compact, Functional Coffee Station or Snack Area
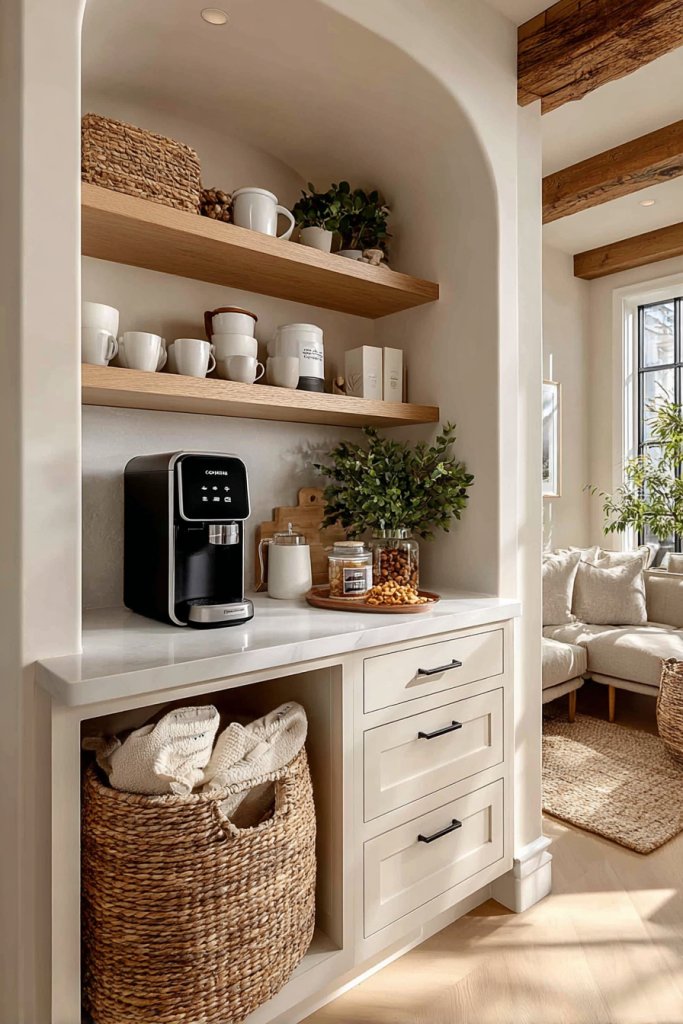
Counter space for coffee and snacks often gets taken over by clutter, leaving you frustrated every morning. A dedicated, compact station keeps essentials organized and within reach. It turns a chaotic corner into a charming, functional nook that makes your day start smoothly. Who wouldn’t want a personal barista at home?
Picture a small cart or a built-in shelf with jars of coffee beans, tea bags, and snacks arranged in a tidy row. A stylish tray holds mugs, sugar, and creamers, ready for your morning routine. The area is decorated with a few personal touches like a colorful jar or a small framed quote. It’s an inviting, organized space that feels both practical and cozy.
Use a rolling cart for portability or dedicate a small nook within cabinetry. Incorporate open shelving or a countertop with compartments for different items. Use labeled jars for coffee, tea, and snacks to keep everything tidy. Add a small chalkboard or label stickers for a personalized touch. Adapt the setup for your favorite beverages and treats.
Choose a compact cart or a dedicated shelf near your main coffee maker or snack zone. Organize items in clear containers or baskets for easy access. Use small hooks or racks for mugs or utensils. Regularly clean and update the supplies, rotating seasonal favorites. Keep the area clutter-free with designated spots for each item.
Add decorative elements like colorful jars, patterned liners, or themed signs. Incorporate a small plant or decorative tray for aesthetic appeal—avoiding greenery, of course. Use matching or complementary colors for containers and accessories. Keep it fresh by swapping out items or updating labels periodically.
A dedicated coffee or snack station makes mornings smoother and your space more organized. It’s a small change that adds convenience and personality to your kitchen. Once you experience the joy of an accessible, tidy setup, you’ll wonder how you ever managed without it.
25. Keep Surfaces Clutter-Free with Smart Storage Solutions
Counter clutter can quickly turn an adorable small kitchen into a chaotic mess. Smart storage solutions help keep surfaces clear, making your space more inviting and functional. Less clutter means less stress—and more room to breathe. Who doesn’t want a tidy, peaceful cooking environment?
Visualize sleek trays, under-cabinet racks, and hidden compartments neatly holding utensils, spices, and small appliances. The countertops are almost empty, with only a few well-chosen decorative or essential items on display. The overall look is clean, minimalist, and calming—a perfect backdrop for everyday life. It’s a visual reminder that organization doesn’t have to be boring.
Use nesting containers, collapsible bowls, or fold-away appliances to hide clutter when not in use. Incorporate vertical storage like hanging racks or magnetic strips. Choose multi-purpose tools that combine functions—think a spatula with a built-in spoon rest. Style with simple, neutral accessories to maintain a peaceful vibe.
Assess your daily routines to identify clutter hotspots. Install wall-mounted organizers or under-cabinet racks for frequently used items. Use labeled containers and trays for sorting small gadgets and tools. Regularly declutter and put things back in their designated spots. Maintain a habit of tidying after each use to keep surfaces clear.
Add personal touches like decorative jars, patterned liners, or themed containers. Incorporate a small chalkboard or label system for quick identification. Use colorful or textured storage options to add visual interest without cluttering. Update your organization system seasonally or as your needs change.
Maintaining clutter-free surfaces boosts your kitchen’s aesthetic and your mood. It makes cooking faster and cleaning easier. With consistent effort and smart solutions, your small kitchen becomes a calm, inviting space that inspires you daily.
Conclusion
Exploring these diverse Small Kitchen Ideas shows how creativity and practicality can turn even the tiniest kitchens into charming, functional spaces. Don’t hesitate to try these clever solutions and tailor them to your unique home. Embrace the challenge and transform your kitchen into a beautiful, efficient hub—your perfect small space awaits!

Post Comment