21 Wall Decor Design Ideas for Unique Style
Imagine stepping into a room that immediately captures your personality and style—wall decor plays a huge role in making that happen! These design ideas are popular because they allow you to showcase your creativity, add personality, and transform any space from ordinary to extraordinary.
In this article, you’ll find a diverse array of wall decor ideas that cater to every taste and space. Whether you love minimalist elegance, boho charm, or eclectic statement pieces, there’s something here to inspire your next home upgrade. Get ready to elevate your walls and make a lasting impression!
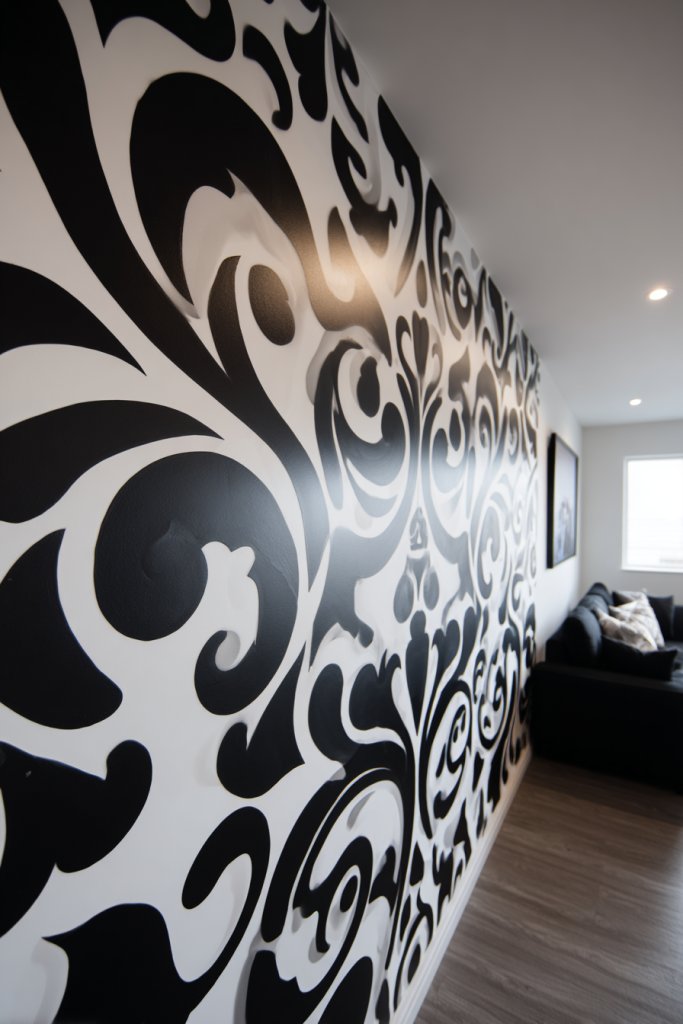
1. Geometric Wall Stencils for Modern Elegance
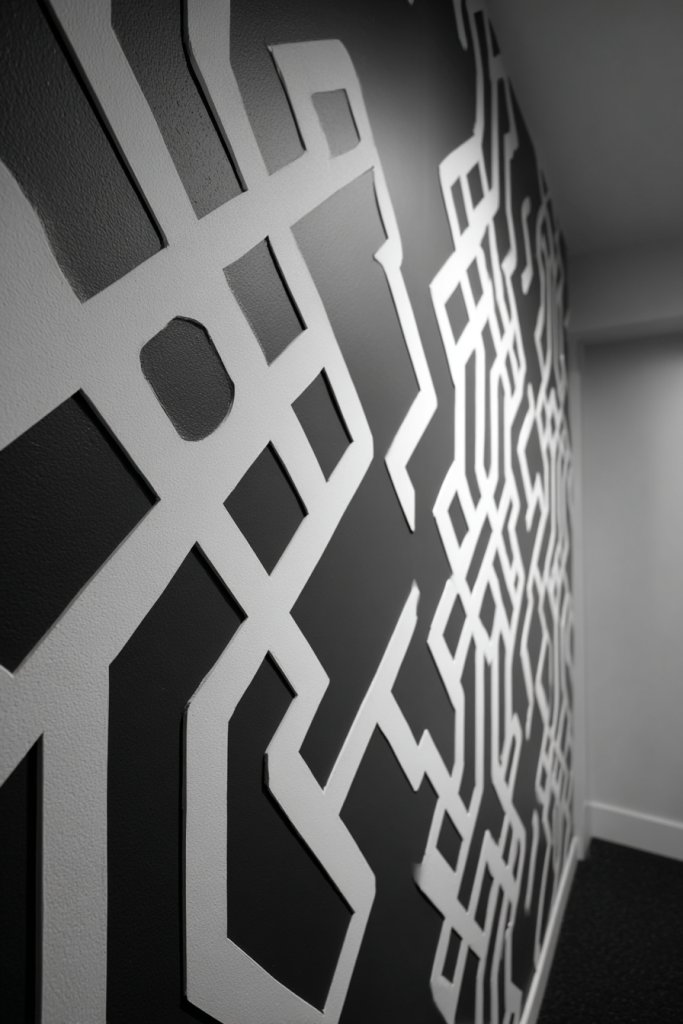
Ever feel like your walls are missing that wow factor? Sometimes, a plain wall just doesn’t cut it when you’re trying to impress or create a stylish vibe. You want something that adds depth and personality without going overboard. Geometric patterns with stencils offer an easy and affordable way to transform a dull space into a modern masterpiece.
Imagine a wall with bold, sharp lines forming intricate shapes in metallic gold or matte black, creating a dynamic visual effect. The patterns catch the light differently throughout the day, giving your room a lively energy. The textured finish of the stencil adds a tactile dimension, making the wall feel alive and engaging. It’s like an art piece that changes with your perspective and lighting.
You can opt for subtle, monochrome designs for a minimalist vibe or go for vibrant contrasting colors to make the pattern pop. Larger geometric shapes work well in open-concept spaces, while smaller, intricate designs suit cozy nooks. Seasonal changes, like adding metallic accents for holiday decor, can refresh the look without permanent commitment. Mix and match with simple furniture for a sleek, contemporary look.
Start by selecting a stencil pattern that suits your style—plastic or mylar options are budget-friendly and easy to clean. Use painter’s tape to secure the stencil on a clean, dry wall. Apply paint with a stencil brush or sponge, tapping lightly to avoid bleed-through. For a sharp edge, remove the stencil carefully while the paint is still wet. Consider using painter’s tape to create borders or sections for a multi-pattern wall. Finish with a clear sealant if you want extra durability.
Personalize the design by choosing colors that match your decor palette or add metallic accents for a luxe touch. You can also layer different geometric patterns for a more complex look. Incorporate textured paint or metallic foil for added dimension. Customizing the size and shape of the patterns can make your wall a true conversation starter. Play with symmetry or asymmetry to match your personality.
Geometric stencil walls are a trendy way to elevate your space effortlessly. They work well in modern, industrial, or even eclectic interiors. Plus, with a little patience and some DIY spirit, you can create a professional-looking feature wall. Ready to add some edge and sophistication? Your walls are the perfect canvas for a bit of creative magic.
2. Oversized Mirrored Panels for a Bold Statement
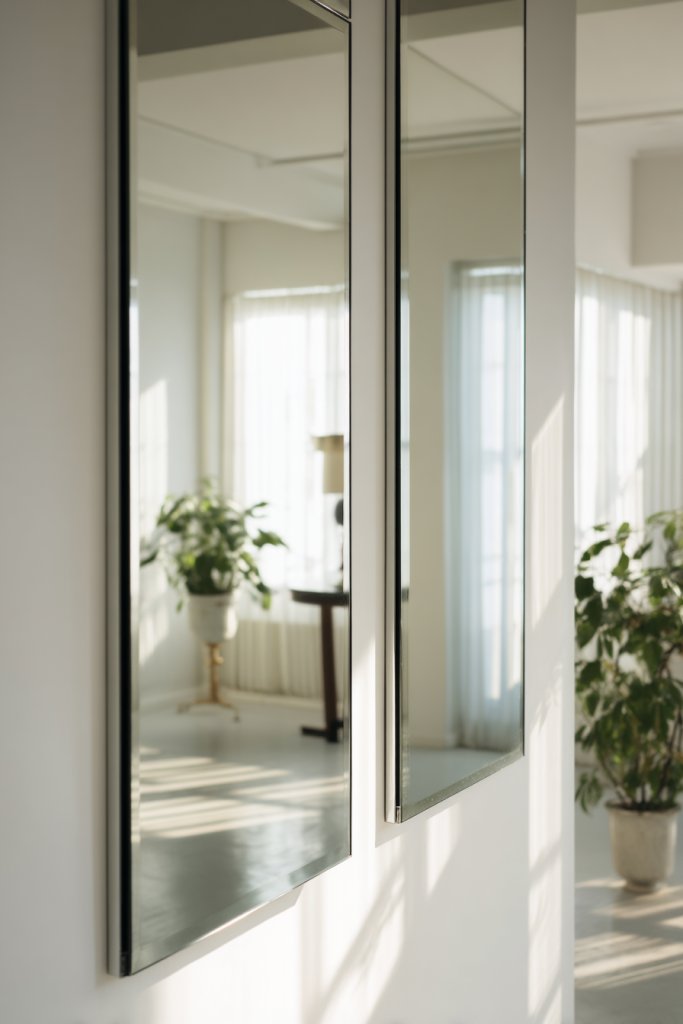
Ever wish your room could feel larger and brighter without knocking down walls? Big, statement mirrors are the secret weapon to instantaneously boost space and light. But instead of just a small decorative mirror, why not go for oversized panels that command attention? They turn a simple wall into a focal point that’s both functional and fabulous.
Picture a wall covered with massive, frameless glass panels reflecting the room’s natural light, bouncing it around and making the space feel endless. The sleek, reflective surface adds a touch of luxury and modernity, while the large scale creates a dramatic effect. The mirrors capture your entire reflection, but also the room’s vibe, doubling the visual interest. It’s like creating a window to a larger universe within your home.
Choose frames in bold metallic finishes like gold, silver, or matte black for a luxe look, or go frameless for maximum impact. You can also opt for textured or beveled edges to add subtle detail. These panels work well in entryways, living rooms, or bedrooms. For seasonal updates, incorporate decorative ledges or lighting around the panels to enhance their glow.
Select high-quality, large mirror panels designed for wall mounting—think sturdy backing and precise edges. Use level tools and strong wall anchors to secure them safely, especially for very large pieces. Plan your layout before installation to ensure symmetry and alignment. If you’re not comfortable with heavy lifting, hire a professional to avoid cracks or accidents. Consider adding a decorative frame or trim for a polished look.
Create a gallery wall with smaller, differently shaped mirrors for a dynamic effect. Incorporate LED backlighting behind the panels to produce a soft glow. For a more eclectic vibe, mix mirror sizes and shapes, or add decorative elements like metallic accents around the edges. A well-placed mirror can also serve as a practical element for last-minute outfit checks.
Oversized mirrors are a bold way to elevate your space and add a touch of glamour. They suit modern, minimalist, and even boho interiors with ease. With a little planning and effort, you can achieve a stunning visual impact that makes your home feel more open and inviting. Ready to reflect a more stylish version of your space? It’s easier than you think.
3. Tape Art Using Painter’s Tape for Clean Lines
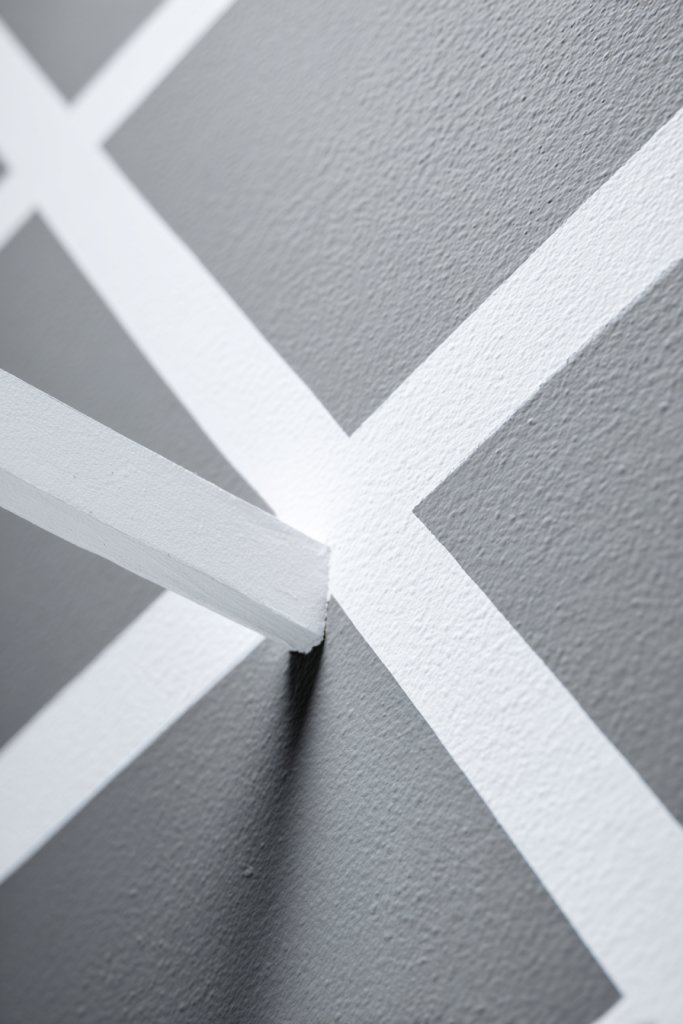
Tired of boring walls but afraid of complicated DIY projects? Painter’s tape is your secret weapon for creating sharp, professional-looking geometric or abstract designs without the mess. It’s perfect for renters or anyone hesitant to commit to permanent changes. With just tape and paint, you can craft a unique statement piece that’s both simple and stylish.
Imagine crisp, clean lines forming bold shapes across your wall in contrasting colors—think black on white or vibrant hues paired with neutrals. The tape acts like a stencil, ensuring each edge remains perfectly straight and sharp. The finished design looks like a gallery-worthy abstract painting, instantly elevating your decor. The tactile contrast between painted sections adds depth and character to the space.
You can experiment with different shapes—triangles, squares, or freeform organic lines—depending on your style. For a softer look, use rounded edges or curvy lines; for a modern feel, stick with sharp angles. Change colors seasonally or for special occasions to keep the design fresh. Smaller patterns work well in bedroom accents, while large bold shapes dominate in open living areas.
Start by sketching your design on paper or lightly drawing with a pencil on the wall. Apply painter’s tape carefully along the lines, pressing down firmly to prevent paint seepage. Use high-quality, matte or semi-gloss paint for a sleek finish. Use a small brush to touch up edges or fill in gaps. Remove the tape while the paint is still slightly tacky for the cleanest lines. Finish with a protective clear coat if desired.
Add multiple layers of pattern or mix in different colors for a more complex look. Incorporate metallic or glitter paints for a subtle shimmer. Use textured tapes or painter’s tape with patterns for added visual interest. You can also create a personalized quote or initials within the geometric design for a custom touch.
This technique proves that you don’t need to be a pro to create a stunning wall. It’s budget-friendly, forgiving, and highly customizable. Plus, it’s a fantastic way to showcase your personality and creativity. Ready to turn a blank wall into a piece of art? Grab some tape and paint and get started!
4. Floating Shelves with Decorative Items
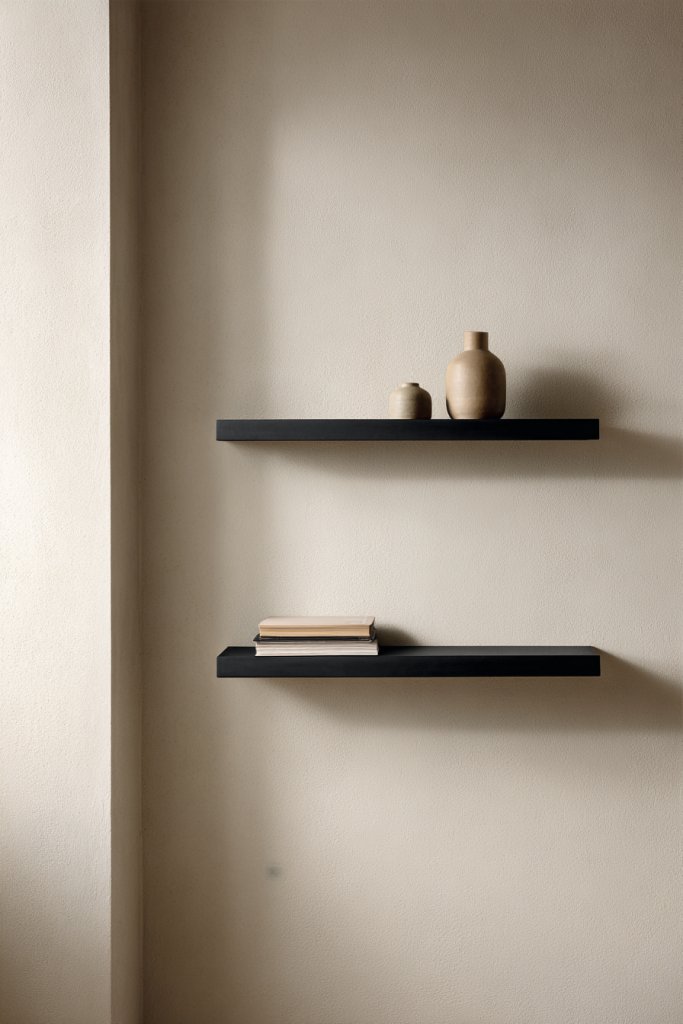
Want to add personality to your walls without cluttering them? Floating shelves provide a sleek, modern way to display your favorite items while keeping the space feeling open. They’re perfect for showcasing books, plants, or decorative objects without the bulk of traditional furniture. It’s the art of functional minimalism.
Picture narrow, wall-mounted shelves in matte black or warm wood tones, floating seamlessly against a wall. They hold a curated collection of colorful books, textured ceramics, or woven baskets. The open design creates a layered, uncluttered look that invites the eye to explore. The minimal hardware makes the shelves appear to hover, adding a futuristic touch to your decor.
Arrange items in varying heights and sizes for visual interest, or keep it uniform for a more streamlined appearance. Change out decorative objects seasonally, such as cozy textiles in winter or fresh florals in spring. Use different finishes—matte, glossy, or distressed—to match your interior style. These shelves work in living rooms, bedrooms, or even bathrooms for extra storage.
Measure wall space carefully to determine shelf length and spacing. Use a level and stud finder to ensure secure mounting, especially for heavier items. Drill holes and insert wall anchors if necessary, then attach the brackets or hidden mounting hardware. Place the shelves on the brackets, ensuring they’re level. Finish by arranging your decor thoughtfully, balancing colors and textures.
Add decorative objects like sculptural pieces, vintage finds, or framed photos to personalize the shelves. Incorporate lighting, such as LED strips or puck lights, underneath for a warm glow. Use decorative storage boxes or baskets to hide clutter while maintaining style. Changing out items periodically keeps the display fresh and engaging.
Floating shelves are a versatile and stylish way to personalize your space. They’re easy to install and adapt to any room or decor style. With a little effort, you can create a curated look that reflects your personality and taste. Ready to elevate your walls and showcase your favorite treasures? Let’s go!
5. Textured Wall Panels with 3D Effects
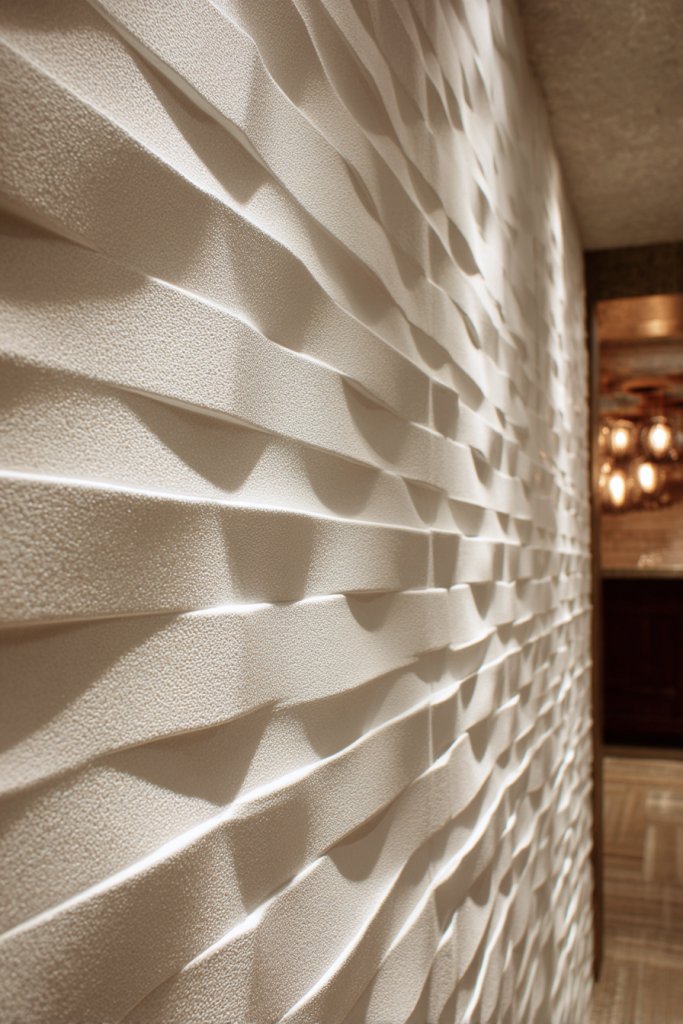
Bored with flat, boring walls? Want to add some tactile interest that also boosts your interior style? 3D textured wall panels are your answer. They instantly transform a plain surface into a piece of art, adding depth and sophistication. Plus, they’re a great way to hide imperfections or uneven surfaces.
Imagine a wall covered in panels with geometric or organic patterns, protruding at different depths. The textured surfaces catch light and cast shadows, creating a dynamic visual effect. Materials like wood, PVC, or foam make the panels lightweight yet durable. The interplay of shadow and highlight adds a sculptural dimension that makes the space feel more alive.
Choose between sleek, modern designs or more intricate, ornate patterns depending on your style. You can install panels vertically for a dramatic look or horizontally for a more subtle effect. Use neutral colors for a sophisticated vibe or bold hues for a statement. These panels work well in feature walls, entryways, or behind beds.
Select panels that suit your aesthetic and wall dimensions. Prepare your wall by cleaning and measuring carefully. Use adhesive or screws, following manufacturer instructions, to attach the panels securely. For seamless installation, ensure edges align properly. Consider sealing joints with caulk or paint for a finished, polished look. Combine different patterns or textures for a customized design.
Paint the panels in your favorite shades or metallic finishes to match your decor. Add LED accent lighting around the edges for a subtle glow. Incorporate contrasting textures, like combining smooth and rough surfaces, for added interest. Personal touches like stenciled motifs or decals can further customize the look.
Textured wall panels are a modern, stylish way to make your home stand out. They’re versatile enough to suit any decor, from industrial to glamour. With minimal effort, you can create a focal point that elevates your entire space. Ready to add some sculptural flair to your walls? It’s easier than you think.
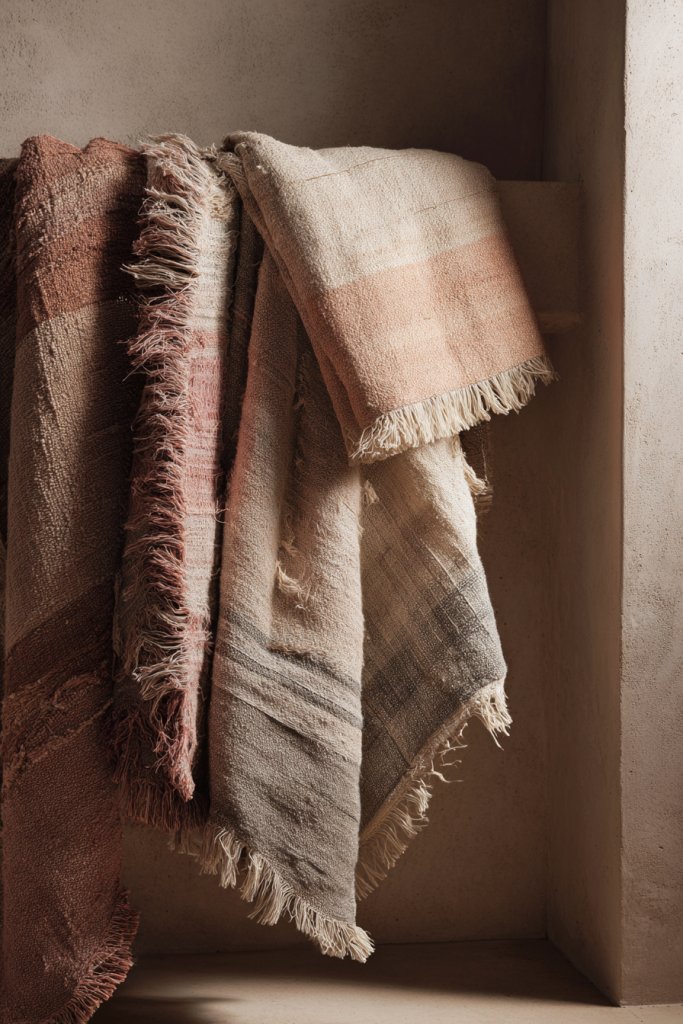
6. DIY Fabric Wall Hangings for Cozy Vibes
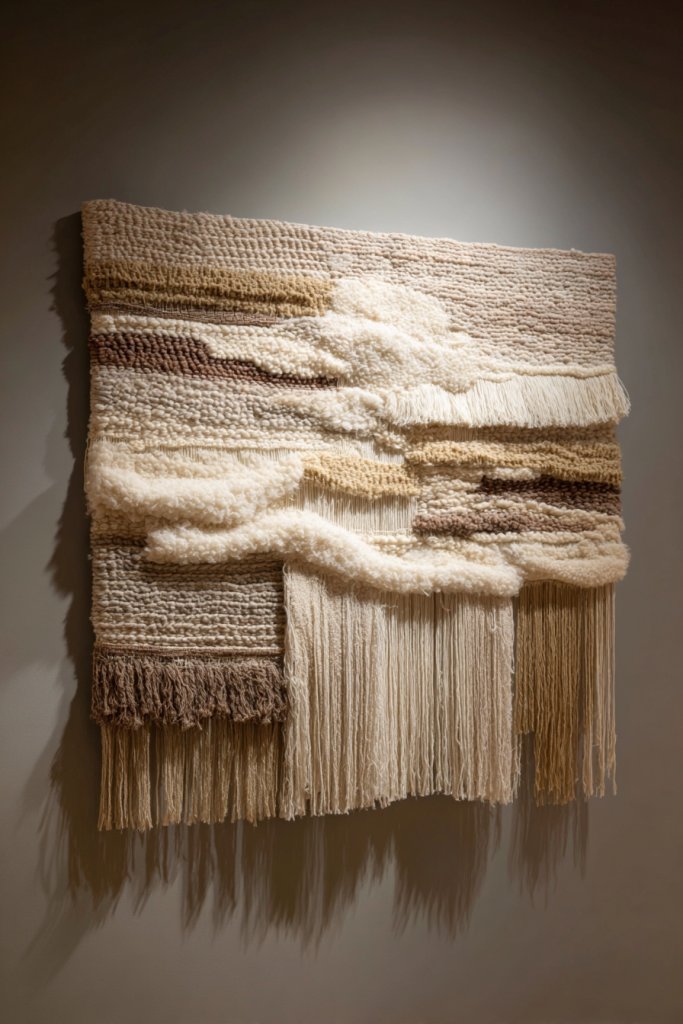
Looking to add warmth and softness to your space without buying art or prints? DIY fabric wall hangings are an affordable and cozy solution. They bring texture and personality, making your walls feel inviting and lived-in. Plus, creating your own gives you complete control over color and style.
Imagine a large, woven textile with fringed edges hanging gracefully on your wall. The soft fibers and varied textures create an inviting focal point that softens the room’s vibe. Natural materials like jute, cotton, or wool add an organic touch, while tassels and embroidery provide detail. The fabric’s thickness and pattern influence the room’s warmth and personality.
Choose from different styles—boho, minimalist, or eclectic—by selecting textiles with bold prints, muted tones, or layered textures. Hang multiple pieces in a gallery arrangement or opt for a single statement piece. Seasonal changes can be easily achieved by swapping out fabrics or adding decorative elements like beads or shells.
Start with a wooden dowel, curtain rod, or metal bar as your hanging support. Attach your fabric using clips, hooks, or simply fold the top edge over the support and sew or glue it in place. Secure the fabric with stitches or fabric glue to prevent slipping. Hang the piece on a nail or hook, ensuring it’s centered and straight. Experiment with different lengths and layering for a more dynamic look.
Add embellishments like embroidery, beads, or painted designs for a personalized touch. Layer different textiles for a more bohemian effect. Use contrasting colors or patterns to make the hanging more eye-catching. Incorporate natural elements like wooden beads or shells for a beachy vibe.
DIY fabric wall hangings are a fun way to infuse your home with warmth and personality. They’re easy to customize and swap out, making them perfect for renters or those who love changing decor. With a few simple supplies, you can craft a cozy, textured feature wall that invites everyone in. Ready to get crafty?
7. Vintage Window Frames as Wall Art
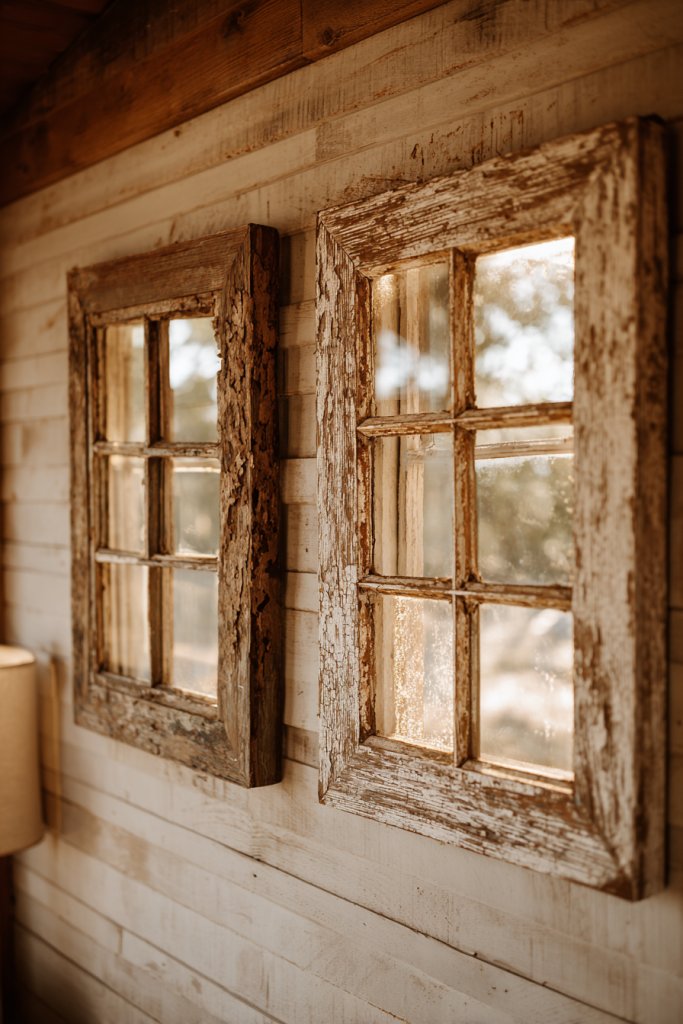
Want to add a touch of rustic charm and history to your decor? Vintage window frames are a nostalgic yet stylish way to create a statement wall. They’re perfect for adding character and a sense of storytelling to any space. Plus, they’re surprisingly easy to incorporate into modern or traditional interiors.
Picture an old, weathered window frame mounted on your wall, its glass panes replaced with mirrors, photos, or decorative fabric. The distressed paint and aged wood evoke a sense of history and craftsmanship. You might hang multiple frames in a grid or asymmetrical arrangement for visual interest. The frames act like mini picture galleries that blend nostalgia with contemporary style.
Use painted or stained frames to match your interior palette. Mix different sizes and shapes for an eclectic look or keep them uniform for a more polished vibe. Insert vintage postcards, botanical prints, or fabric behind the glass for added texture. Incorporate string lights or candles nearby to enhance the rustic charm.
Source authentic vintage window frames from flea markets, thrift stores, or online marketplaces. Clean and sand the frames if needed, then repaint or stain for a refreshed look. Mount them securely with appropriate hooks or brackets, ensuring they’re level. You can also attach hooks or wires inside the frame to hang small decorative items or photos. Play with layout before committing to a final arrangement.
Create a photo collage or display fabric, lace, or wallpaper behind the frame for added texture. Incorporate small decorative elements like vintage keys or charms hanging from the frame. Use LED fairy lights to outline or highlight the frames at night. Personal touches like family photos or meaningful memorabilia turn the display into a personal story.
Vintage window frames bring a rustic, nostalgic charm that elevates your decor effortlessly. They suit farmhouse, shabby chic, or eclectic styles perfectly. With a bit of creativity, you can craft a distinctive feature wall that’s rich in character and history. Ready to add some vintage magic to your home? It’s simpler than you think.
8. Peel-and-Stick Wall Decals for Easy Transformation
Looking for a quick, mess-free way to refresh your walls? Peel-and-stick decals are the answer—easy to apply, remove, and reposition without damaging paint. They’re perfect for renters, kids’ rooms, or anyone who loves changing decor without the hassle. With a wide range of designs, you can instantly customize your space.
Imagine large, geometric shapes or intricate patterns in bold colors transforming a blank wall into an eye-catching feature. The decals cling smoothly to surfaces, creating crisp, clean lines without fuss. They can mimic murals, mosaics, or abstract designs, adding visual depth with minimal effort. When illuminated by natural or artificial light, they come alive, giving your walls a fresh, modern vibe.
Choose decals in neutral tones for a subtle upgrade or vibrant shades for a statement. Mix and match different shapes and sizes for a collage effect or keep it simple with a single large motif. Seasonal themes like holidays or nature scenes are easy to swap in and out. They work well in living rooms, bedrooms, or even kitchens.
Start by cleaning your wall thoroughly to remove dust and grease. Carefully peel the decal from its backing, then align it with your desired position. Smooth it out with a squeegee or credit card to remove air bubbles. For larger decals, work gradually from one edge to the other. To remove, gently peel back from one corner; decals rarely leave residue or damage paint.
Customize decals by combining different patterns or creating your own designs with printable vinyl. Use decals to frame or highlight certain areas or objects in your room. Add metallic or glitter finishes for a touch of glam. Layering decals over textured paint or wallpaper can create more visual interest.
Peel-and-stick decals are a no-fuss way to experiment with your decor and update your walls anytime. They’re budget-friendly and suitable for all skill levels. With these decals, your walls can go from boring to bold in minutes. Ready to give your space a fresh new look? Just peel and stick!
9. Statement Wall with Patterned Wallpaper
Feeling like your room is missing a focal point? Patterned wallpaper offers a bold way to add personality and drama. It creates an instant statement, transforming an ordinary wall into a showstopper. Plus, it’s a quick upgrade that doesn’t require a full overhaul of your decor.
Imagine a wall covered in vibrant floral, geometric, or abstract patterns that draw the eye immediately. The textured print adds depth, making the space feel layered and lively. Paired with neutral furniture, the wallpaper becomes the hero, anchoring the room’s style. When lit well, the patterns pop, creating a dynamic backdrop for your daily life.
Choose from subtle, tone-on-tone designs for a sophisticated look or go for bold, contrasting patterns for maximum impact. Match the wallpaper with accessories in similar hues or keep it neutral for a more balanced aesthetic. Change the mood seasonally with removable wallpaper or temporary peel-and-stick options. It’s perfect for accent walls or entire rooms.
Prepare your wall by cleaning and smoothing it out, removing any imperfections. Use a level to align the wallpaper perfectly; apply adhesive evenly or opt for peel-and-stick varieties for easier installation. Carefully smooth out air bubbles with a wallpaper brush or plastic smoothing tool. Trim edges precisely, and consider sealing seams for a seamless look. For best results, hire a professional for large or complex patterns.
Add decorative trim or molding to frame the wallpaper for a more polished appearance. Incorporate matching textiles or accessories to tie the look together. Use removable decals or stencils to add additional details or accents. You can also overlay clear protective finishes for durability in high-traffic areas.
Patterned wallpaper is a surefire way to elevate your decor and showcase your style. It’s adaptable to any interior theme, from modern to vintage. With the right choice, your wall becomes a statement piece that sparks conversation and admiration. Ready to turn your walls into a work of art? Go bold!
10. Metallic Wall Accents with Gold or Copper Foil
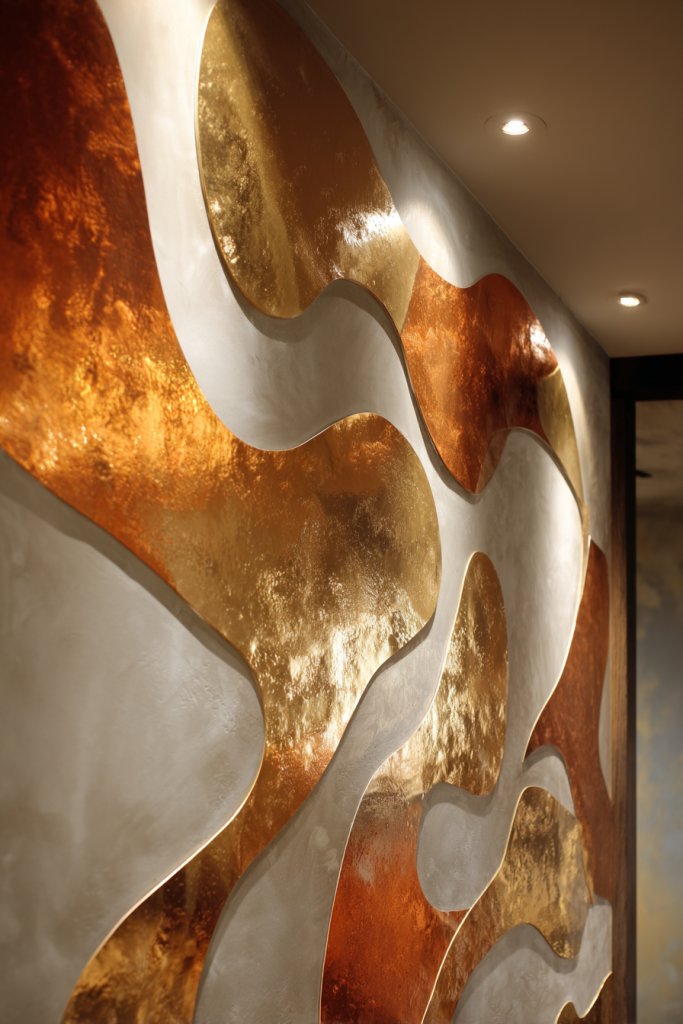
Want to add a touch of luxe without overwhelming your space? Metallic accents in gold, copper, or bronze can instantly elevate your decor. They bring a sense of sophistication and shine that catches the eye. Best of all, you can incorporate them in subtle ways or make a bold statement—your choice.
Picture thin metallic strips, decals, or foil applied in geometric shapes or abstract patterns. They reflect light beautifully, creating a shimmering effect that changes throughout the day. When paired with matte walls or textured surfaces, the metallic accents stand out even more. It’s like adding a sprinkle of glamour that elevates the entire room.
Use gold for a classic, opulent look or copper for a warmer, boho vibe. Combine different metallics for a layered, eclectic style. Small accents work well in kitchens, bathrooms, or entryways, while larger panels suit feature walls. Seasonal accents like metallic snowflakes or stars can add a festive touch during holidays.
Select metallic decals, foil sheets, or strips designed for wall application. Clean the surface thoroughly before applying to ensure adhesion. Use a smoothing tool to press down firmly and eliminate bubbles. For foil sheets, cut to size and adhere with a compatible adhesive or double-sided tape. Seal with a clear topcoat for protection against scratches or tarnishing.
Create custom patterns or shapes, such as initials or geometric motifs, for a personalized touch. Incorporate LED lighting behind the metallic accents to amplify their shine. Mix metallics with other textures like wood or matte paint for a balanced look. Consider framing metallic decals for a more finished appearance.
Metallic accents add a refined touch that’s perfect for modern, glam, or industrial decor. They’re versatile enough to suit any room and easy to update with seasonal or personal motifs. With a little effort, you can add a sophisticated shimmer that elevates your entire home. Ready to shine? It’s easier than you think.
11. Wooden Slat Walls for Natural Warmth
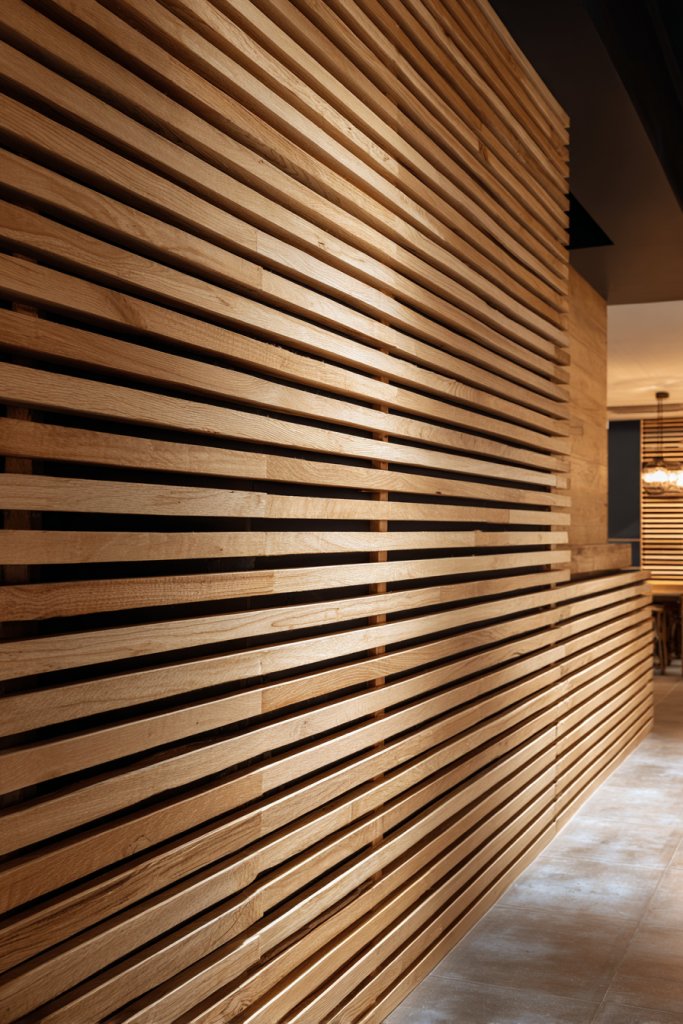
Looking for a way to bring warmth and texture into your space? Wooden slat walls create a cozy, inviting atmosphere while adding visual interest. They’re a stylish alternative to paint or wallpaper, offering a natural, earthy vibe. Plus, they’re surprisingly simple to install and maintain.
Envision horizontal or vertical wooden slats running across your wall, with a natural or stained finish. The texture and grain of the wood add depth, while the pattern creates a rhythmic, calming effect. Paired with neutral decor, it transforms a plain room into a Scandinavian-inspired retreat. When illuminated with warm lighting, the wood’s natural tones glow softly, enhancing the cozy ambiance.
Opt for light woods like pine or birch for a fresh, airy look, or darker woods like walnut for richness. Horizontal slats tend to make a space appear wider, while vertical slats add height. You can leave the wood natural or paint/stain for different effects. Use in living rooms, bedrooms, or even behind a home office desk for a calming background.
Measure wall dimensions and choose slats with the right width and thickness. Prepare your wall by cleaning and leveling it. Attach slats with nails, screws, or adhesive, ensuring even spacing with spacers or a level. For a seamless look, align each slat carefully and secure thoroughly. Finish with a clear sealant or oil to protect the wood and enhance the grain. For a more finished look, add trim or molding at the edges.
Add decorative elements like built-in shelves, hidden lighting, or contrasting colors. Incorporate natural decor pieces like stone or woven textiles nearby. Change stain or paint colors seasonally for a fresh look. Personalize with engraved initials or custom patterns for a unique touch.
Wood slat walls exude warmth and craftsmanship, perfect for creating a natural sanctuary. They suit modern, rustic, or coastal styles beautifully. With a bit of effort, you can craft a feature wall that radiates comfort and style. Ready to bring nature indoors? It’s easier than you think.
12. Cluster of Small Mirrors in Unique Shapes
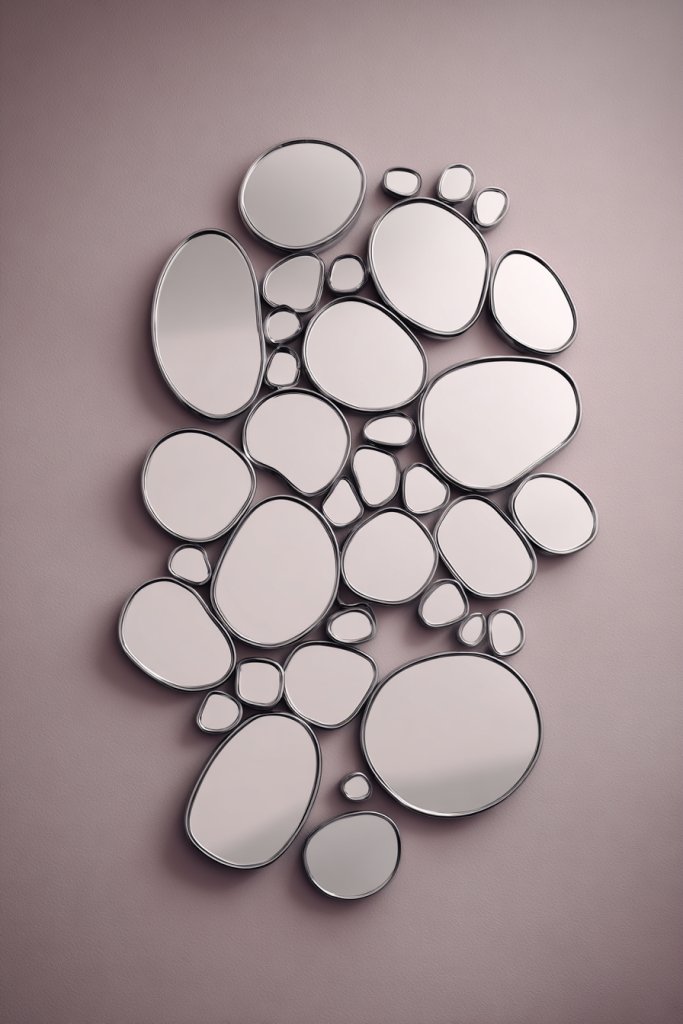
Want to add a dash of whimsy and light to your decor? A cluster of small, uniquely shaped mirrors can turn a boring wall into an artistic focal point. They serve both decorative and functional purposes, reflecting light and making your space feel bigger. Plus, they’re easy to customize and rearrange.
Picture an arrangement of tiny mirrors in shapes like stars, circles, or abstract forms, grouped in an organic or geometric pattern. The reflective surfaces bounce light around, brightening dark corners and adding visual depth. The quirky shapes provide a playful contrast to traditional art or frames. The scattered arrangement creates a dynamic, lively wall that invites curiosity.
Mix different shapes and sizes for a playful, eclectic look or keep them uniform for a more cohesive aesthetic. You can also add decorative elements like metallic frames or painted borders. Use in bedrooms, hallways, or above sofas to add character. Change the layout periodically to keep the wall fresh and engaging.
Select mirrors with hooks or adhesive backs for easy mounting. Arrange the mirrors on the floor first to experiment with layout, then mark the positions on the wall. Use a level and measuring tape to ensure even spacing. Secure each mirror firmly, making sure hooks or adhesives are rated for weight. Adjust as needed until the composition feels balanced.
Frame the mirrors with decorative borders or paint the frames in colors that match your decor. Incorporate LED backlighting behind the mirrors for a subtle glow. Mix in small wall sculptures or textured elements for added depth. Personalize the arrangement with meaningful shapes or symbols.
This mirror cluster idea adds a playful, artistic touch that works in many interiors. It’s a flexible and budget-friendly way to enhance your decor. With a little creativity, you can craft a lively, reflective wall that’s both functional and fun. Ready to mirror your style? Start experimenting!
13. Custom Chalkboard or Dry-Erase Wall
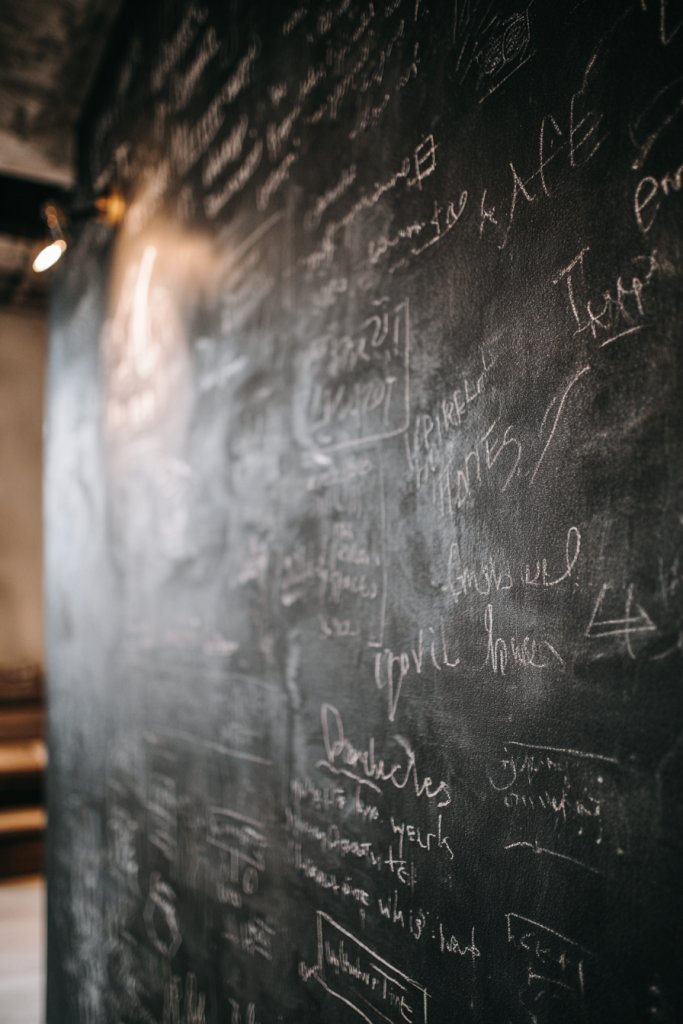
Looking for a functional yet stylish way to stay organized and inspired? A chalkboard or dry-erase wall transforms a blank space into a versatile canvas. It’s perfect for jotting down ideas, quotes, or reminders, while also adding a playful, creative element. Plus, it’s easily customizable to match your mood or decor.
Imagine a large blackboard or whiteboard covering an entire wall, filled with colorful notes, sketches, and motivational quotes. The smooth surface invites interaction, making the space both practical and interactive. Framed with a sleek trim, it blends seamlessly into your room’s design. The wall becomes a dynamic hub for family, friends, or personal reflection.
Choose between traditional black chalkboard paint or modern white dry-erase surfaces. Frame the wall with wood or metal for a polished look. Use color-coded markers or chalk for visual clarity. Change the content seasonally or weekly, switching between schedules, doodles, or inspiring words. It’s perfect for kitchens, home offices, or kids’ play areas.
Prepare your wall by cleaning thoroughly and sanding if needed. Apply chalkboard paint with a roller or brush, following manufacturer instructions, and let dry completely before use. For dry-erase walls, simply paint with a suitable whiteboard paint or install a large whiteboard sheet. Frame the edges with trim or molding for a finished look. Keep cleaning supplies nearby for easy updates.
Add colorful magnets, decorative clips, or washi tape to organize notes and brighten the space. Incorporate themed accessories like vintage erasers or stylish markers. Use decals or stencils to create borders or patterns around the writing surface. Personalize with stickers or inspirational quotes for motivation.
A chalkboard or dry-erase wall combines practicality with style, making your space more interactive. It encourages creativity and organization in a fun way. With minimal effort, you turn a plain wall into a motivational hub. Ready to write your way to a more inspired home? Let’s go!
14. Layered Wall Tapestries and Textiles
Craving a cozy ambiance that’s both stylish and versatile? Layered textiles and tapestries create a warm, inviting atmosphere while adding visual depth. They’re perfect for softening harsh lines and incorporating color and texture effortlessly. Plus, they’re easy to swap out whenever you want a fresh look.
Visualize multiple textured textiles hanging in overlapping layers—think woven, embroidered, or fringed fabrics. The layers add dimension, making the wall appear more dynamic and tactile. Natural fibers like jute or cotton in earthy tones evoke tranquility, while bold prints add energy. The combination creates a bohemian or eclectic vibe that feels both relaxed and curated.
Mix different textiles—think a large woven wall hanging layered over a tapestry or quilt. Use contrasting colors or textures for a more eclectic look, or stick to a monochrome palette for sophistication. Seasonal swaps, like adding a faux fur throw or lightweight linen, refresh the ambiance. Hang multiple pieces in a gallery style or in a cascade for maximum impact.
Start with a sturdy rod, dowel, or branch as your base. Attach textiles with clips, curtain rings, or sew them directly onto a fabric backing. Secure the layered pieces with hooks or nails, arranging for a balanced, intentional look. Use wall-safe adhesives for lighter textiles or hooks for heavier pieces. Adjust layers until the composition feels harmonious.
Add decorative trims, tassels, or painted accents to your textiles. Incorporate meaningful symbols, initials, or motifs through embroidery or fabric paints. Use LED string lights or fairy lights woven into the layers for a magical glow. Change out pieces seasonally to reflect your evolving style.
Layered textiles create a relaxed, artsy atmosphere that’s easy to personalize. They work beautifully in boho, rustic, or modern interiors. With a little creativity, you can craft a textured feature wall that invites comfort and personality. Ready to layer up your decor? Get started!
15. Shelving with Artistic Plates or Ceramics
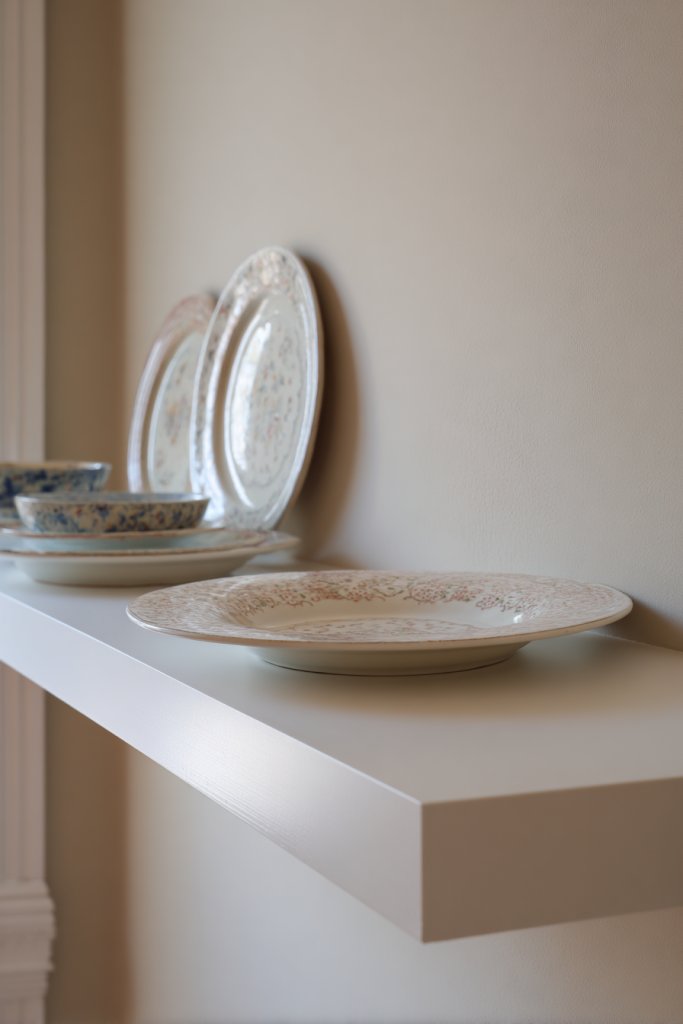
Looking for a way to showcase your collection of decorative ceramics without cluttering surfaces? Floating shelves are perfect for displaying artistic plates or ceramic pieces that add color and personality. They turn everyday objects into art, creating a curated, eclectic look. Plus, it’s a simple way to elevate your interior style.
Picture a series of floating shelves arranged at varying heights, each holding beautifully crafted plates or ceramics in vibrant glazes or intricate patterns. The artful placement creates a visual rhythm, drawing the eye along the wall. The glossy finishes and unique shapes add a playful, sophisticated touch to your space. It’s like having a mini gallery right in your home.
Mix different sizes, shapes, and colors for an eclectic look or keep it uniform for a more streamlined vibe. Rotate collections seasonally or for special occasions. Add decorative brackets or frames for a more finished appearance. Use in dining areas, kitchens, or living rooms to add a touch of artisanal charm.
Measure wall space and select shelves that suit your collection size. Mount brackets securely into studs or with anchors, then place the shelves levelly. Arrange your ceramics artistically, balancing colors and shapes. Ensure heavier pieces are supported properly to prevent accidents. Clean and maintain the ceramics regularly to keep them looking their best.
Personalize with custom-painted designs or patterns on the ceramics. Incorporate lighting—such as small LED spotlights—to highlight the collection. Add framed photos or small decorative objects on the shelves to create a balanced display. Change arrangements periodically to showcase new pieces or seasonal themes.
Displaying artful ceramics on shelves turns everyday objects into focal points. It’s a simple, flexible way to add color and personality. With some planning, you can create a curated collection that reflects your style and taste. Ready to turn your walls into a gallery? Let’s go!
16. Backlit Wall Art with LED Strips
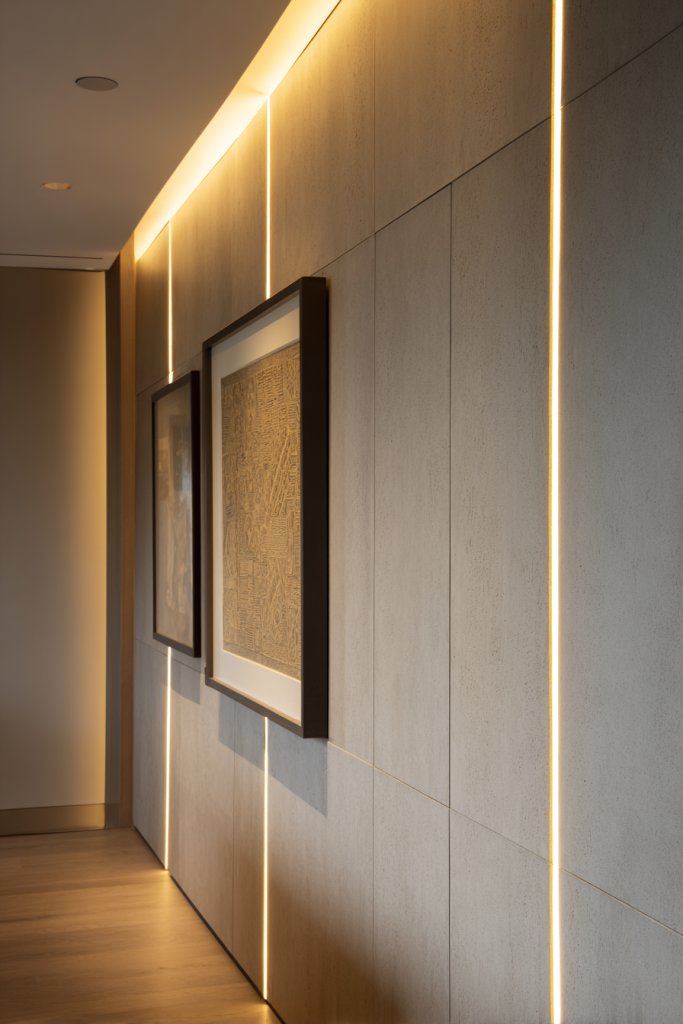
Want to add a subtle glow and modern flair to your walls? Backlit wall art uses LED strips to create soft, ambient illumination that enhances any piece. It’s a stylish way to set the mood and add visual interest without overwhelming your space. Plus, it’s easy to install and customize.
Imagine a sleek panel or artwork with hidden LED strips behind it, casting a gentle halo of light. The glow highlights textures and shapes, creating a layered, almost three-dimensional effect. When dimmed at night, the lighting offers a cozy ambiance. During the day, the art remains a beautiful focal point, elevated by the backlighting.
Use warm white or color-changing LEDs to match your mood or decor theme. Install behind framed artwork, textured panels, or even geometric installations. For a more subtle effect, hide the strips behind crown molding or within recessed niches. Change the lighting settings seasonally or for special occasions for a personalized touch.
Choose LED strip lights with adhesive backing for easy mounting. Measure and plan your layout, ensuring power sources are accessible. Affix the strips behind your chosen art or panels, hiding wiring neatly along edges or within wall cavities. Connect to a compatible dimmer or remote control for adjustable brightness and colors. Test thoroughly before finalizing placement.
Combine backlit art with smart home systems to control lighting scenes via apps. Incorporate color options to match your decor or mood. Use textured or layered art pieces to maximize the shadow and glow effects. Add decorative trim or framing to enhance the overall presentation.
Backlit wall art creates a modern, gallery-like atmosphere right in your home. It’s adaptable to many styles and easy to update with new lighting effects. With minimal effort, you can achieve a high-end look that impresses everyone. Ready to let your walls glow with personality? Start experimenting!
17. Artistic Vinyl Wall Coverings in Abstract Designs
Searching for a sleek, modern way to add visual interest without permanent commitment? Vinyl wall coverings with abstract designs offer a stylish, versatile solution. They’re perfect for creating a bold statement or subtle textured background. Plus, they’re easy to apply and remove, making them ideal for renters or those who love to change things up.
Visualize large-scale vinyl decals in swirling lines, geometric shapes, or organic motifs in contrasting colors. The glossy finish reflects light, adding depth and dimension. When applied to a feature wall, these decals create a dynamic backdrop that elevates the entire room. The abstract patterns evoke creativity and movement, transforming your space into an artful sanctuary.
Choose monochrome or multi-color designs depending on your interior palette. Combine multiple decals for a layered, textured effect or keep it minimal with a single bold motif. They work well in contemporary, boho, or eclectic interiors. Change the decals seasonally or for special events to keep the decor fresh.
Clean and prep the wall surface thoroughly. Carefully peel the backing from the vinyl decal and align it precisely before pressing down. Use a squeegee or credit card to remove air bubbles and ensure adhesion. For larger pieces, work gradually from one side to the other. For removal, gently peel back the decal without damaging the paint underneath.
Customize by layering decals or combining different shapes and colors. Add textured finishes like matte or metallic overlays for extra dimension. Use decals to highlight specific areas or create a mural-like effect. Incorporate complementary accessories like lighting or textured paint nearby.
Abstract vinyl decals are a modern, flexible way to add personality and style. They’re perfect for experimenting with design without permanent changes. With a little creativity, you can craft a captivating feature wall that reflects your artistic side. Ready to make your walls stand out? Get creative!
18. Faux Brick or Stone Wall Coverings
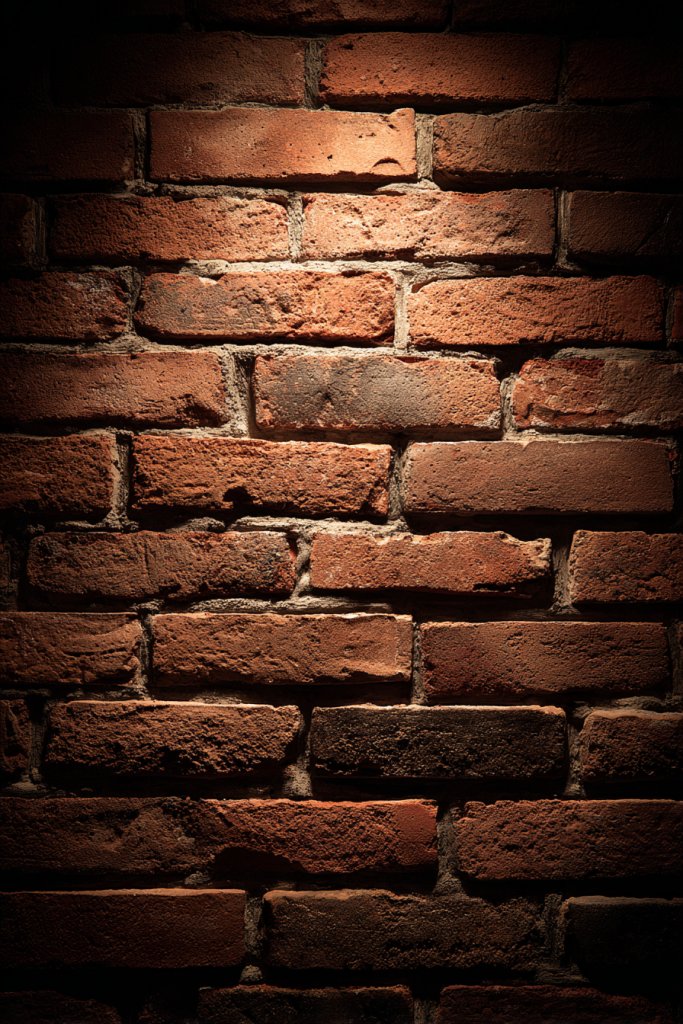
Want that rustic or industrial look without the weight or cost of real brick? Faux brick or stone wall coverings give you the authentic appearance with less hassle. They instantly add texture and character, making any space feel more grounded and stylish. Plus, they’re a quick DIY upgrade for a dramatic transformation.
Envision a wall clad in textured faux brick in warm reds or cool greys, or stone panels that mimic natural rock formations. The rough surface and irregular patterns evoke a cozy, earthy vibe. When lit with warm or directional lighting, the textured surface casts shadows that enhance the realism. It’s like bringing an outdoor element inside, creating a striking focal point.
Choose between full wall coverage or partial accent areas for a more subtle look. Match the color tones to your existing decor or go for contrasting shades for a statement. Use in kitchens, fireplaces, or feature walls in living rooms. Combine with sleek furniture and minimal accessories for a balanced, modern rustic style.
Measure your wall carefully and select panels that fit your space. Prepare the wall by cleaning and smoothing it out; apply adhesive or interlock the panels as per manufacturer instructions. Overlap edges for seamless appearance, and secure tightly. Seal joints with grout or caulk for added realism and durability. Clean the surface regularly to maintain appearance.
Add decorative touches like vintage signs, metallic accents, or lighting fixtures to complement the brick or stone. Use contrasting grout paint or joint filler for a more authentic look. Incorporate natural elements like potted plants or baskets nearby for a rustic vibe.
Faux brick and stone coverings are a quick, cost-effective way to add character and texture. They suit rustic, industrial, or modern farmhouse styles perfectly. With minimal effort, you create a stunning feature that’s both practical and stylish. Ready to bring some rugged charm inside? Let’s do it!
19. Hanging Macramé or Tapestry Art
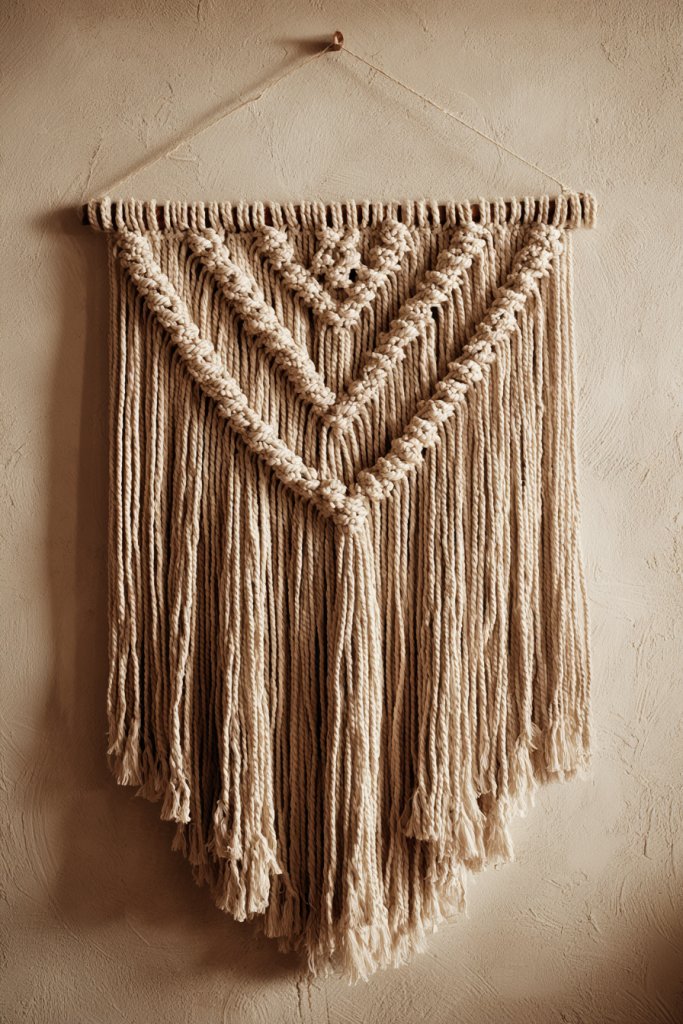
Craving a boho, handcrafted vibe for your space? Hanging macramé or woven tapestry art adds texture, warmth, and personality effortlessly. They’re perfect for creating a focal point that feels cozy and artistic. Plus, they’re easy to swap out when you want a style refresh.
Picture a large, intricately knotted macramé piece with fringe details hanging above a sofa or bed. The textured knots and patterns create visual depth, while the soft fibers add a tactile element. The neutral tones or vibrant colors set a relaxed, artistic tone in the room. When paired with other textiles, it amplifies the layered, cozy aesthetic.
Choose from minimalist designs or elaborate, detailed weaves depending on your taste. Layer multiple pieces for a gallery wall effect or keep it simple with a single large hanging. Use natural fibers like jute, cotton, or hemp for an earthy feel. Change the size and pattern seasonally or for special occasions.
Hang your textile on a sturdy rod, dowel, or directly attach with hooks or nails. Ensure the hanging hardware is rated to support the weight. Position the piece at eye level for maximum impact. Adjust the tension and placement until it hangs evenly. For larger pieces, consider additional support or wall anchors.
Add decorative beads, shells, or painted accents to customize your textile. Incorporate contrasting textiles or layered tapestries to create a rich, textured wall. Use lighting, such as fairy lights or picture lights, to highlight the weave and details. Personalize with initials or meaningful symbols woven into the design.
Macramé and tapestry art bring a handcrafted, relaxed vibe that’s timeless and trendy. They’re easy to make or buy, and fit effortlessly into boho, rustic, or eclectic schemes. With a little effort, you can craft a wall that invites warmth and creativity. Ready to weave your own style? Let’s start!
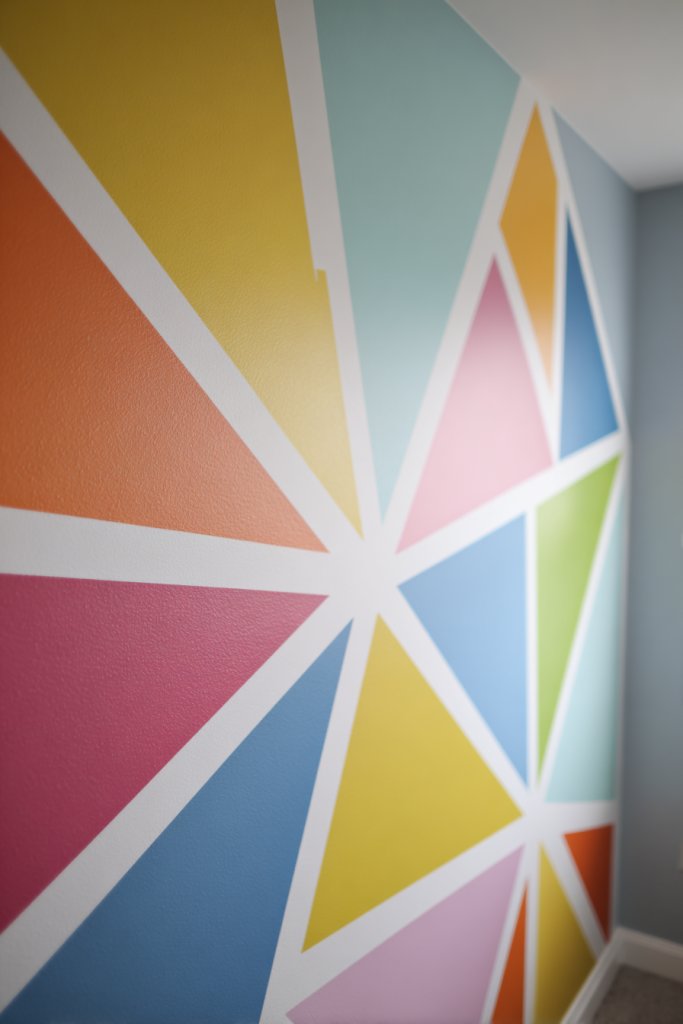
20. Multi-Colored Paint Stripes or Blocks
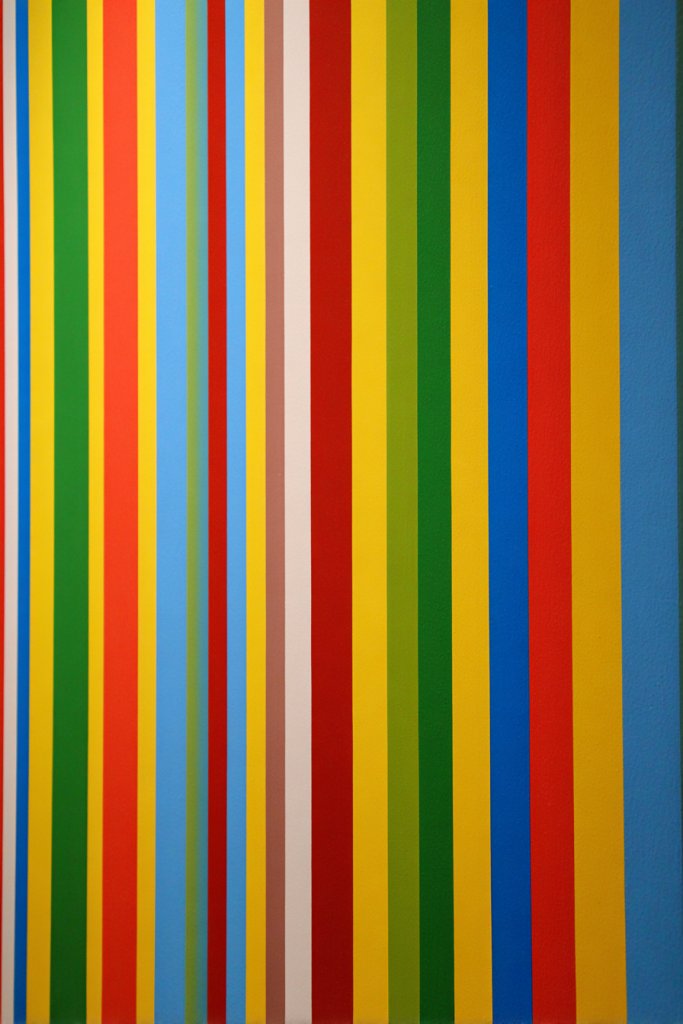
Want to make a bold statement without much fuss? Multi-colored paint stripes or blocks add energy and personality to any wall. They’re a fun way to introduce color, pattern, and a sense of movement. Plus, with the right tools, you can do it yourself and avoid costly wallpaper or renovations.
Visualize vertical or horizontal stripes in contrasting hues like navy and blush or bold rainbow palettes. The clean lines create a vibrant, dynamic backdrop that energizes the space. When combined with simple furniture, they become the room’s focal point. The layered color blocks evoke a playful, modern aesthetic that’s hard to ignore.
Use wide or narrow stripes depending on ceiling height and room size. For a more subdued look, choose pastel or muted tones; for maximum impact, go for bright, saturated colors. Change the pattern’s orientation to suit your space—vertical for height, horizontal for width. Incorporate color blocking with painter’s tape for sharp, crisp edges.
Start by measuring and marking your wall with a level and pencil. Apply painter’s tape along your lines, pressing firmly to prevent bleed-through. Use high-quality, washable paint in your chosen colors. Apply multiple coats if necessary, allowing each to dry thoroughly. Remove tape carefully while paint is still slightly tacky for sharp edges. Clean brushes and tools immediately after.
Incorporate metallic or glitter paints for a touch of shimmer. Use painter’s tape to create geometric shapes or intersecting patterns for a more complex look. Add complementary decor in similar hues to reinforce your color story. Change up the pattern or colors seasonally to keep the space lively.
Paint stripes and blocks are a quick, affordable way to energize your decor. They suit modern, playful, or even sophisticated interiors. With a little effort, you can create a vibrant feature wall that sparks joy and creativity. Ready to add some color punch? Grab the tape and paint!
21. Artistic Wall Sculptures in Metal or Wood
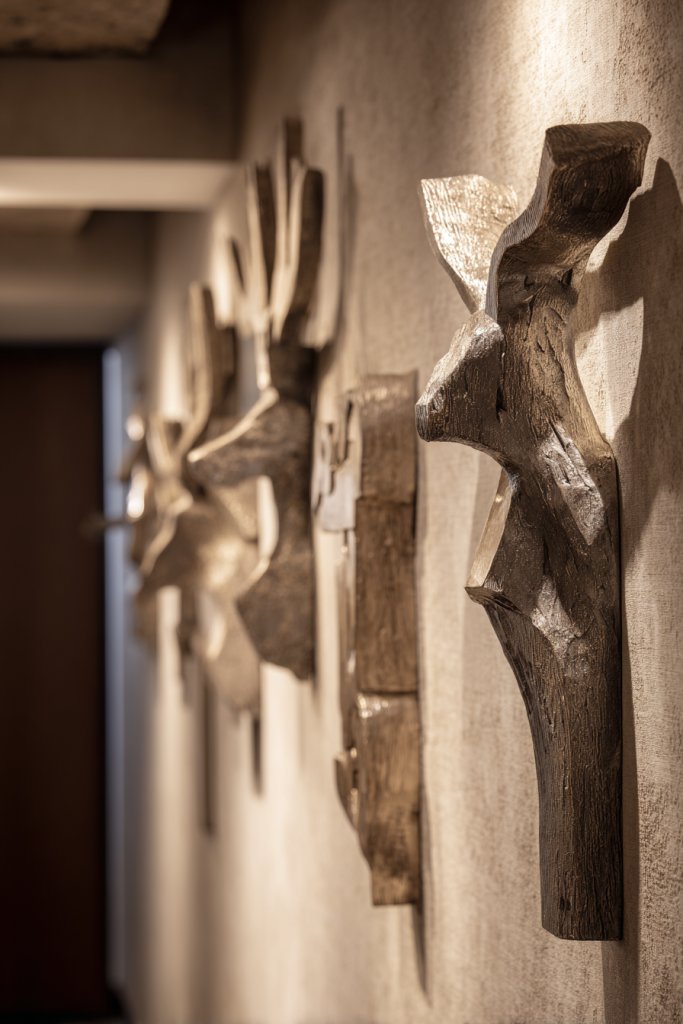
Looking to add a bold, three-dimensional element to your walls? Metal or wood sculptures serve as striking focal points that elevate your decor. They introduce texture, movement, and a modern or rustic vibe depending on the materials. Plus, they’re a great way to showcase craftsmanship and artistic flair.
Imagine abstract or nature-inspired sculptures protruding from your wall with intricate details. The interplay of shadows and light creates a dynamic visual effect, especially when illuminated with directional lighting. The materials—brushed metal, polished steel, or carved wood—add tactile richness. These pieces can be minimalist or highly detailed, depending on your style.
Choose sleek, modern designs for a contemporary look or ornate, handcrafted pieces for a boho or rustic feel. Mount sculptures directly onto the wall or use floating mounts for a floating effect. Large sculptures work well as statement pieces, while smaller accents can complement other decor. Mix materials for contrast and visual interest.
Select the sculpture based on wall size and style. Securely attach mounting hardware, ensuring the piece is level and well-supported, especially for heavier materials. Use wall anchors or studs for larger sculptures. Consider positioning sculptures at eye level or slightly above to maximize impact. Install lighting nearby to highlight textures and details.
Incorporate lighting to accentuate shadows and textures. Mix metallic and wooden sculptures for a layered look. Personalize with engraved or painted details if possible. Arrange multiple sculptures in a gallery style for a curated, artistic display. Rotate or swap sculptures seasonally for variety.
Wall sculptures add a sophisticated, artistic touch that’s sure to impress. They suit modern, industrial, or eclectic interiors. With the right piece and placement, you turn your wall into a piece of art. Ready to sculpt your space? Let’s get creative!
Conclusion
With these varied wall decor ideas, you’re equipped to personalize your home and create a space that truly reflects you. From bold art pieces to subtle accents, each idea offers a unique way to enhance your environment. Don’t hesitate to experiment and make these designs your own—your perfect wall decor awaits to inspire and delight!

Post Comment