24 Wall Paneling Ideas for Textured Elegance
Imagine walking into a room that instantly exudes style, warmth, and personality—wall paneling can make that dream a reality! This design trend has surged in popularity because it adds depth and texture, transforming ordinary walls into stunning focal points.
In this article, you’ll uncover a diverse range of wall paneling ideas that bring textured elegance into any space. Whether you prefer classic wood finishes, modern geometric patterns, or bold textured surfaces, there’s something here to inspire your next home upgrade. Get ready to explore creative ways to elevate your interiors effortlessly!
1. Shiplap Paneling with a Modern Twist
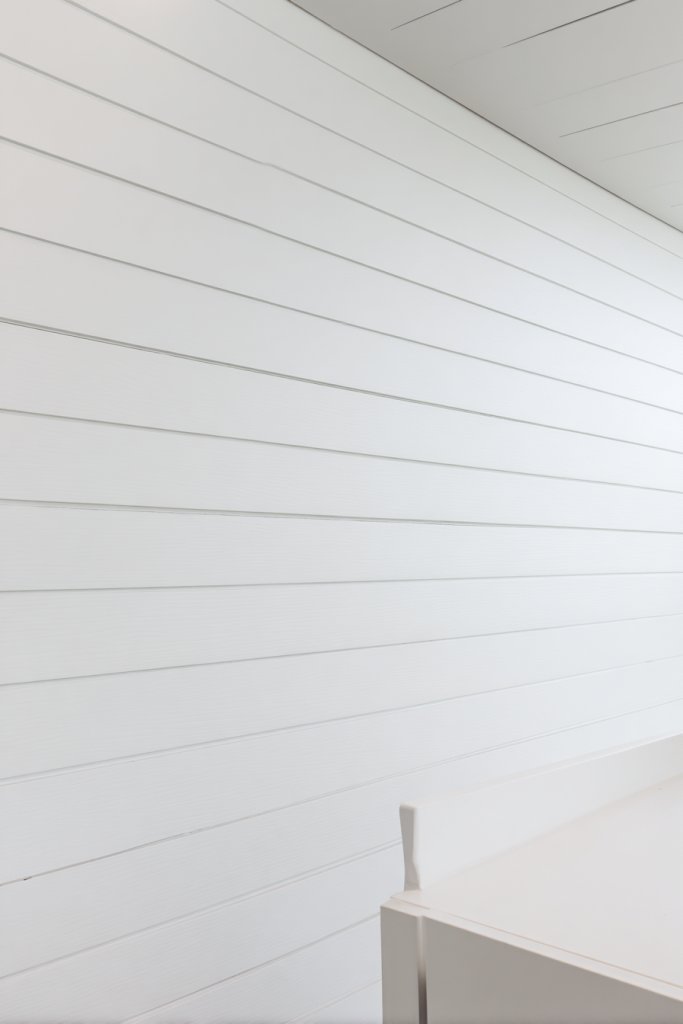
Ever felt that plain walls just don’t cut it anymore? You want something sleek, stylish, but not overly traditional. Shiplap offers that perfect balance of rustic charm mixed with modern flair, transforming any room into a contemporary haven. Whether you’re after a subtle update or a bold statement, this idea hits the sweet spot.
Imagine horizontally aligned wood planks painted in crisp white or a deep matte black, running seamlessly from floor to ceiling. The clean lines add a sense of spaciousness, especially in smaller rooms. The textured surface plays with light and shadow, creating depth without clutter. It’s like giving your walls a fresh, sophisticated layer of interest, all while keeping the look minimal yet impactful.
You can opt for stained wood for a warm, natural vibe or paint it in bold, unexpected colors for a modern twist. In coastal homes, soft blues and whites evoke beachy serenity, while in urban apartments, monochrome shades keep it chic. For small spaces, vertical shiplap can add height; for larger rooms, combining with contrasting materials or textures brings variety. Seasonal accents like cozy throws or metallic decor can further elevate the style.
Start by choosing high-quality pine, cedar, or MDF panels suited for wall application. Measure your walls carefully and plan your layout to ensure cuts are precise. Use a level and spacers to keep planks aligned, and secure them with nails or adhesive. Sand rough edges before painting or staining, and finish with a matte or semi-gloss top coat for durability. For a seamless look, consider tongue-and-groove panels, which lock together effortlessly. DIYers can handle this with patience, but a pro might save you time.
Add personal touches by choosing colors that match your personality or decorating with minimalist hardware. Incorporate textured fabric curtains or plush rugs to complement the sleek walls. For a more layered look, install floating shelves or decorative ledges on the shiplap surface—just avoid clutter to keep it modern. Even small metallic accents or subtle lighting can enhance the effect, making the space feel both fresh and cozy.
Shiplap with a modern twist is all about mixing rustic charm with sleek design. It’s a versatile choice that can adapt to nearly any aesthetic, from farmhouse chic to ultra-modern. Once installed, it instantly elevates your space and boosts your confidence in DIY projects. Ready to give your walls a stylish upgrade that lasts?
2. 3D Geometric Wall Panels in Neutral Tones
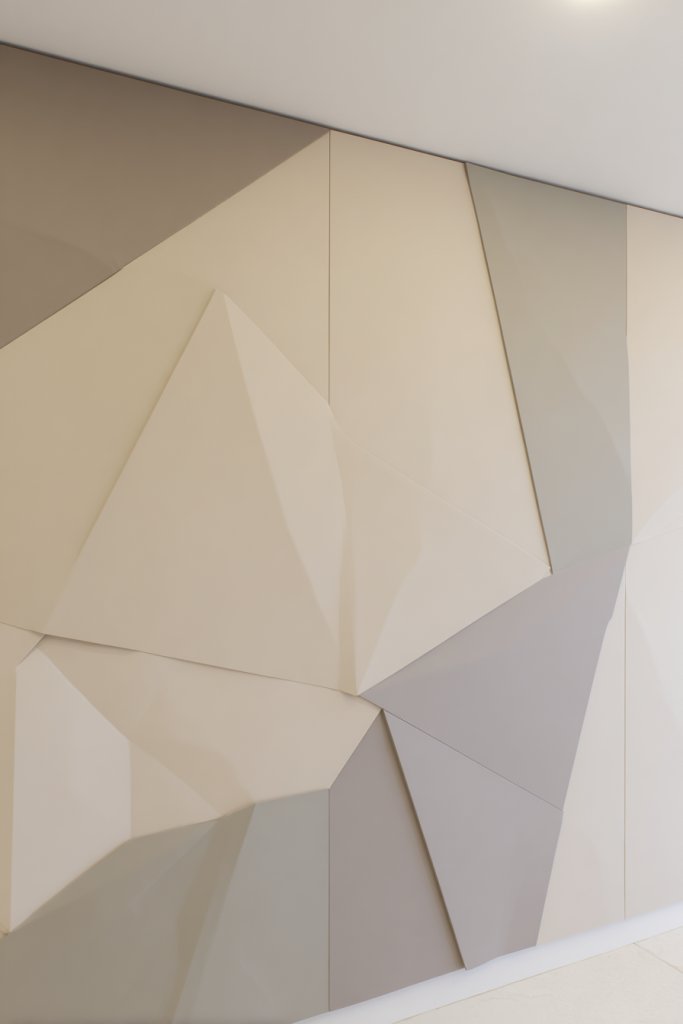
Feeling like your walls need more than just paint? You crave depth and dimension that catch the eye without overwhelming the space. Geometric 3D panels check all those boxes, adding architectural interest effortlessly. They turn boring flat walls into modern art, making your home feel fresh and dynamic.
Picture layered shapes—triangles, hexagons, or abstract polygons—protruding from the wall in soft beige or grey tones. The textured surfaces create shadows that dance as lighting changes, giving the illusion of movement. This adds a sculptural element that transforms flat walls into focal points. The neutral palette keeps it sophisticated, perfect for contemporary or minimalist interiors.
Choose panels with subtle textures or matte finishes to stay understated or go for glossy, reflective surfaces for a more dramatic effect. These panels work well in living rooms, bedrooms, or even office spaces. Mixing different geometric patterns creates a playful, eclectic vibe, while keeping a consistent color palette ensures harmony. Seasonal changes like adding colorful accessories or textiles can refresh the look without needing a full overhaul.
Select modular 3D panels made from materials like PVC, MDF, or lightweight composites. Measure your wall space and decide on a pattern that fits your room’s proportions. Use adhesive or mechanical fasteners for installation, ensuring each piece aligns perfectly. Some panels come pre-mounted, simplifying the process. Once secured, fill any gaps with caulk, sand smooth, and paint in your chosen neutral tone. For added impact, consider backlighting or spotlighting to emphasize the 3D effect.
Personalize with different textures or finishes—matte, satin, or gloss—to match your decor style. Incorporate complementary textiles like soft cushions or throws to soften the geometric edges. Framing certain panels with thin molding or installing accent lighting can elevate the aesthetic further. You can also experiment with different color schemes for each section to create zones within a room.
3D geometric panels prove that wall art can be sleek, simple, and modern all at once. They add a layer of depth and personality that’s hard to replicate with paint alone. Once installed, they boost your confidence in tackling architectural features yourself. This trend is all about making your walls stand out without cluttering the space—perfect for a stylish upgrade.
3. Wainscoting with Beaded Detailing for Classic Charm
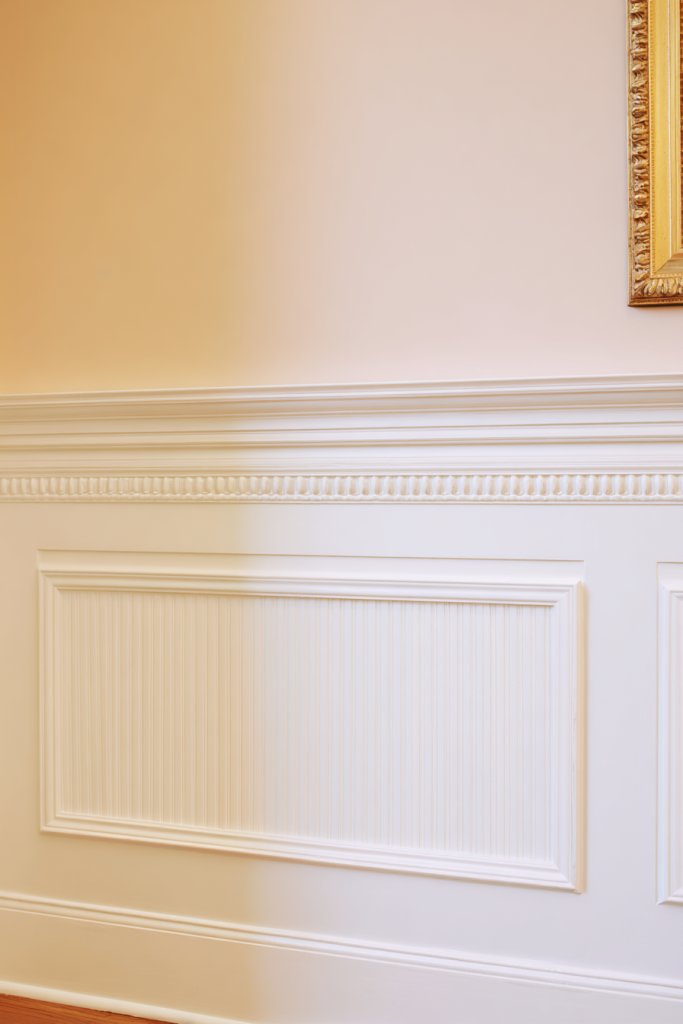
Ever wish your walls exuded timeless elegance? Wainscoting offers that classic charm, elevating any room from ordinary to sophisticated. Adding beaded detailing enhances this effect, giving a subtle texture that feels both vintage and refined. It’s like dressing your walls in a tailored suit—polished and stylish.
Picture crisp white or soft pastel wainscoting panels reaching halfway up the wall, topped with a decorative chair rail. The beaded detailing adds a delicate rhythm, like tiny pearls lining the panels. The textured beads catch the light, creating gentle shadows that add depth. Paired with traditional crown molding, this look radiates elegance and a sense of history.
Opt for painted wood for a clean, fresh look or stain for a richer, warmer feel. Beaded wainscoting suits traditional, farmhouse, or shabby chic styles equally well. For smaller rooms, lighter shades open up the space, while darker stains or paints add drama in larger areas. You can also combine beaded panels with wallpaper or textured paint for layered effects, depending on your taste.
Start by measuring wall height and selecting panel styles—raised or flat, bead detail or smooth. Attach panels using nails or adhesive, ensuring the beads are aligned uniformly. Finish with caulk along joints and paint or stain to match your decor. Installing a chair rail or molding at the top completes the look. For DIYers, pre-cut panels and pre-beaded molding simplify the process, but a professional can handle intricate details seamlessly.
Add decorative hardware like vintage knobs or small hooks for a functional twist. Incorporate contrasting colors—darker beads on lighter panels or vice versa—to make the details pop. Use textured wallpaper or fabric inserts between panels for a custom, layered appearance. Personal touches like family photos in vintage frames can make the classic charm feel uniquely yours.
Wainscoting with beaded detailing is a proven way to add sophistication without overwhelming a space. It’s a design element that stands the test of time, proving that traditional styles can look fresh and modern. Installing it yourself can boost your confidence in tackling more detailed carpentry projects. Just imagine, your walls telling a story of timeless elegance.
4. Faux Brick Wall Paneling for Rustic Appeal
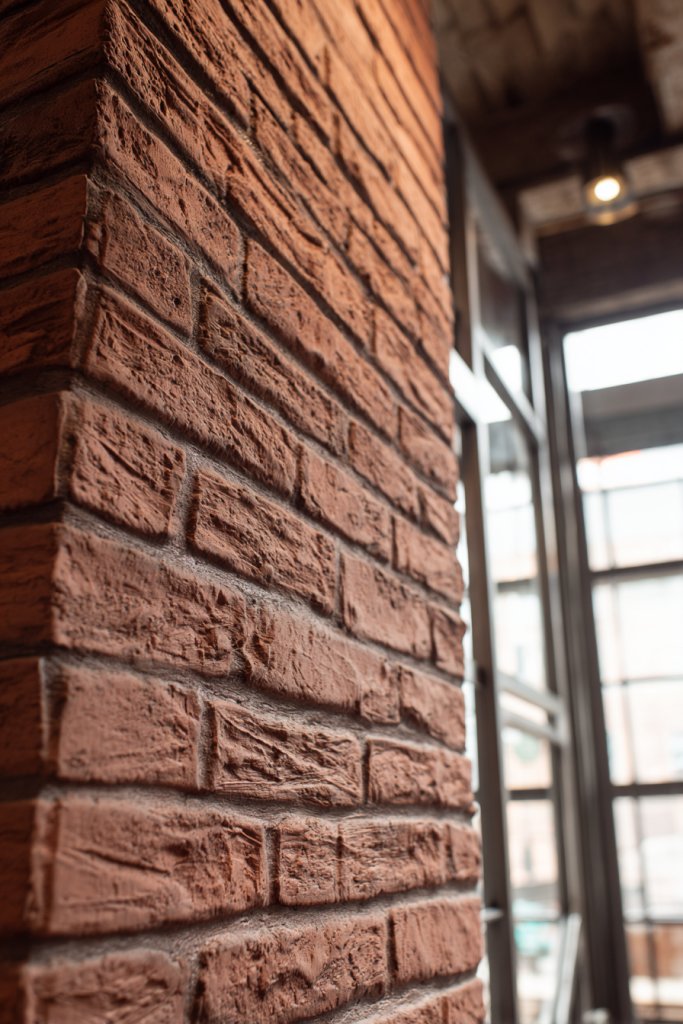
Craving that raw, industrial look but not ready to tear down your walls? Faux brick panels give you that rugged charm without the mess and expense of real bricks. They’re perfect for adding texture and warmth, especially in modern rustic or loft-inspired spaces. Plus, installation is surprisingly straightforward—no mortar required.
Imagine a wall covered in distressed, weathered brick in shades of red, gray, or white. The textured surface mimics the uneven mortar lines and chipped paint, creating an authentic aged appearance. The rough surface catches light differently throughout the day, giving your space a lived-in, cozy vibe. It’s like bringing a piece of historic warehouse charm into your home, instantly transforming the atmosphere.
Choose between full panels or smaller tiles to suit your space. For a more modern take, opt for sleek, uniform bricks in neutral tones. Incorporate lighting fixtures like wall sconces or industrial lamps to highlight the texture. In small rooms, use faux brick as an accent wall; in larger areas, cover entire walls for maximum impact. Seasonal accessories like greenery or textiles complement the rustic aesthetic.
Select high-quality faux brick panels made from lightweight polyurethane or PVC. Measure your wall carefully and prepare a clean, dry surface. Use adhesive or mechanical fasteners to mount the panels, ensuring tight seams and a flat finish. Fill gaps with caulk, then paint or seal for extra durability. Some panels come pre-painted, saving time, while others accept custom finishes. For DIY installation, a level and patience are your best friends.
Add vintage or industrial-style accessories to complement the rustic feel. Incorporate reclaimed wood shelves or steel accents for a layered look. Keep the focus on the brick by choosing simple, understated furniture and decor. For a softer touch, introduce cozy textiles like wool throws or plush cushions. This creates a warm, inviting space that balances rugged charm with comfort.
Faux brick paneling is a clever way to add character and texture without the hassle of real masonry. It’s a versatile choice that works in many styles, from industrial to farmhouse. Installing it yourself proves that you can achieve professional-looking results with minimal effort. Your walls will tell a story of urban elegance with a touch of rough-and-tumble flair.
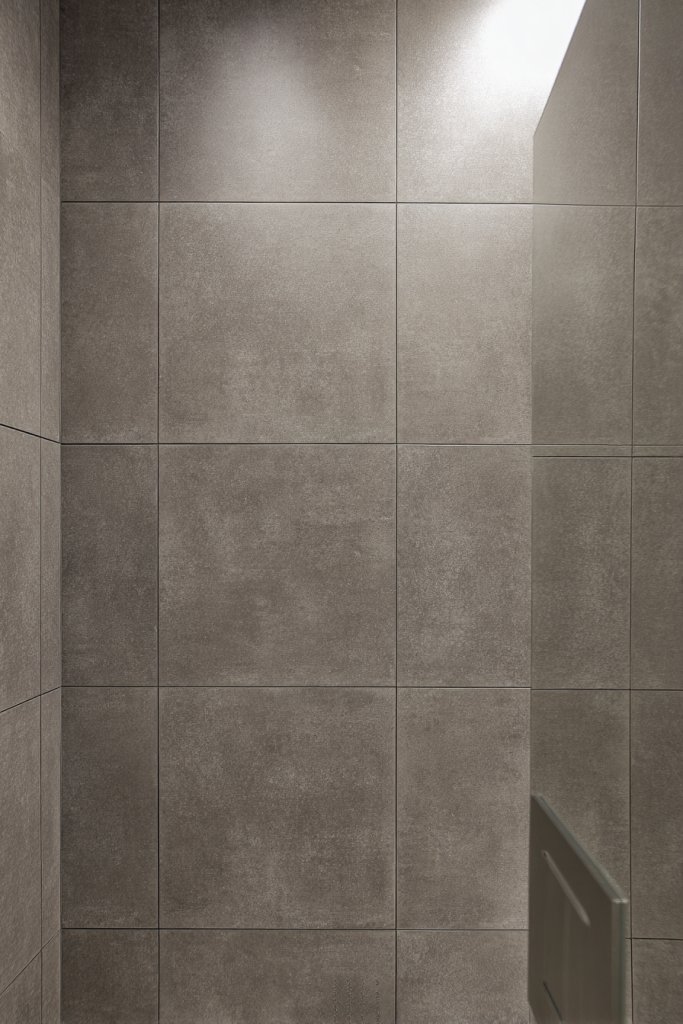
5. Textured MDF Wall Panels with Carved Patterns
Looking to add intricate detail without the fuss of real wood carvings? Textured MDF panels with carved patterns offer a cost-effective, stylish solution. They bring a touch of craftsmanship and sophistication to any room, elevating your wall decor from plain to artful. If you love detailed design but hate the expense, these panels are your new best friend.
Visualize panels with ornate swirling or geometric patterns carved into a smooth surface. The textured relief creates shadows and highlights as light hits the surface, adding depth and visual interest. Choose neutral tones like soft grey or warm taupe to complement modern or traditional interiors. The detailed carvings can mimic intricate woodwork or vintage plaster, giving a rich, layered look.
Mix and match different carved patterns across your walls for an eclectic vibe, or keep it uniform for a more refined appearance. Painting or staining enhances the carved details, making them pop or blend subtly. These panels suit formal spaces like dining rooms or entryways but can also add elegance to bedrooms. Incorporate lighting to emphasize the relief and create dramatic shadows.
Choose MDF panels with pre-cut patterns or customize your own design. Measure wall dimensions carefully and cut panels to fit, ensuring seamless joints. Attach panels with strong adhesive or nails, focusing on the carved areas for a secure fit. Fill any gaps with wood filler, sand smooth, and paint or stain as desired. For a professional look, consider adding a clear sealant to protect the surface. DIY installation is straightforward with basic tools, but precise measurements are key.
Highlight carved patterns with contrasting paint colors or metallic finishes for a luxe effect. Incorporate decorative moldings or framing around panels for a gallery-like appearance. Use complementary textiles—like velvet or silk—to soften and elevate the space further. Personalize the pattern choice to reflect your style, whether ornate or minimalist, for a truly custom feature.
Textured carved MDF panels prove that you can achieve detailed, high-end looks on a budget. They add richness and depth, making your walls the centerpiece of any room. Installing them yourself boosts confidence and shows that DIY can look upscale. It’s a small change that makes a big impact, transforming your space into a showcase of craftsmanship.
6. Tongue and Groove Paneling for a Cozy Feel
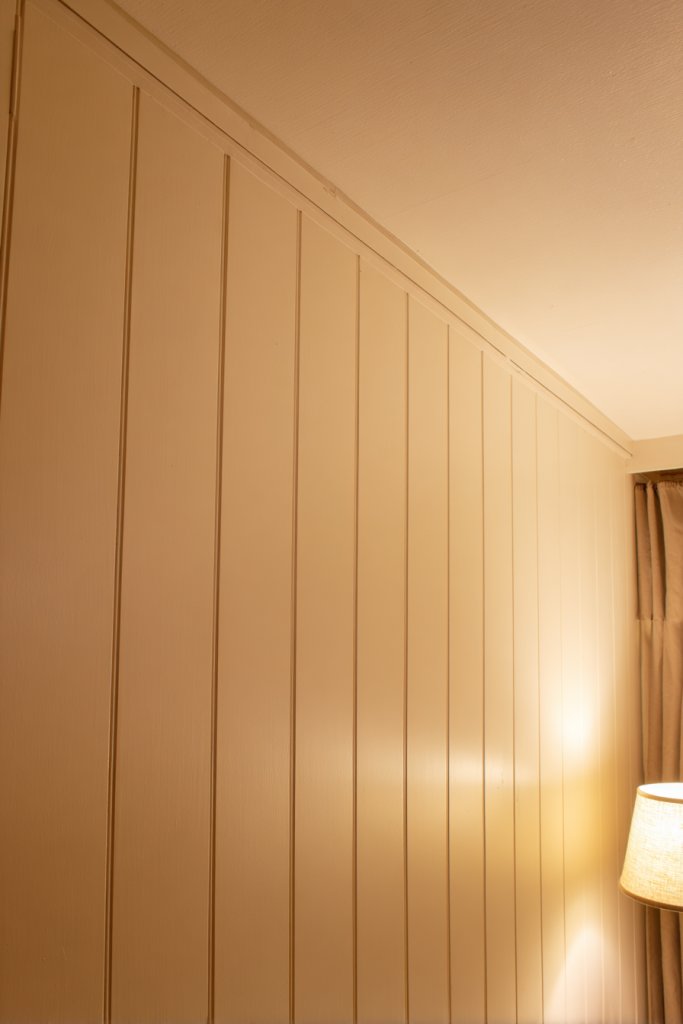
Ever wish your walls felt warmer and more inviting? Tongue and groove paneling creates that cozy, cabin-like atmosphere that everyone loves. It offers a timeless look that adds texture and depth to any space, making even the simplest room feel special. Plus, it’s surprisingly easy to install—no complicated tools required.
Picture narrow wooden planks fitting snugly together in a continuous pattern, creating horizontal or vertical lines. The natural grain and knots add charm and authenticity, especially in softer hues like cream or honey. The panels reflect soft light, giving your walls a warm, glowing appearance. It’s like wrapping your space in a comforting blanket, with every line adding to the layered, textured effect.
Choose stained wood for a rustic, natural look or paint in light pastel shades for a modern twist. Vertical paneling can visually elongate walls, making rooms feel taller. In small spaces, this paneling adds character without overwhelming; in large rooms, it defines zones or creates feature walls. Pair with antique or modern furniture to suit your aesthetic. Seasonal accessories like cozy throws or candles enhance the inviting vibe.
Select high-quality pine, cedar, or MDF tongue-and-groove panels designed for walls. Measure wall height, and cut panels to fit, leaving room for expansion if necessary. Install using nails or adhesive, ensuring each tongue fits securely into the groove of the adjacent panel. Sand rough edges, then paint or stain to match your decor. Finish with a protective top coat if desired. DIY installation is straightforward but requires patience to ensure tight, seamless joints.
Add decorative accents like contrasting paint on the groove edges or subtle distressing for a vintage look. Incorporate decorative molding or wainscoting to frame the panels elegantly. Use textured or patterned textiles to complement the wood’s natural warmth. Personalize by choosing colors that evoke your personality or mood for the room, making the space uniquely yours.
Tongue and groove paneling offers a classic, cozy aesthetic that’s both functional and stylish. It’s a DIY-friendly upgrade that instantly boosts your space’s warmth and charm. Installing it yourself not only saves money but also gives you confidence in tackling more carpentry projects. Your walls will radiate comfort and timeless elegance.
7. Vertical Plank Paneling for Height Enhancement
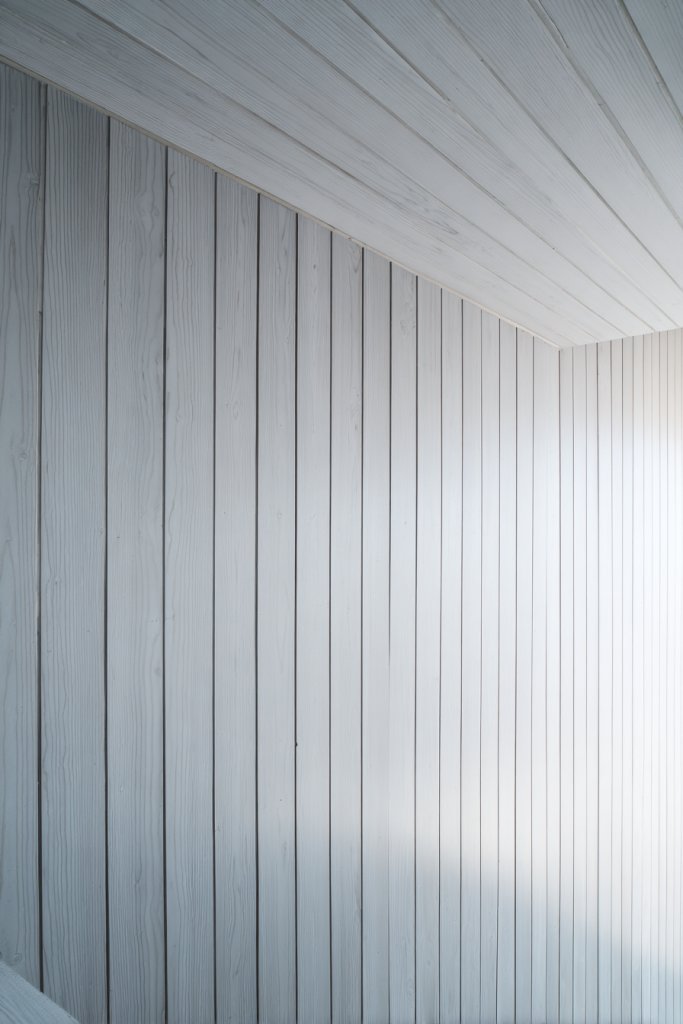
Feeling like your room needs a boost of height and openness? Vertical plank paneling is your answer. It elongates walls, making ceilings seem higher and spaces feel more expansive. It’s a simple yet effective trick that adds a contemporary edge to traditional or modern interiors. Plus, it’s a quick way to refresh tired walls without a full remodel.
Visualize sleek, narrow planks running from floor to ceiling in a uniform pattern. The vertical lines draw the eye upward, creating an illusion of taller walls and higher ceilings. The texture can be smooth or subtly grooved, depending on your style. Choose neutral tones like soft grey, crisp white, or warm wood stains for a clean, modern look that brightens the space. The effect is both minimalist and dramatic, transforming the room’s proportions.
In small rooms, keep the planks light-colored to amplify brightness; in larger spaces, darker stains add sophistication. Mix vertical planks with horizontal accents for visual interest or keep it simple for a sleek look. It pairs well with modern furniture, metal fixtures, and minimal decor. Seasonal changes like plush cushions or textured fabrics can soften the look or add warmth. This style adapts easily to different room functions, from bedrooms to hallways.
Choose tongue-and-groove or shiplap panels suitable for vertical installation. Measure your wall height and cut panels accordingly. Attach using nails or adhesive, making sure each plank is perfectly aligned. Fill gaps and sand smooth before painting or staining. For a seamless finish, use a level and spacers. Consider adding a baseboard or molding at the top for a polished appearance. DIYers can do this quickly with patience and proper tools.
Accent with contrasting paint or stain at the edges or between planks for a layered effect. Incorporate wall-mounted shelves or decorative hooks to add functionality. Use textured fabrics or wall tapestries to complement the vertical lines. Personalize by choosing colors or finishes that match your style—be it sleek modern or rustic charm. This approach keeps your walls feeling fresh and tailored.
Vertical plank paneling is a smart, modern way to make your space feel taller and more open. It’s a quick DIY project that yields instant results, boosting your confidence in wall upgrades. The clean lines and simple installation make it accessible for beginners. Soon, your walls will impress everyone with their sleek, expansive look and your newfound carpentry skills.
8. Beaded Board Paneling for Cottage Charm
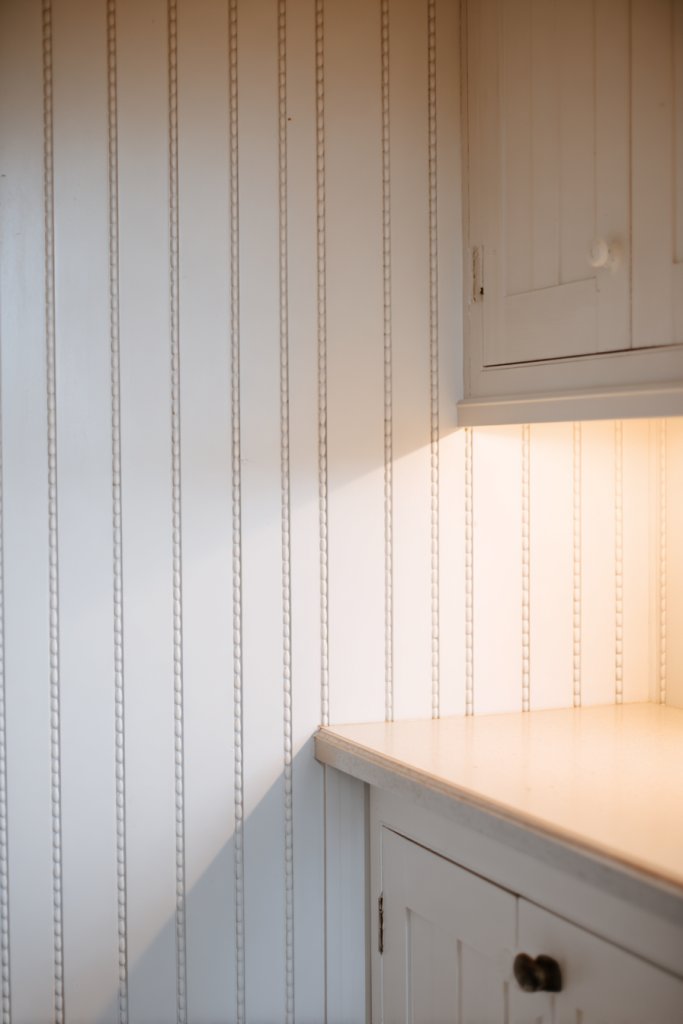
Longing for that cozy cottage or coastal vibe? Beaded board paneling offers charming, textured walls that evoke relaxation and nostalgia. It’s a timeless look that works beautifully in kitchens, bathrooms, or bedrooms. If you want to add subtle character with a touch of vintage appeal, this idea is perfect. Plus, it’s easier to install than you might think.
Imagine narrow, vertical wooden panels with tiny beads running along the grooves. The bead detailing adds a delicate rhythm, catching the light and creating soft shadows. Usually painted in white or pastel shades, these panels brighten and soften the space. The repeating beaded pattern lends a handcrafted, inviting feel reminiscent of seaside cottages or farmhouses. It’s a look that’s both charming and timeless.
Choose painted wood for a classic look or stain for a warm, natural finish. In small spaces, light colors keep the room airy; darker stains add depth in larger rooms. Pair with vintage or shabby chic furniture to enhance the cottage charm. You can also combine beaded paneling with wallpaper or textured paint for layered interest. Seasonal accessories like floral textiles or woven baskets complement this style beautifully.
Select tongue-and-groove beaded panels made from MDF or real wood. Measure your wall to determine panel length and width. Attach panels with nails or adhesive, making sure the beads align uniformly. Fill gaps with wood filler, sand smooth, and paint or stain in your preferred color. For authenticity, use a semi-gloss or matte finish. Installing a simple chair rail or decorative molding at the top completes the cottage look. DIYers can handle this with basic carpentry skills.
Add decorative hooks, small shelves, or vintage hardware to maximize functionality. Use contrasting paint colors on the beads or panels to customize the style further. Incorporate fabrics like gingham or floral prints in cushions or curtains to reinforce the cozy vibe. Personal touches like family heirlooms or handcrafted accessories make the space truly yours. The result is a charming, inviting wall that feels warm and nostalgic.
Beaded board paneling captures that quintessential cottage appeal, proving that classic styles remain relevant. It’s a DIY project that instantly adds character and charm to your home. Installing it yourself gives you a sense of achievement and a deeper appreciation for craftsmanship. Your walls will radiate warmth, history, and a cozy spirit—perfect for relaxing retreats or family spaces.
9. Mirrored Wall Panels with Textured Frames

Ever wish your space felt brighter and more expansive? Mirrored wall panels create an illusion of more space while adding a glamorous touch. Paired with textured or decorative frames, they turn ordinary walls into stunning focal points. If you want to boost natural light and style simultaneously, this idea delivers. It’s a clever way to make a room feel larger without knocking down walls.
Picture large, seamless mirrors framed with textured metal or decorative wood trim. The reflective surface bounces light around, instantly brightening the room. The textured frames add visual depth and contrast, making the mirror pop even more. In a bedroom or living room, they reflect the decor beautifully, creating a sense of depth and elegance. The overall effect is both modern and luxe, elevating your interior aesthetic.
Choose frameless, full-length mirrors for sleek minimalism or ornate frames for vintage charm. Pair with lighting fixtures like sconces or LED strips to highlight the textured frames. Use in small spaces to visually expand the room or as a statement piece in larger areas. You can also layer multiple smaller mirrors for an eclectic, gallery-style look. Seasonal decor like candles or fabric accents can complement the overall vibe.
Select high-quality mirrors with safety backing and durable frames. Measure your wall thoroughly and mark placement spots. Mount the mirrors using appropriate hardware—wall anchors or brackets—ensuring they’re level and secure. For textured frames, choose materials like carved wood, embossed metal, or decorative resin. Finish by cleaning the surface and adjusting for perfect alignment. DIY installation is manageable with basic tools, but professional help ensures safety and precision.
Customize frames with paint, metallic finishes, or decorative molding to match your decor. Incorporate accent lighting behind or beside the mirrors to emphasize the textures. Use complementary furniture and accessories to create a cohesive, glamorous space. Personal touches like engraved initials or artistic embellishments on the frames add a unique, personal flair. The end result is a stunning, luminous wall that elevates your entire room.
Mirrored panels with textured frames combine functionality with luxury, proving that a simple idea can transform a space. They reflect your style and make your home feel brighter and larger. Installing them yourself boosts confidence in tackling DIY projects that have a high visual impact. Soon, your walls will radiate sophistication and brilliance—talk about a win-win.
10. Metal Accent Wall Panels for Industrial Style
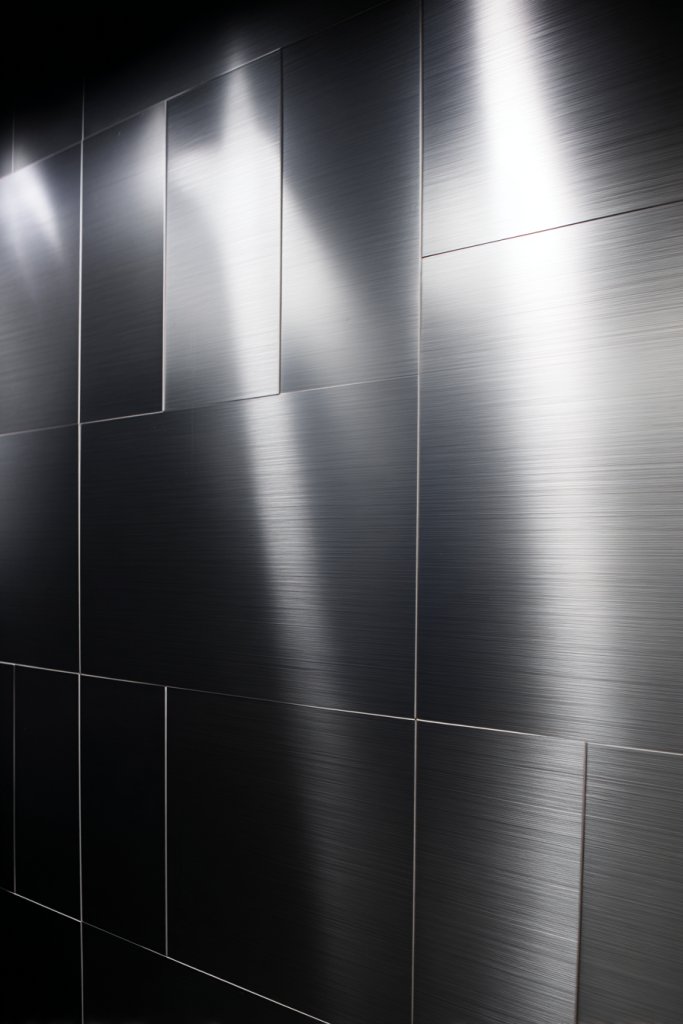
Looking to create a bold, modern statement in your space? Metal accent panels bring an edgy, industrial vibe that’s hard to ignore. They add texture and shine, giving your walls a sleek, contemporary feel. If you love the idea of combining raw materials with modern design, these panels are your new go-to.
Imagine brushed aluminum or embossed steel panels arranged in a geometric pattern or a simple grid. The metallic surface reflects light and adds a sense of depth, making your walls pop. The textured or embossed details create visual interest and contrast with softer elements like fabric or wood. The overall effect is striking, sophisticated, and unmistakably modern. It’s like turning your wall into a piece of urban art.
Choose matte or glossy finishes depending on your mood—matte for understated elegance, glossy for high shine. Combine with concrete or brick textures for layered industrial appeal. Use in kitchens, offices, or feature walls in living rooms to add focal interest. Incorporate warm lighting or LED accents to highlight the metallic surfaces and textures. Seasonal decor can be minimal, allowing the panels to shine year-round.
Select panels made from lightweight metals like aluminum or steel, with embossed or textured patterns. Measure your wall carefully and plan your layout. Mount panels with appropriate hardware—screws or industrial adhesive—ensuring they’re level and securely attached. Clean the surface thoroughly before installation to ensure adhesion. Finish with protective coatings if necessary, especially in high-humidity areas. DIY installation requires some tools but yields a high-impact result.
Customize with color-tinted finishes or metallic paints for a unique look. Pair with other industrial elements like pipe shelving or concrete furniture. Incorporate accent lighting to emphasize the textures and metallic shine. Combining different metal finishes (brushed, matte, polished) creates a layered, curated effect. It’s a perfect way to showcase your bold, modern style.
Metal accent panels transform any space into an industrial masterpiece, blending form and function seamlessly. They prove that a high-end look can be achieved with simple materials and DIY spirit. Installing them yourself can be satisfying and affordable, boosting your confidence in tackling other home upgrades. Get ready to impress with a wall that screams modern chic.
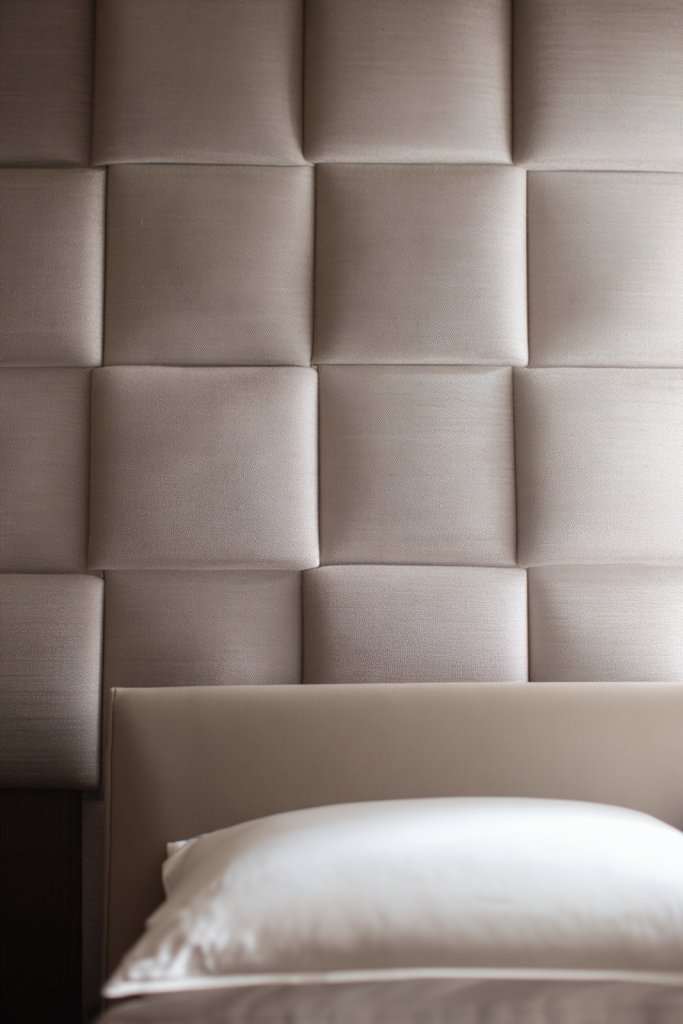
11. Fabric-Textured Wall Panels for Soft Sophistication
Ever wish your walls could feel just as inviting as your favorite sweater? Fabric-textured panels add softness and elegance, making any room instantly cozier. They’re perfect for bedrooms, lounges, or home offices where comfort matters most. If you’re tired of hard, cold surfaces, this idea wraps your walls in plush, tactile luxury.
Visualize panels covered in plush velvet, soft linen, or textured boucle fabric. The material absorbs light and creates a warm, inviting glow, especially in muted or jewel-tone colors. The fabric’s weave and pile add subtle depth, making the walls feel layered and tactile. They look sophisticated yet approachable, blending well with textiles and soft furnishings. The gentle textures invite touch and create a calming environment.
Choose fabrics in neutral shades for understated elegance or bold colors for statement walls. Incorporate tufted or quilted patterns for extra dimension. Use in bedrooms or reading nooks to enhance comfort, or in home theaters for a luxurious effect. Pair with soft lighting and plush accessories to reinforce the cozy vibe. Seasonal fabric covers or removable panels allow for easy updates.
Select fabric panels pre-made with mounting boards or foam backing for easy application. Measure your wall and cut panels to size if needed. Attach using adhesive, staples, or thumbtacks—whichever suits your fabric type and wall surface. Finish edges with decorative trim or piping for a polished look. Clean the fabric regularly with a vacuum or lint roller to maintain freshness. This DIY project is accessible and adds a tactile dimension to your decor.
Add decorative elements like embroidery, beaded accents, or contrasting piping to customize. Incorporate textured throws or cushions to complement the fabric walls. You can also layer with textured wallpaper or paint for further depth. Personalize by choosing fabrics that reflect your personality, whether bold, subtle, or tactile. The result is a warm, inviting space that beckons relaxation.
Fabric-textured panels show that comfort and style can go hand in hand. They’re an affordable, DIY-friendly way to add softness and sophistication. Installing them yourself proves that home decor can be both creative and rewarding. Soon, your walls will not only look stunning but also feel like a warm hug every time you enter.
12. Layered Wood Veneer Panels for Rich Texture
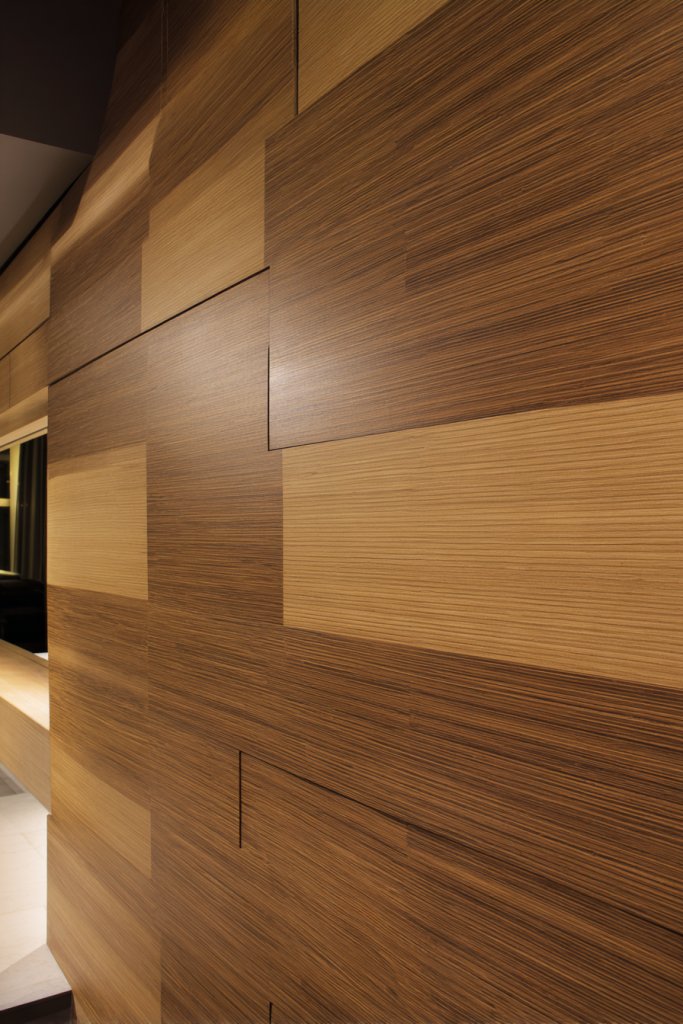
Craving a luxurious, layered look that adds depth and warmth? Wood veneer panels with multiple grain patterns create a rich, textured wall experience. They offer the beauty of solid wood at a fraction of the cost and complexity. If you want your walls to whisper sophistication, this idea is a winner.
Envision thin slices of real or engineered wood layered in varied grain directions, creating a tapestry of textures. The interplay of light and shadow across the different grains adds a dynamic, tactile quality. The natural tones—honey, walnut, cherry—bring warmth and richness to the space. The layered effect makes the wall a centerpiece, inviting admiration and touch. It’s a subtle yet impactful upgrade.
Choose from natural finishes or stain for a darker, more dramatic look. Combine different wood types for a mixed-media appearance or keep it uniform for sleek elegance. Use in feature walls, hallways, or even ceiling applications. Pair with minimalist furniture and neutral decor to let the wood textures shine. Seasonal accents like soft textiles or metallic decor add contrast.
Select high-quality veneer panels with varied grain patterns and sizes. Measure your wall carefully, then cut panels to fit, leaving small gaps for expansion. Attach using adhesive or nails, ensuring the grains align to your design plan. Fill gaps and sand smooth, then finish with clear sealant or stain. For a seamless look, consider installing with a slight gap for a shadow line. DIY installation is manageable with patience and precision.
Highlight the layered grain with contrasting stains or finishes. Incorporate decorative trims or framing to define sections. Combine with textured textiles or artwork that complements the natural wood tones. Personalize by choosing wood types that evoke certain moods—warm, rustic, or sleek modern. This approach adds richness and a bespoke feel to your decor.
Layered wood veneer panels demonstrate that high-end aesthetics can be achieved affordably. They add depth, warmth, and a touch of nature to any room. Installing them yourself boosts confidence in handling intricate projects. Your walls will radiate craftsmanship and style, proving that thoughtful detail makes all the difference.
13. Corrugated Cardboard Panels for Unique Texture
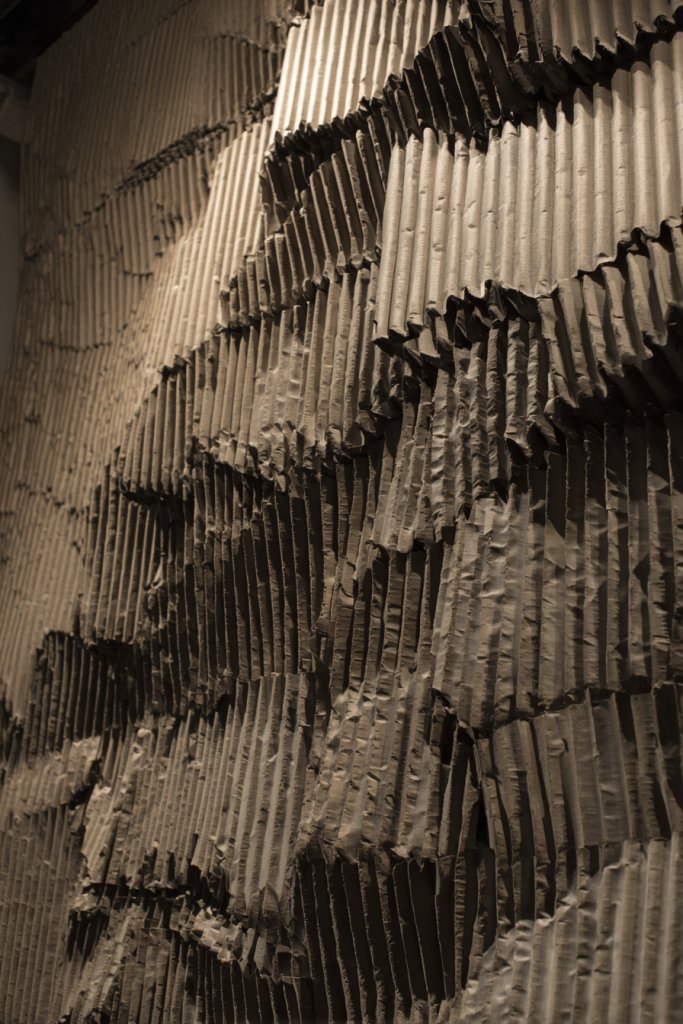
Looking for an eco-friendly, budget-friendly way to add texture? Corrugated cardboard panels offer a quirky, sustainable solution that’s surprisingly stylish. They bring a bold, industrial vibe to your walls without breaking the bank. If you’re willing to embrace a bit of whimsy and creativity, this idea is perfect.
Imagine panels made from layered, ridged cardboard in natural brown or painted in bold colors. The corrugated surface creates a striking, wave-like texture that catches light and shadows dynamically. It’s a tactile, playful look that can be both modern and retro. The ridges add depth and movement, making your wall a conversation piece that’s both eco-conscious and artistic.
Use large panels for a statement wall or smaller sections as accents. Paint in bright hues for a fun, energetic vibe or keep it raw for an industrial look. Match with minimalist furniture or vintage decor for contrast. Incorporate lighting to emphasize the textured surface and add warmth. Seasonal touches like fabric or soft lighting can soften the bold look or enhance its edge.
Construct panels from recycled corrugated cardboard, sealing or painting them to improve durability. Measure your wall space and cut the panels to size. Attach using adhesive or screws, ensuring the ridges are aligned uniformly. Seal or paint the panels to protect against moisture and wear. For stability, reinforce with backing or framing if necessary. DIY installation is simple but requires handling with care.
Customize by adding colorful paint, patterns, or even layering with other materials like fabric or wood strips. Use as a backdrop for art or shelving—just avoid covering the ridges completely. Incorporate lighting, such as LED strips, to enhance the texture and create visual interest. Personal touches like stenciled designs or decals make the space uniquely yours.
Corrugated cardboard panels show that sustainable materials can be creative and stylish. They’re a bold choice that adds texture and fun to your decor. Installing them yourself can be a fulfilling project that boosts your confidence in eco-friendly design. Your walls will be a statement of innovation and environmental consciousness—who knew cardboard could look so good?
14. Modular Panel Systems with Mix-and-Match Textures
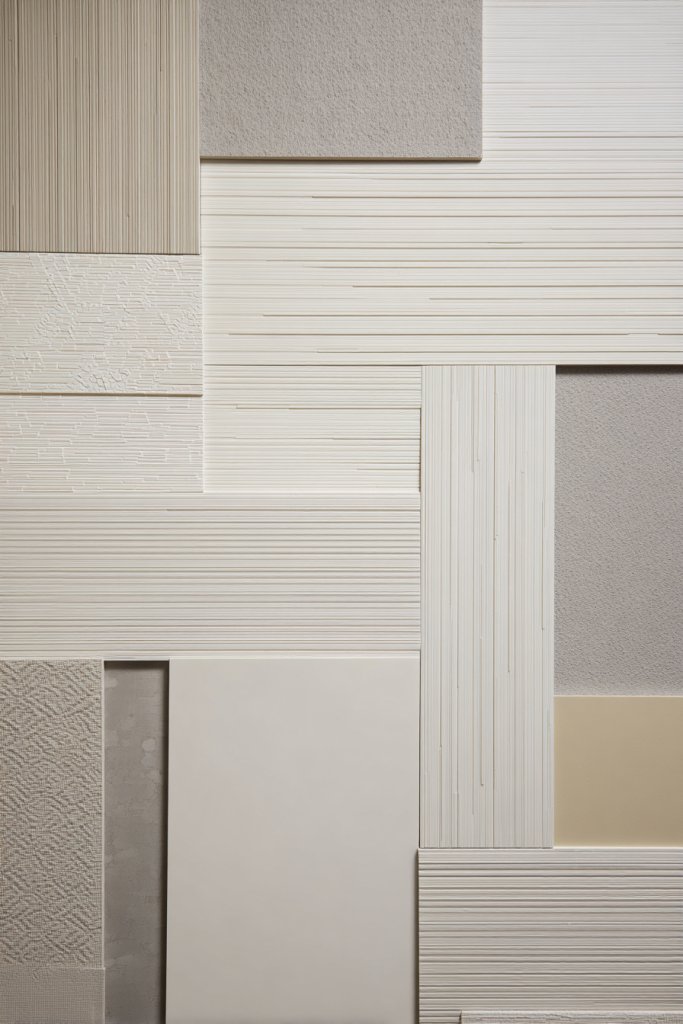
Want a customizable wall that reflects your unique style? Modular panel systems let you mix textures, patterns, and finishes for a tailored look. They’re perfect for creative souls who like to change things up without a full overhaul. If you’re tired of one-size-fits-all solutions, this flexible approach is your answer.
Picture a wall composed of different panels—some with geometric patterns, others with textured surfaces or smooth finishes—arranged in a harmonious mosaic. The variety creates a dynamic visual rhythm that draws the eye and keeps the space lively. The mix-and-match concept allows you to play with color, texture, and scale, crafting a truly personalized backdrop. It’s like creating your own wall art, but with functional panels.
Combine panels with different finishes—matte, gloss, textured—to suit your aesthetic. Use in living rooms, bedrooms, or home offices to define spaces or add focal points. Change the arrangement seasonally or as your style evolves—no demolition required. Incorporate lighting or decorative accents to highlight specific textures or patterns. The modular system adapts easily to different room sizes and layouts.
Choose modular panels made from MDF, PVC, or lightweight composites. Measure your wall and plan your layout, considering a balanced mix of textures and patterns. Attach panels with adhesive or mechanical fasteners, aligning edges carefully. Use spacers or templates for consistency. Finish by sealing or painting as desired. The versatility allows DIYers to experiment without commitment, making it a fun project.
Personalize by customizing each panel with paint, decals, or textured finishes. Create zones within a room by grouping similar textures or colors. Incorporate small shelves, hooks, or decorative elements within certain panels for added function. Seasonal color changes or rearrangements keep the space fresh and engaging. This approach ensures your walls evolve with your tastes.
Modular panel systems empower you to design a wall that’s uniquely yours, reflecting your creativity. They’re a practical way to experiment with different textures and styles confidently. Installation is straightforward, and the results are highly customizable. Your space will feel fresh, dynamic, and totally personalized—proof that DIY can be both fun and stylish.
15. Faux Stone Wall Panels for Natural Elegance
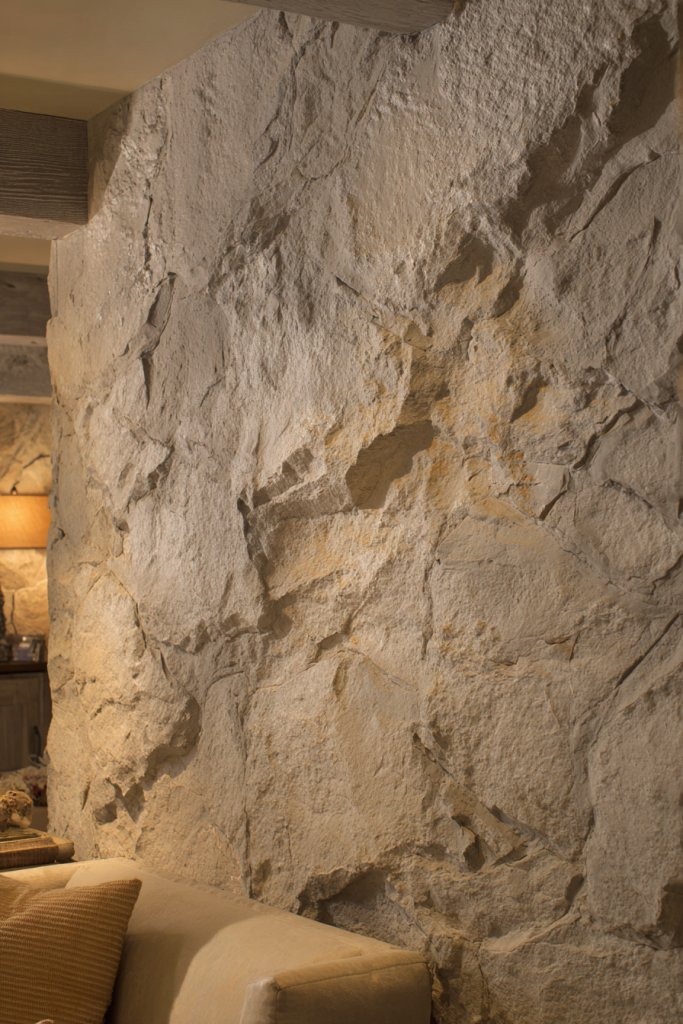
Craving the rugged beauty of stone without the weight and expense? Faux stone wall panels deliver natural elegance with minimal fuss. They instantly add texture and character, giving your space a timeless, earthy vibe. If you love the idea of rustic charm or Mediterranean flair, this solution is your new best friend.
Imagine textured panels mimicking natural stone—rough, uneven surfaces in shades of gray, taupe, or warm earth tones. The 3D surface catches light differently throughout the day, creating shadows and highlights that enhance the natural look. The irregular shapes and textures evoke mountain retreats, Mediterranean villas, or historic walls, transforming your space into an outdoor-inspired sanctuary.
Choose panels with a rough, natural finish for rustic or farmhouse themes, or smooth, refined textures for more polished interiors. Use as an accent wall in living rooms, fireplaces, or entryways to create a focal point. Pair with warm lighting, wood accents, or vintage decor to amplify the rustic appeal. Seasonal accessories like cozy throws or candles can soften the rugged look. It’s adaptable for both traditional and contemporary styles.
Select high-quality faux stone panels made from lightweight polyurethane or resin. Measure your wall space carefully, and cut panels to fit as needed. Mount using adhesive or mechanical fasteners—ensure proper alignment for a natural, seamless appearance. Fill gaps with mortar-like caulk or filler to enhance realism. Finish with a sealant to protect against wear and moisture, especially in humid areas. DIY installation is manageable with patience and the right tools.
Enhance realism by adding weathered paint or staining for aged effects. Incorporate wrought iron or distressed wood accents nearby for a complete rustic look. Use lighting to cast shadows that emphasize the textured surface. Personal touches like vintage lanterns or plant holders can complement the natural theme. The end result is a warm, inviting wall that feels rooted in history.
Faux stone panels unlock a world of natural beauty without the hassle of actual masonry. They’re a durable, stylish upgrade that elevates any space with earthy sophistication. Installing them yourself shows that you can achieve professional results and embrace a rustic lifestyle. Your walls will tell stories of nature, craftsmanship, and timeless elegance—without the weight of real stone.
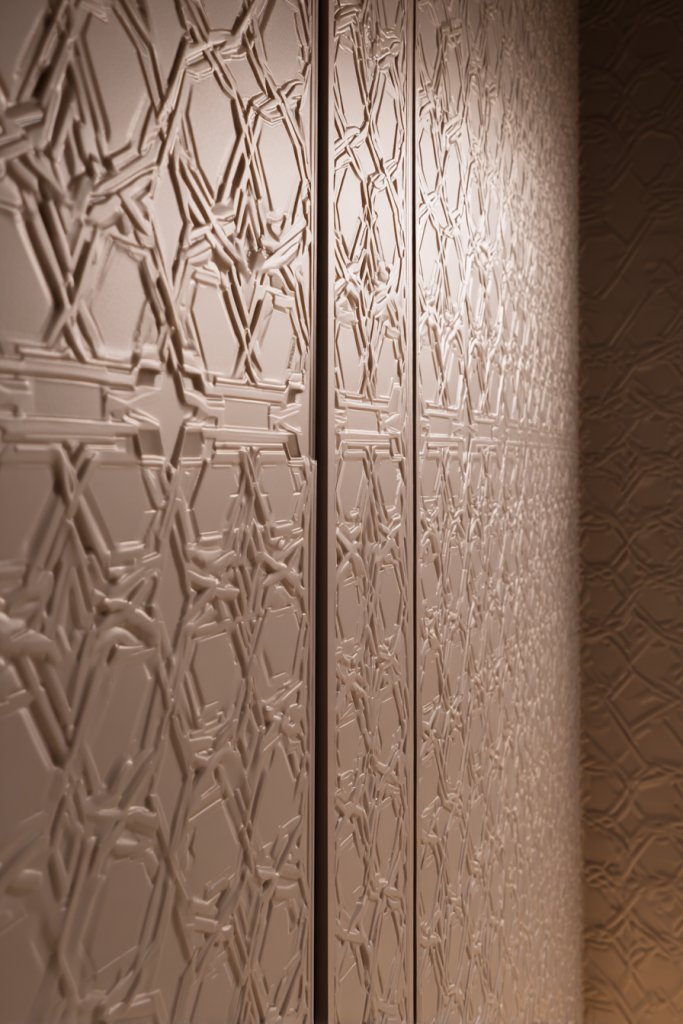
16. Laser-Cut Patterned Wood Panels for Artful Detailing
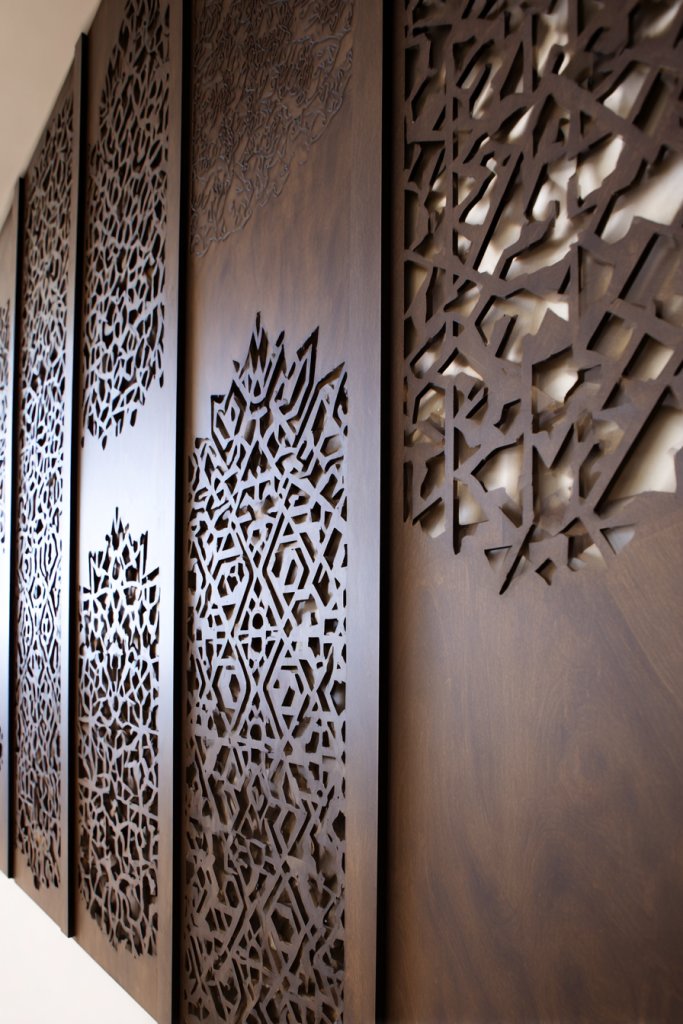
Want your walls to feel like living art? Laser-cut wood panels offer intricate, artistic detailing that elevates any room. They combine craftsmanship with modern technology, resulting in patterns that are both precise and stunning. If you crave a focal point that’s both decorative and functional, this idea is a game-changer.
Visualize delicate, geometric, or floral patterns carved into thin wood panels—some resembling lace, others with bold abstract designs. The laser-cut surfaces create a play of light and shadow, adding depth and visual intrigue. Finished in natural wood tones or painted in bold colors, these panels serve as statement pieces. The detailed cutouts give a sense of craftsmanship and artistry, transforming your walls into curated gallery displays.
Opt for natural finishes for a warm, organic feel or paint in vibrant hues for a contemporary look. Mix and match different patterns for a dynamic, eclectic vibe or keep it uniform for elegance. Use as a full wall feature or as decorative inserts within larger wall spaces. Incorporate lighting to highlight the intricate cutouts, creating stunning shadows. They work well in living rooms, dining areas, or as room dividers.
Choose laser-cut wood panels made from plywood, MDF, or solid wood, depending on budget and desired durability. Measure your space and select patterns that fit your style. Mount with adhesive, nails, or clips—ensure the panels are level and securely attached. Finish with a clear coat or paint to protect the surface and customize color. For best results, consider framing or adding decorative trim to enhance the detailed patterns. DIY installation is manageable with patience and precision.
Personalize by customizing patterns or combining different designs on one wall. Highlight the cutouts with backlighting or colored LED strips for a dramatic effect. Incorporate artwork, textured fabrics, or metallic accents nearby for a balanced aesthetic. Use contrasting paint colors or stains to make the patterns stand out even more. These panels become both art and architectural feature, showcasing your style.
Laser-cut wood panels demonstrate how craftsmanship and technology can create artful, functional decor. They’re a statement of sophistication and creativity, proving DIY can be both fun and impressive. Installing them boosts confidence in handling detailed projects and elevates your interior design skills. Your walls will tell stories of artistry, innovation, and personal style—an inspiring transformation.
17. Textured Plaster Wall Panels for a Matte Finish
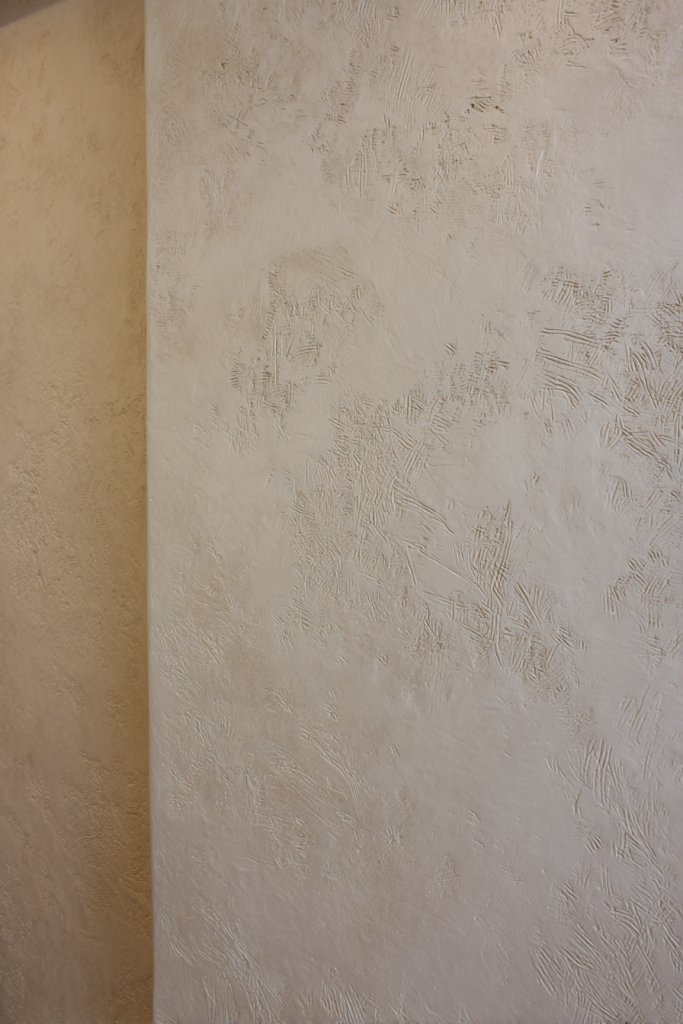
Craving a wall that feels organic and sophisticated? Textured plaster panels give you a matte, tactile surface that’s both modern and timeless. They add subtle depth and a natural feel, perfect for creating a calm, Zen-like atmosphere. If smooth walls bore you and textured wallpaper feels too busy, this idea offers a refined alternative.
Picture panels with irregular, organic textures—like lightly stuccoed surfaces or embossed patterns—done in neutral tones. The matte finish absorbs light, creating a soft, muted glow that enhances the tactile quality. The textured surface invites touch and adds visual interest without overwhelming the space. It’s like bringing a piece of nature indoors, blending craftsmanship with contemporary minimalism.
Choose from subtle textures or more pronounced patterns depending on your taste. Use in feature walls, entryways, or even ceilings to add architectural interest. Pair with natural materials like wood or stone for a harmonious look. In modern interiors, keep the palette monochrome for a sleek appearance; in rustic or eclectic spaces, mix textures and finishes for layered interest. Seasonal decor like textiles can soften or emphasize the texture.
Select plaster-textured panels made from durable, lightweight materials suited for walls. Measure carefully and prepare the surface—clean, dry, and smooth. Attach panels with a suitable adhesive or mechanical fasteners, ensuring the texture aligns as desired. Finish by sealing or painting in matte finishes. For DIYers, a textured plaster roller or trowel can add custom patterns before sealing. Regular maintenance involves gentle cleaning to preserve the tactile appeal.
Highlight the texture with soft lighting or minimal decor to avoid visual clutter. Incorporate natural or industrial-inspired accents nearby to complement the organic feel. Use contrasting colors or subtle metallic accents to add sophistication. Personalize by layering with textiles or art that echoes the natural or minimalist aesthetic. These panels create a calm, textured backdrop that’s both stylish and soothing.
Textured plaster panels reflect a commitment to craftsmanship and natural beauty. They prove that walls can be both artistic and understated, enhancing your space with subtle elegance. DIY installation boosts your confidence in handling tactile, artistic projects. Your walls will exude organic sophistication, making your home a peaceful retreat—proof that simple textures can make a big impact.
18. Layered Paneled Wall with Built-In Shelving
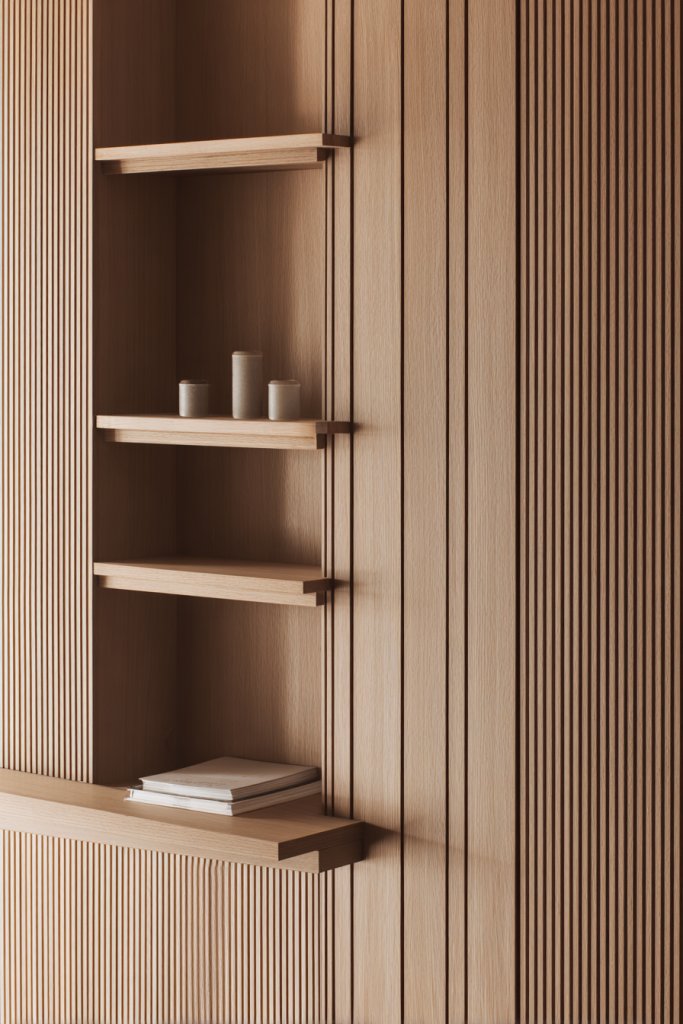
Want a wall that’s both functional and stylish? Layered paneled walls with built-in shelving merge design and practicality seamlessly. They add depth, texture, and storage all at once, transforming a plain wall into a statement piece. If you’re tired of cluttered surfaces and want to maximize space, this idea offers a smart solution.
Imagine a wall with decorative panels creating a textured background, interspersed with open shelves for books, plants, or decor. The layered effect adds dimension, making the wall pop and inviting touch. The shelves break up the panels, adding functional space without cluttering the aesthetic. The combination of textures and storage creates a balanced, curated look that’s both modern and cozy.
Use sleek, minimalist panels with floating shelves for a contemporary vibe, or opt for ornate moldings with cubbies for a classic look. Vary shelf depths and materials—wood, metal, glass—for visual interest. Incorporate lighting within the shelves or behind panels for added ambiance. This system suits living rooms, home offices, or entryways, adaptable to your storage needs and decor style.
Design your layout by measuring wall space and planning panel placement and shelf locations. Choose panels with integrated grooves or decorative moldings. Attach panels with nails or adhesive, ensuring they’re level. Mount shelves using brackets or floating hardware, securing them well for stability. Finish by painting or staining panels and shelves to match your decor. Fill gaps and touch up for a polished look. DIY is accessible with proper planning and tools.
Add decorative elements like small sculptures, books, or plants on the shelves to personalize the space. Incorporate lighting or accent colors within the panels or shelves for visual depth. Use contrasting finishes—matte, gloss, textured—to enhance the layered look. Personal touches make the wall dynamic and tailored to your lifestyle, turning it into a functional art piece.
Layered paneled walls with built-in shelving prove that you can design a space that’s both beautiful and practical. They show off your personality and organizational skills, boosting confidence in DIY projects. The result is a wall that feels curated and complete, elevating your entire room’s style. Get ready for compliments and a newfound pride in your home improvement skills.
19. Bamboo Wall Panels for Eco-Friendly Texture

Looking for a sustainable, natural upgrade? Bamboo wall panels combine eco-consciousness with fresh, textured style. They add warmth and a hint of exotic appeal to any space. If you’re passionate about green living and want your decor to reflect that, this idea ticks all the boxes. Plus, bamboo’s natural beauty is hard to beat.
Picture panels made from tightly woven bamboo strips, showcasing their natural grain and subtle color variations—from light honey to deep amber. The textured surface adds a tactile element, inviting touch and creating visual depth. The linear patterns and organic feel evoke tropical retreats or zen-inspired sanctuaries. The natural sheen of bamboo catches light softly, adding warmth and brightness.
Opt for horizontal or vertical installation depending on your aesthetic. Keep the finish natural for a minimalist look or apply a light stain or sealant for added richness. Use in feature walls, bathrooms, or even kitchens—bamboo handles humidity well when properly sealed. Pair with neutral or earthy decor, and incorporate textiles like linen or jute for a cohesive eco-friendly vibe. Seasonal accents like woven baskets or ceramic pieces work well.
Source high-quality bamboo panels from reputable suppliers. Measure your wall to determine panel sizes and cut as needed. Attach using adhesive, nails, or clips designed for natural materials. Seal the bamboo with a non-toxic, clear finish to protect against moisture and wear. Ensure proper ventilation during installation to prevent warping. This project is DIY-friendly, especially with pre-cut panels, but patience ensures the best results.
Highlight the bamboo’s natural tones with light staining or clear sealing. Incorporate woven or textured textiles nearby to enhance the organic feel. Use decorative elements like handcrafted pottery, woven baskets, or natural fiber rugs for a layered, eco-chic look. Personal touches like engraved wooden signs or minimalist art complete the earthy vibe. The result is a warm, inviting wall that celebrates sustainability.
Bamboo panels showcase that eco-friendly decor can be stylish and functional. They add a natural texture that’s both calming and contemporary. DIY installation boosts your confidence in sustainable design solutions. Your walls will radiate eco-conscious elegance, making your home a testament to responsible living and timeless style.
20. Corrugated Metal and Wood Mix for Industrial Charm
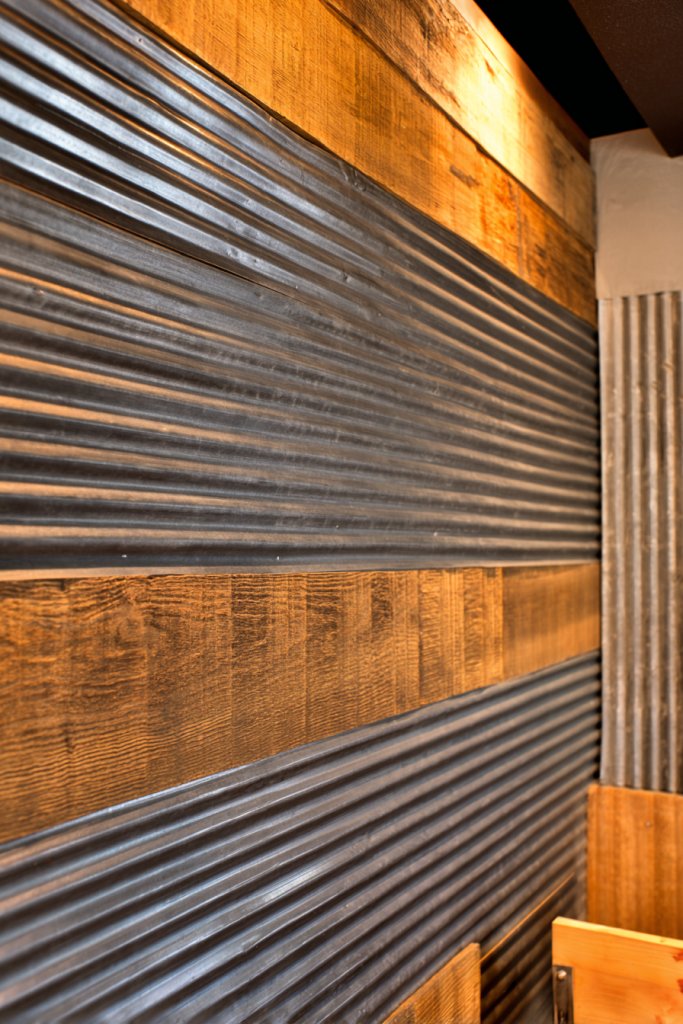
Craving an edgy, industrial look that stands out? Combining corrugated metal with warm wood creates a bold, layered wall that’s full of character. It’s a perfect choice for lofts, studios, or modern spaces seeking that raw, urban vibe. If you love mixing textures and materials, this pairing will elevate your decor game.
Imagine a wall where corrugated metal panels are juxtaposed with reclaimed or stained wood slats. The shiny, rippled surface contrasts beautifully with the warm, textured wood, creating a layered, tactile experience. The metal’s cool sheen reflects light, while the wood adds warmth and softness. Together, they evoke the feel of an industrial workshop turned chic living space, with depth and visual interest.
Use galvanized or brushed metal for a more modern look, or rusted, weathered finishes for vintage charm. Pair with steel or iron fixtures, vintage bulbs, and minimal decor for authentic industrial appeal. Apply in kitchens, garages, or feature walls—seasonal accessories like vintage signs or textiles can soften or complement the look. Mix different metals and woods for a layered, curated effect. It’s highly adaptable to different spaces and styles.
Choose lightweight metal panels with embossed or textured finishes. Measure your wall and plan your layout—consider alternating metal and wood sections or creating geometric patterns. Attach panels with industrial screws or strong adhesive, ensuring secure fastening. Seal or treat metal surfaces if necessary to prevent rust or damage. Finish wood with stain or sealant for durability. DIY installation is manageable with basic tools and some patience.
Add decorative touches like vintage signage, industrial lighting, or leather accents to enhance the theme. Use contrasting or complementary colors—black, gray, or metallic—to create visual interest. Incorporate textured textiles or rugs nearby to soften the hard surfaces. Personalize your space with meaningful vintage finds or custom metal art for a truly unique look. This wall becomes a statement of industrial chic and personal style.
Mixing metal and wood proves that you can create high-impact, stylish spaces with simple materials. It’s a DIY project that emphasizes creativity and resourcefulness. Once installed, it boosts confidence in handling mixed-media projects and designing bold interiors. Your walls will reflect a daring, modern aesthetic that’s both authentic and inspiring—proof that industrial charm is within reach.
21. Chevron Patterned Wall Paneling for Dynamic Movement
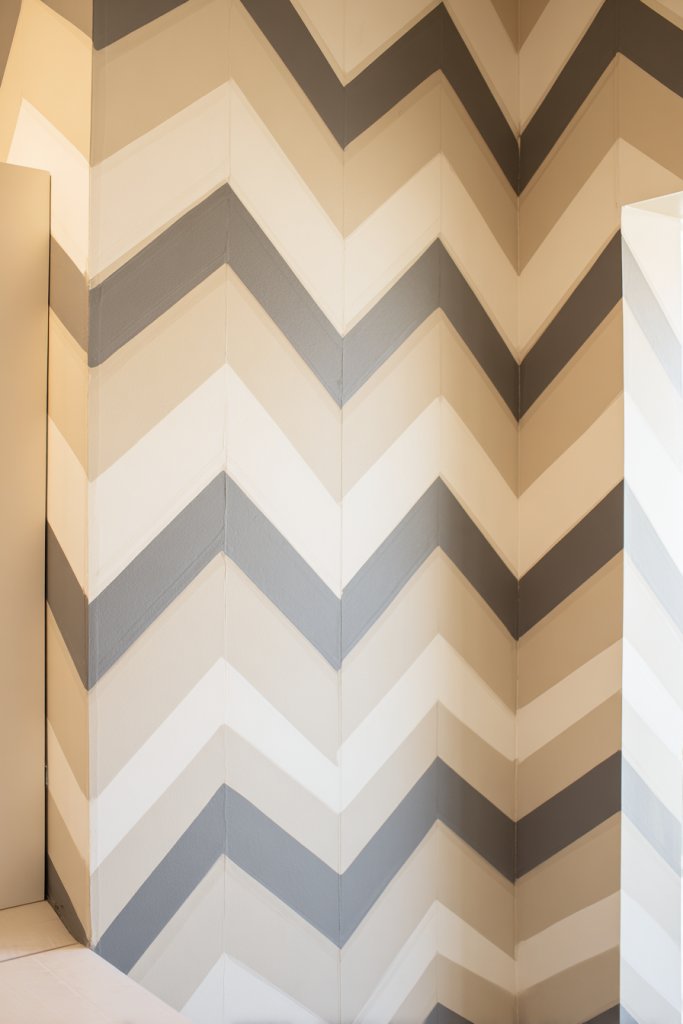
Feeling like your walls need a little more movement and energy? Chevron patterned paneling adds a dynamic, eye-catching element that transforms flat surfaces into visual masterpieces. It’s perfect for creating a sense of flow and sophistication in any room. If you love bold patterns but want something fresh, this idea is your new favorite.
Imagine a wall with zigzagging chevron lines in contrasting colors or textured finishes. The repetitive V-shapes create a rhythmic movement that guides the eye across the room. The pattern works well in both subtle tones for a refined look or bold hues for a statement. The textured surface adds depth, making the pattern pop and inviting touch. It’s like turning your wall into a piece of modern art.
Use painted wood, wallpaper, or textured panels to achieve the chevron effect. Keep the colors monochrome for elegance or go for multicolor for playful energy. In small rooms, lighter shades keep the space feeling open; in larger areas, darker or contrasting colors add drama. Pair with sleek, minimalist furniture to let the pattern shine. Seasonal accessories like textiles or lighting can enhance the energetic vibe.
Create or buy pre-cut chevron panels or stencil your own pattern on plywood or MDF. Measure your wall carefully and plan your pattern layout. Attach panels using adhesive or nails, ensuring consistent angles and spacing. Fill gaps and sand smooth before painting or applying textured finishes. Use painter’s tape for clean lines and precise pattern alignment. DIY is feasible with patience, a level, and basic tools.
Accentuate with metallic or gloss finishes on certain sections for extra shine. Incorporate lighting to emphasize the zigzag pattern, such as track lights or LED strips. Use accessories like cushions, curtains, or rugs that echo the pattern’s energy. Personalize with your favorite color palette, balancing boldness with harmony. Your walls will radiate movement and modern charm.
Chevron patterning proves that bold geometric designs can be elegant and versatile. It shows that with a little planning, you can create stunning walls that feel lively yet sophisticated. Installing it yourself boosts confidence in handling detailed projects. Your space will not only look dynamic but also reflect your daring and creative spirit—ready to impress.
22. Raised Panel Wall Designs for Traditional Sophistication
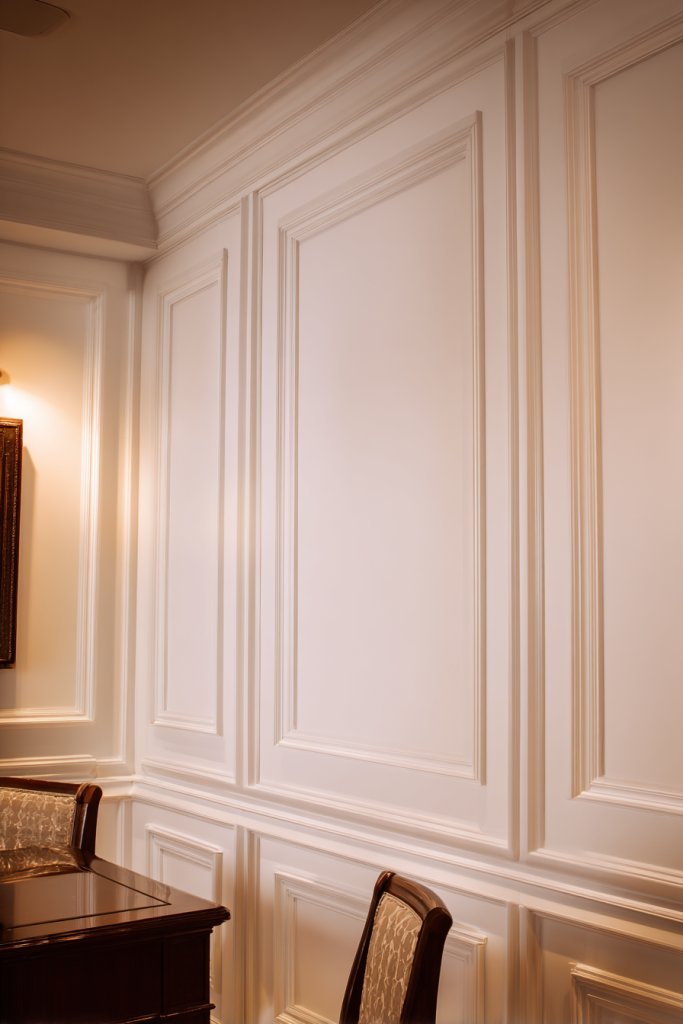
Longing for a wall that exudes traditional elegance and craftsmanship? Raised panel designs offer that classic, sophisticated look that elevates any interior. They are perfect for formal living rooms, libraries, or dining areas where timeless style matters. If you appreciate detailed carpentry and architecture, this idea will inspire you.
Envision intricately carved or molded panels with raised borders and recessed centers, arranged in symmetrical patterns. The three-dimensional surface creates shadows and highlights, emphasizing craftsmanship. Rich wood finishes or painted surfaces in muted tones add depth and richness. The overall effect echoes historic mansions and stately homes, bringing a sense of grandeur and tradition.
Choose from ornate, carved wood, or simpler molded designs depending on your decor. Pair with crown molding and wainscoting for a cohesive traditional look. Use rich, dark stains for warmth or painted finishes for a softer, more modern take. Incorporate decorative hardware or gilded accents for added luxury. It suits large, formal spaces but can be adapted for smaller rooms with scaled-down designs.
Select pre-made raised panel boards or custom carve your own. Measure your wall and plan the panel arrangement carefully. Mount panels with nails or adhesive, aligning the borders precisely. Fill gaps with wood filler, sand smooth, and finish with stain, paint, or lacquer. Add decorative moldings or trim to frame the panels for a finished look. DIY installation requires patience and attention to detail but offers a high-end result.
Highlight details with gold or silver leaf, contrasting paint, or subtle gilding. Incorporate vintage or antique hardware to reinforce the traditional theme. Use luxurious textiles, heavy drapes, or ornate lighting nearby for a regal effect. Personal touches like family crests or custom carvings make the design uniquely yours. These panels become a statement of timeless elegance and craftsmanship.
Raised panel wall designs prove that classic sophistication can be achieved with skill and patience. They elevate your space with architectural detail and artistic craftsmanship. Installing them yourself boosts confidence in handling intricate carpentry projects. Your walls will radiate tradition and refinement, making your home feel like a private estate or historic manor—authentic and inspiring.
23. Textured Vinyl Wall Panels for Easy Maintenance
Tired of constantly cleaning and maintaining your walls? Textured vinyl panels offer a practical, low-maintenance solution that doesn’t compromise style. They mimic natural textures like stone or wood while being waterproof and easy to clean. If durability and convenience are your priorities, this idea is a game-changer.
Imagine panels with embossed patterns resembling stone, brick, or wood grain, in durable vinyl material. The textured surface adds depth and tactile interest, catching light in subtle ways. Available in a wide range of colors and finishes, they can complement modern, rustic, or coastal decor. The matte or semi-gloss finish reduces glare, creating a soft, inviting backdrop. It’s wall decor that’s both practical and visually appealing.
Choose from panels that mimic natural materials or go for bold geometric or abstract patterns. Use in bathrooms, kitchens, or high-traffic areas where moisture and dirt are concerns. Pair with simple furniture and minimal decor to keep the focus on the textured surface. Seasonal updates are easy—just swap out panels or add themed accessories. They’re versatile and suitable for busy households.
Select high-quality vinyl panels with textured patterns. Measure your wall, cut panels to size, and clean the surface thoroughly. Attach with waterproof adhesive or mechanical fasteners, ensuring a flat, seamless appearance. Finish edges with trim or caulk for a polished look. Clean regularly with mild soap and water—no scrubbing or special products needed. DIY installation is straightforward and quick, ideal for a hassle-free upgrade.
Customize with paint or overlay with decorative decals or stencils for added flair. Use lighting to highlight the textured surface, such as recessed or directional lights. Pair with waterproof accessories or functional decor like hooks and shelves. The low-maintenance nature means your walls will stay looking fresh with minimal effort. It’s practical, stylish, and built to last.
Textured vinyl panels prove that smart, easy-care solutions can be stylish and impactful. They’re perfect for busy households or rental spaces where permanence isn’t an option. Installing them yourself boosts confidence in handling straightforward home upgrades. Your walls will look fresh, modern, and durable—ready to withstand everyday life with ease.
24. Monochrome Textured Wall Panels for Subtle Sophistication
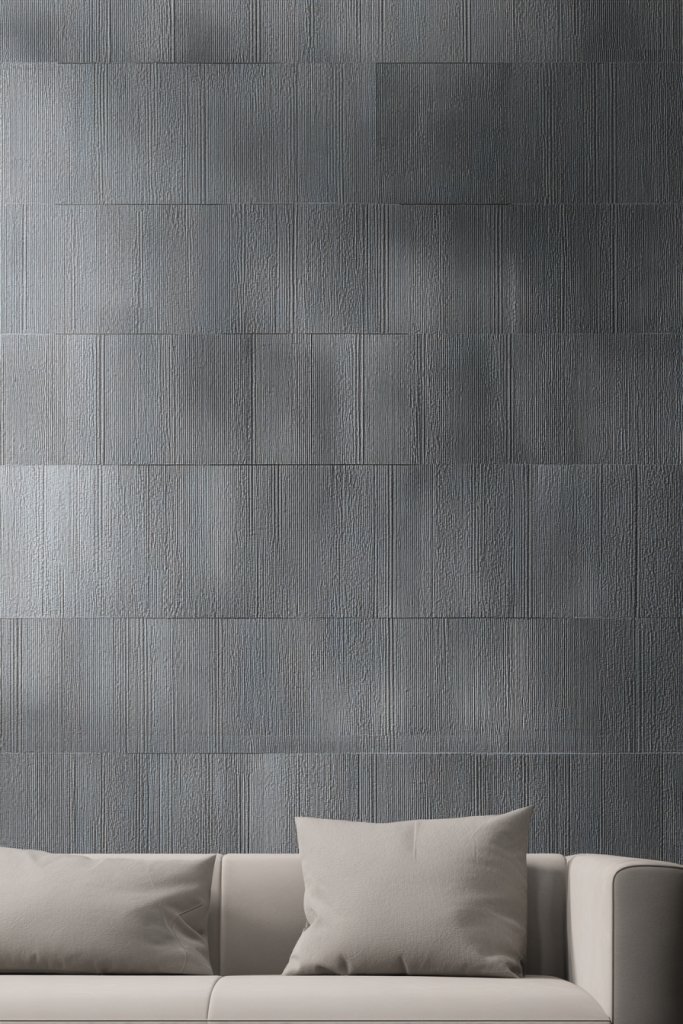
Want walls that whisper understated elegance? Monochrome textured panels create a refined, cohesive look that’s both subtle and sophisticated. They add depth and interest without overwhelming the space, perfect for minimalists or lovers of muted palettes. If you prefer quiet luxury over bold statements, this idea will resonate.
Picture panels in a single color—like soft grey, warm beige, or deep navy—with textured surfaces such as embossed lines, stippling, or wave patterns. The uniform color palette emphasizes the texture itself, creating a layered visual effect that’s calming yet intriguing. The matte or satin finish softens the overall appearance, making the walls feel plush and refined. It’s wall decor that’s both modern and timeless.
Keep the color neutral for maximum versatility, or choose a dark tone for dramatic effect. Use in bedrooms, living rooms, or offices to add depth without distraction. Pair with simple furniture and minimal accessories to maintain the understated vibe. Seasonal accents like textured throws or subtle lighting can enhance the sophisticated atmosphere. The panels adapt seamlessly to various decor styles, from contemporary to classic.
Select panels with embossed or stippled textures in your chosen color. Measure your wall and plan the layout, ensuring consistent pattern placement. Attach panels with adhesive or nails, aligning edges carefully. Finish with a matte or satin paint or coating to preserve the subtlety of the texture. Regular dusting and gentle cleaning keep the surface pristine. DIY installation is simple, especially with pre-finished panels.
Add contrast with metallic or glossy accents in small decor pieces or hardware. Use layered textiles like velvet or silk in cushions, curtains, or rugs to complement the textured walls. Incorporate subtle lighting to cast shadows that emphasize the textures further. Keep the decor minimal to let the walls’ subtle sophistication shine. Personal touches like monogrammed art or custom embroidery elevate the space.
Monochrome textured panels demonstrate that simplicity can be elegant and impactful. They’re a perfect choice for creating a calm, cohesive environment that feels chic and effortless. Installing them yourself reinforces your confidence in handling sophisticated decor projects. Your walls will exude understated luxury, proving that less is truly more—timeless and refined.
Conclusion
From intricate patterns to sleek finishes, these wall paneling ideas showcase the endless possibilities for adding textured elegance to your home. Don’t hesitate to experiment and bring your unique style to life—your walls are the perfect canvas. Let these inspiring ideas motivate you to create a space that reflects your personality and taste. Start your transformation today and turn your walls into works of art!

Post Comment